

Fiat Falco build album


Comments
2 16 February 2015, 00:25
Building this one OOB.
Christmas present from my daughter.
Has some fit issues and feels somewhat crude after building a Wingnut Wings kit.
Enjoyable so far though, there are lots of struts coming up. Could get iffy if the fit is off there..
Also the camo will be interesting to tackle.
The camo was the reason my daughter chose this one.
She wanted to give me a challenge I'm sure.. 🙂
16 February 2015, 04:00
Progress so far.
Quality is varying, some detail is crisp, some look like their master melted or something during development.
Some parts fit excellently, some have no hope in fitting as described /or molded..
Practicing freehand airbrushing while building.. 🙂
This is a cool looking plane, the fuselage has a kind of art-deco feel to it..
23 February 2015, 00:26
lovely subject! I'll be following the rest of the build. The detail of the kit as seen in the pics is very inconsistent indeed!
24 February 2015, 07:37
Thanks.
Not a bad kit I guess, a bit of contrast when just finishing a Wingnut kit.
-Gabor, cool! -Do you have any pictures? How did you find the fit of the cockpit interior? 🙂
26 February 2015, 01:19
Phew, that would have to do..
I need a new airbrush.
My old Badger is rather erratic in flow when doing fine line work.. 🙁
28 February 2015, 10:14
Thanks,
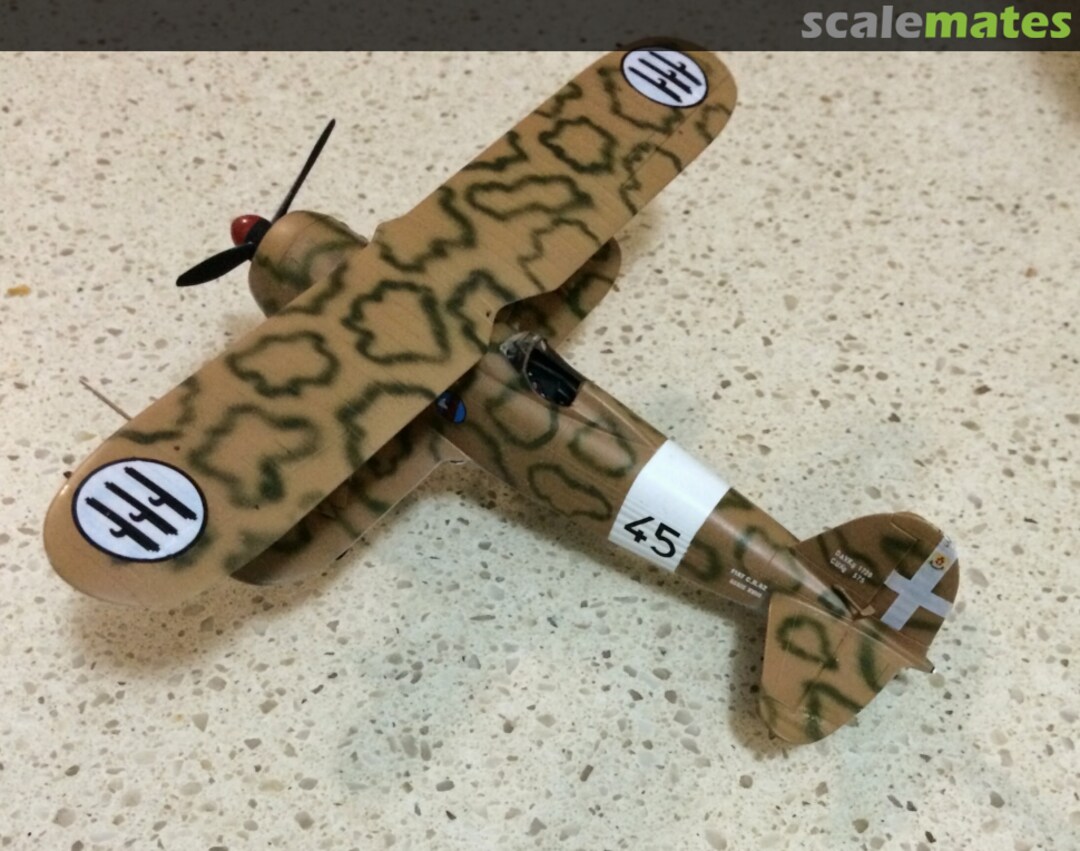
I'm going for the cover version; From Scuola Caccia Assalto, Ravenna 1942.
Too late, I discovered that according the instructions, this version should not have bomb racks.
However, upon checking the web, this fortunately appears to be wrong:
ww2incolor.com/itali..VENNA-SPRING-42.html
Exactly the plane I'm building!
Now, if I had found this one before yesterday, I would have tried to match the camouflage pattern more exactly.. 🙂
28 February 2015, 22:43
Ok, here goes the top wing.
This is going to be tricky. The struts are not all that great.. 🙁
A bit at a time does it. I Hope.
At least that's the idea...
4 March 2015, 00:51
Great work. I especially like the camo scheme. I used it on a Tamiya Tiger I in Sicily. Check it out (there's an album under my name).
4 March 2015, 01:37
I use two a forty year old Badger 200 and your basic Harbor Freight 95810 double action (the one I used on the Tiger) though the Badger does better spotting like on late Luftwaffe fighter camo in 1/72. Use it almost closed with low pressure, hold it close and give it one quick burst for each spot. practice to get the technique right, and know when to quit. For the Tiger's worms it was all about the setup of the brush. With practice and patience any clean airbrush should do the job with practice. I tend to use them until they almost quit then clean everything in alcohol.
4 March 2015, 04:02
Wow, -My old Badger Crescendo is quite young then, at 25 years..
I'll give it an overnight soak and a second chance. 🙂
I have tried the Luftwaffe dots, (there is a picture in my albums of my 1/72 ME262). that was about 10 years ago now. Maybe I don't do this kind of painting often enough to keep the skill up.
That said, I think the airbrush is a bit erratic in that it doesn't give the same result for the same action, even within the same minute.
I'll try lowering the pressure a bit, and run some tests.
You never know when the next crazy paint job will be required! 🙂
4 March 2015, 05:22
Really nice build and very impressed with the paint job, i just got my first airbrush, Badger 200 NH and i never think about but i will play a bit with the compressor pressure as you suggest.
4 March 2015, 05:28
Just in passing--the most consistent results I've gotten over the years for detail airbrushing are using canned propellant or a car tire with the Badger adapter. For some unknown reason air tanks don't give the same results. The best compressor I've found (and which I need to find unpacking from moving-today maybe) is the one from HarborFreight.com. It is on sale I noticed while on the throne this morning for $59.99. If you're just starting with airbrushing get the package deal; this compressor and a decent double action airbrush and accessories for about $80 on sale. You'll have to work out your own pressure regulation. No I don't work for Harbor Freight, I just find their airbrushing stuff to be a good deal, and once you get in their store watch out, just get the groceries for for the week first. RLM 74/75/76 forever!
4 March 2015, 13:54
When I first started airbrushing (about 25 years ago now), I could not afford a compressor, so I used only tire air.
Living in Sweden at the time meant I had a total supply of five tires to use, so I had plenty of air. (a set of winter tires in summer, and a set of summer tires in the winter, plus the spare in the boot!)
However, it is way too much carrying, hauling these in and out of the car to get to the petrol station for a refill.
I never did try much detail work with this setup.
The me262 in my albums is done using Testor's canned airbrush propellant, and it worked really well.
What I'm now wondering is if that has to do with low air pressure preferred for fine detail work.
One of the things with the canned propellant is that when the propellant decompresses, it cools quite a bit. Up to the point when the can gets covered in frost and the pressure drops to near zero.
This is not air though, it is isobutane in the can (no smoking!), so it may not be only the pressure having an effect here.
Unfortunately, these cans were about $25 a pop here, so quite expensive!
Now I use a cheap compressor, the AS186 that I got from eBay.
It seems to be doing a good job. Most times I have trouble seems to be paint quality.
(Especially Humbrol and Italeri. They are usually good, but then there's the occasional jar that is worse than useless. Makes you wonder if they do quality control! Trying to stick with Tamiya, Alclad and mrHobby now.. never had any problems at all with any of these.)
I didn't run any pressure test experiments yet. No time. Hopefully can get some time in this weekend. 🙂
4 March 2015, 22:32
Just read that gravity feed means it can run at lower pressure and therefore better fine detail?
Anyone have experience in comparing the two?
I only have one, siphon-fed airbrush..
5 March 2015, 11:48
You are correct, Peter. For large areas the suction bottle is more efficient, but keep the needle closed more (less paint) and the draw tube clean. For acrylics use a retarder if you can to prevent clogging the nozzle. The detachable cup most airbrushes come with usually works better for me for everything in lieu of a gravity fed brush. The most useful thing on my bench is disposable pipettes (very cheap on eBay). The next airbrush I buy will be a gravity fed Iwata type for about $18 on eBay. Right now I'm just trying to find the moving box with my airbrushing stuff in it. Until then I'm like a beached whale spending my modeling time reading and writing about modeling. Okay, there's two boxes just found under a table that seem familiar. See you fellows later.
5 March 2015, 15:58
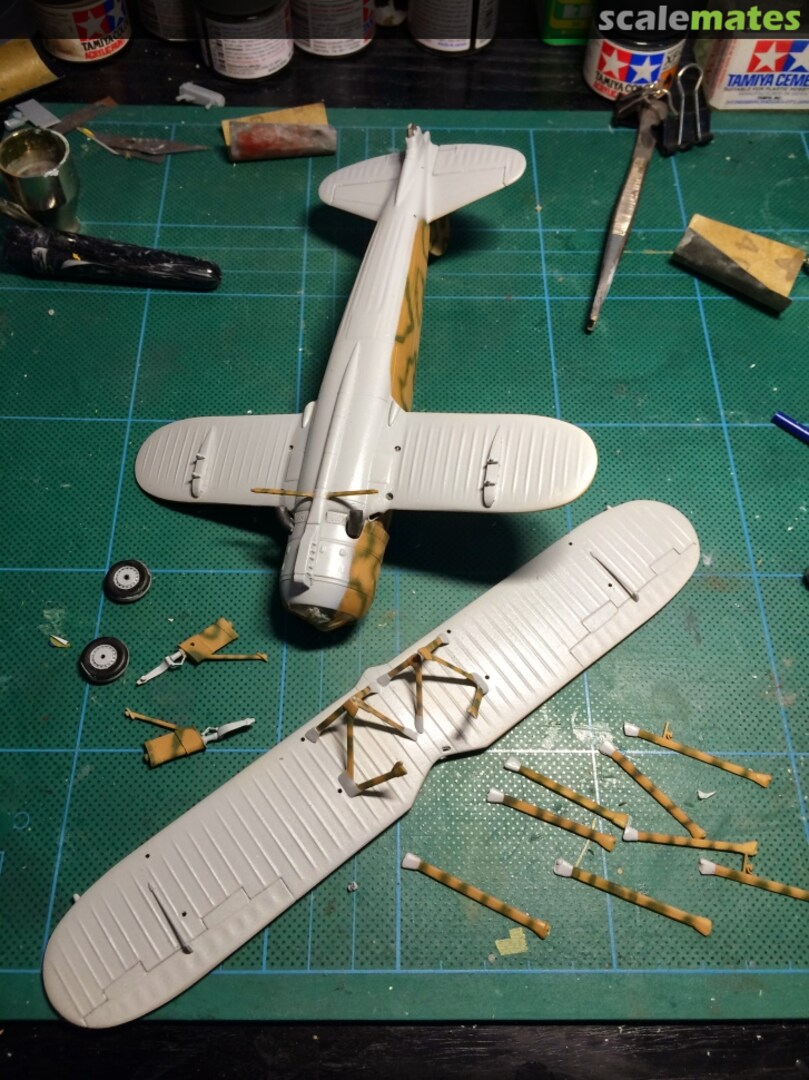
The struts are on. Fit is not great..
Is going to need putty and a paint touch-up.
5 March 2015, 23:35
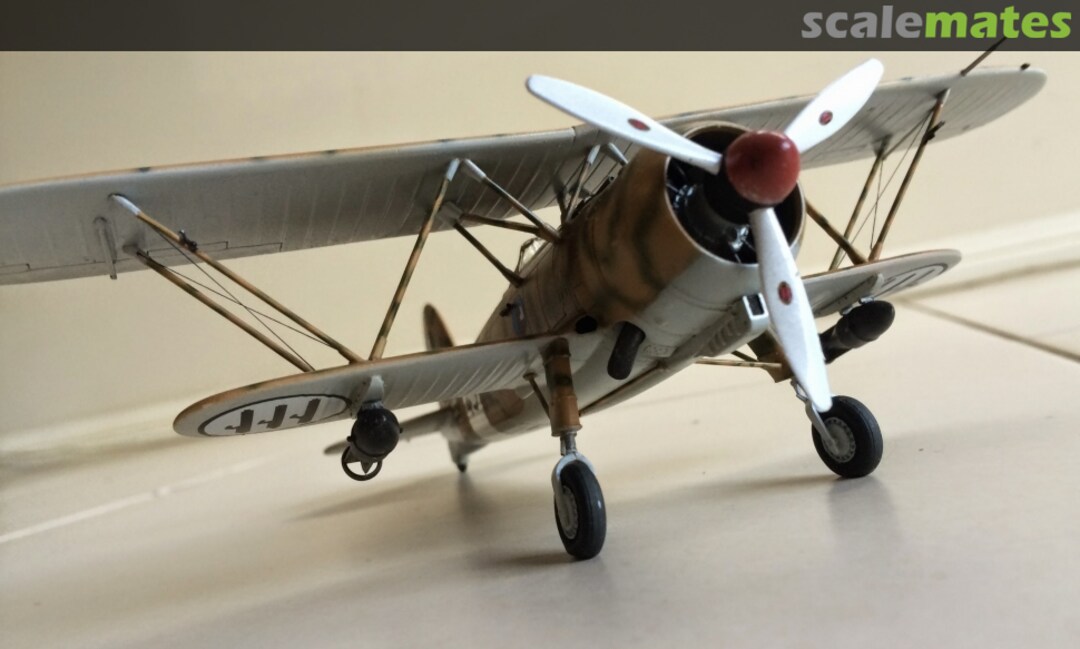
This one has been done for a while now.
Finally gotten around to taking a few pictures..
A nice little kit.
I like the touch of including a walk-around booklet.
In general good finish and detail, but there are exceptions. Tooling quality is a bit uneven in this kit.
Things to watch out for;
Fit of wing struts
Fit of wing roots.
Fit of cockpit interior (actually, there is no way it can fit in the fuselage without cutting bits off..)
23 March 2015, 22:06
Hi! Sorry for the late reply. Really great work here! Grat! Yes, I experienced some issues with the fit of the cockpit but as I used some eduart PE I guessed it's not the kit fault - not too bad anyway. As on an Italeri kit the fit is always a bit loosy (italian way I guess 😄 - I have some Alfas so I know about it some stories).
23 March 2015, 22:22
I use airbrushes for more than 20 years (oh god!) now. My first one was a syphon type Kager 2000 (very similar to Badger suction type stuff) but I coudn't mastered it really. The next was a gravity feed type one (Kager 1201 and later an 1801) and till that I use only similar types. I have good experience with the Iwata Neo (cheap Iwata 🙂 ) CN airbrush I currently use for general purposes. The new type "environment and modeller's health friendly" paints are somehow thicker than those good old smelly and harmful ones (I still have some bottles😉 so I find this gravity type brush with a quite large nozzle (0,35mm!) very useful. I have an old DevillBiss with 0,18mm nozzle and that poor thing has no any chance to keep up with Vallejos or any other new type acrilics. I can tell that Your "smoke rings" are great!
23 March 2015, 22:37

