

RF-4E Phantom II, End of the film
 | View full picture")


Comments
1 16 January 2018, 11:28
Made a start with the wheelbays... doesn't have to be the cockpit all the time... 😉
16 January 2018, 11:35
Good start so far! You tackle the hardest parts first I see. To help you with the questions in picture 1: Yes, those braces need to be sanded off when the pylons aren't mounted. They are part of the pylon but Hasegawa chose to have them molded onto the wing. Those pylons are mounted 99.9% of the time anyway. (To be very acurate, they should stand a little proud of the wing surface as dampers are visible between the wing skin and the braces, other story...) The auxilliary doors in between the landing gear openings start to open during landing approach as the airspeed decreases but the engines still need sufficient airflow for cooling. These doors stay open untill the aircraft reaches a certain speed the next flight. The air brakes air hydraulically operated and depending on the time after shut down, the state of the hydraulic system and the wear on hinges etc may keep shut after landing, bleed off a little bit thus creep open or open fully. The best way to find out, as you're building a unique show bird, is to look at pictures of it parked on the tarmac. Hope this helps. Good luck getting that Aires well in there!
16 January 2018, 12:55
About the black ones in the wings, I think so. unless I am mistaken those surfaces are actually part of the pylons and not part of the wing itself.
See for example a nice walkaround of the Duxford F-4J at [img1].html
i can not be sure if the other two are always open or close when F-4s are parked... Patrick and some of the F-4 experts here may be able to answer 🙂

16 January 2018, 13:23
i had the windows open without refreshing and Patrick actually answered before me 🙂
16 January 2018, 13:26
and good luck with fitting the aires sets into the hasegawa kit. i had the same trouble with them 🙂 you can check my F-4 black bunny build for details of what i did.... one thing for sure, sand, sand, sand. and when you think you are done, it is possible that is only half way. on way of know if you can keep sanding for example the bottom of the front wheel bay, is to drill a hole in a place where will not be a problem. you can use a piece of wire or similar, to measure how thick the resin still is....
if you place that piece close to a light bulb, it seems that is really thin for example... but you may still have a thickness of 1 millimetre t yet. so you can safely keep sanding.
first album for that build is kind of hidden... so here you have it
F-4J Phantom II Black Bunny work in progress (1/2) | Album by hetspanjaard (1:48)
this is what i did with the wings
Picture 13 -I sanded it deeper next to the border, to have it fitting better later on, instead of sanding complete wing.
Picture 21 - I needed to cut a bit of the fuselage for the parts to fit corectly
16 January 2018, 13:31
😄 Thanks for your kind words Spanjaard! Nice to be considered an expert but I am truly not, I just relay all the information that is out there. There are a lot of people who actually worked on the Phantom. But I'm glad I could help. 🙂
16 January 2018, 16:58
Thx for the tips, advice and references... Hetspanjaard, I was already checking both albums of that phantom as a reference.
16 January 2018, 17:27
glad to help 🙂
now i see that the picture of the walkaround did not appear in my post....
this one should work
[img1]
part of walk around
walkarounds.scalemod..avia/after_1950/f-4j
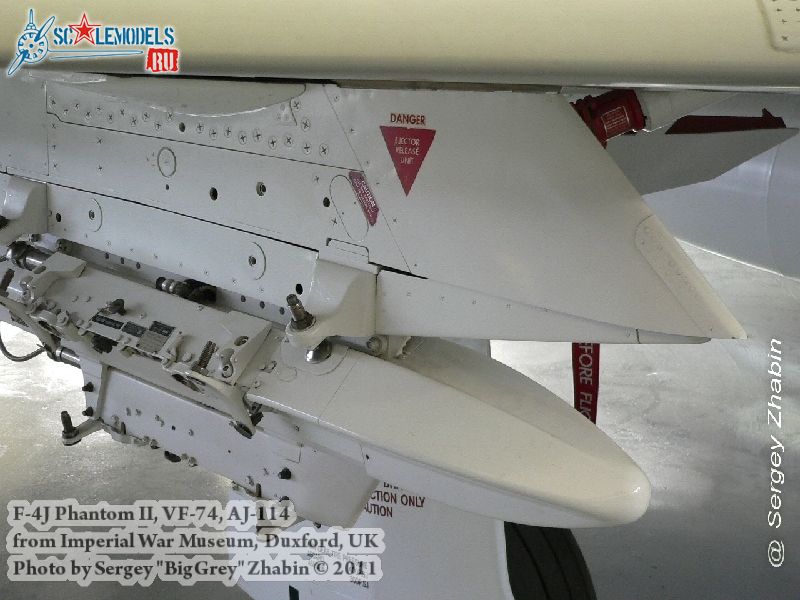
in the picture you can appreciate the space between the pylon and the wing. no idea why it appeared as a minuscule bar in my previous post, instead as a picture or a link.....
16 January 2018, 17:55
Thx for the walk-around, luckily I don't have to worrie about this, the plane flew always in a clean configuration, no pylons, droptanks etc... so all holes need to be filled and sanded, also the ones in the round recesses except where the fins would fit...
17 January 2018, 09:51
Here is a build of the same aircraft in 1/32. The guy building it is the guy that actually painted the real thing.
modelclub.gr/forums/..p/topic,33819.0.html
15 February 2018, 20:25


