

B-24D/ 90th BG, 320th BS/ Eduard LE,


Comments
1 4 January 2012, 16:10
Wow Roland, Du und 1:72? Das ist ja mal selten...😢 Sehr schöne Arbeit an diesem Vogel, bin gespannt wie er fertig aussieht!
Lieben Gruß nach Österreich, Holger
14 February 2012, 15:23
Hello,
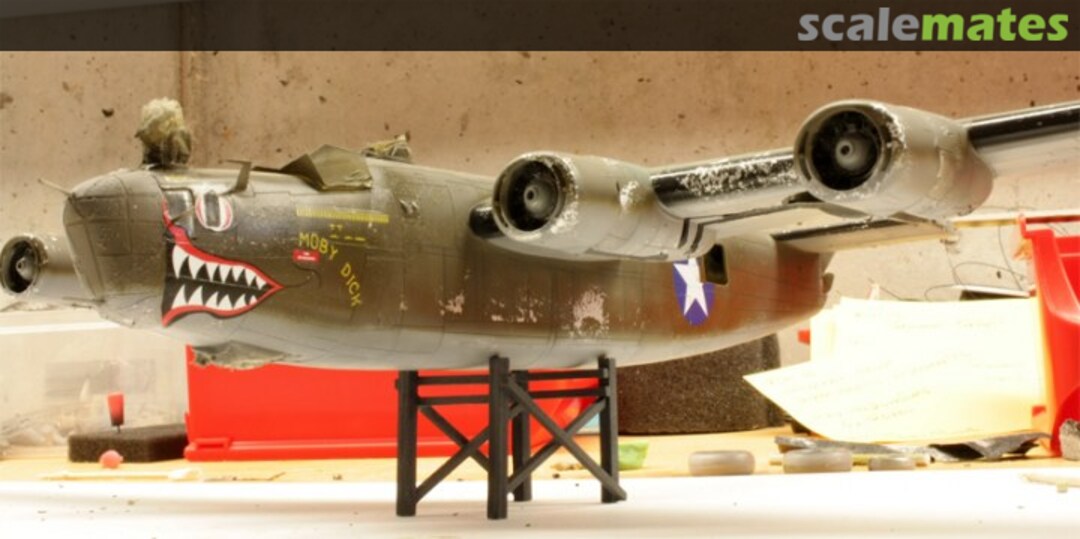
yeah, a Jolly Roger- but one without bones and scull on the fin... I opted for the early "Moby d*ck" decal version, dated 1943 in the South West Pacific.
Holger, Du hast recht- ein eher selten von mir besuchter Maßstab... Aber so viel Freude, wie mir hier dieses Bauen macht, wird das nicht das Letzte Mal gewesen sein!
Alpinen Gruß an die Nordsee 😮)
Roland
14 February 2012, 17:20
Hallo Holger, hello Michael- thank´s for your words...
Ich verwende da die "Limited Edition" von Eduard. Fünf Maschinen aus dem Pazifik und dem Mittelmeer, die über hundert Einsätze überstanden hatten -"mission centinarians"- werden hier angeboten... Der Bausatz kommt eduard-typisch und in gewohnter Qualität mit Ätzteilen für Innen/ Außen und Maskierfolie. Der Plastik-Bausatz selbst greift auf die, naja, qualitativ recht durchwachsenen, Minicraft Spritzgußteile zurück.
15 February 2012, 06:34
Hello Aghis, thank you for your statement-
"a fat a**": does that mean "Triple A"? Oh yes... desperatly needed in times like these 😮)
Greetings from Austria to Greek!
Roland
15 February 2012, 06:38
Hi Roland, a huge bird! did you used the Hairspray technic for flaking the surface? Why did you aluminium flakes on de-icer? I thought they are made out of rubber?
So far a fine paint job on your Lib!
Dirk
15 February 2012, 08:17
Hi Dirk, judging from production photos, the black leading edges have just been painted black- no inflating rubber... I have seen pics of well-worn Liberators, which are extremly worn on these parts.
Please take a look at the JAM Forums workbench area- in the next days, I will put in some photos to prove this😮) Here is the Link: razyboard.com/system..44136-6140333-0.html
On this place you can also watch how I made the flaking of the surface: I masked with "Masking solution" over Alclad "White Aluminum", after painting, I rubbed of this agent....
Greetings, Roland
15 February 2012, 09:54
Thx for your reply! The chipping effects are well done! Very subtle and fine!
For your explanation of de-icer boots I`ve found this one:
forum.armyairforces...removed-m165410.aspx
Wish you a steady hand!
Greetz
Dirk
15 February 2012, 10:20
Thank you for your kind words- and, last but not least, for this Link!
Quite an interesting and well versed discussion. These arguments make sense anyway ...and I have to consider, in which way it could (should) alter the colours of the leading edges.
I will tell you on this place, when I have come to a decision!
15 February 2012, 13:07
Hello,
Dirk, thank you for this input- I was definitly wrong: black coloured leading edges and torn off paint do not fit together. When the wings are showing black edges, then de-icing rubber is fitted- so I have corrected the splintered black and painted all again. Not a great hassle, put now I feel better...
16 February 2012, 17:42
Roland, this is a wonderful technique for the paint chipping and wearing. I must copy it!! Good catch on the leading edges - whose plastic is in the Eduard kit? Academy I think?
16 February 2012, 17:57
Hello Roland, very nice paint weathering technique! What I meant earlier was "what a fat ass" for the Liberator aft end ( That's the reaction IJAF and LW pilots must have had when chasing after her)😉
16 February 2012, 18:15
Hello Bill, hello Aghis,
indeed- I prefer this technique to get chipped and devasted surfaces... just try out, you can easily extend the effect from "slight, hard to see" to "wow, hard to believe" ;o) I guess, the plastic parts of Eduards kit are from Minicraft.
Fat ass... I will remember that meaning! Not being a IJAF or LW pilot, for me it stands for that my Lib is a definit tail-sitter by now... I have to put considerable more weight in the front wheelwell 😮)
17 February 2012, 06:48
Hi Roland,
hope you are not angry about me! 🙂
Wish you a steady hand and success with your Lib!
17 February 2012, 15:07
Oh, Minicraft I understand. They are a distributor in California who used to be the importer for Hasegawa, Academy, and others. I have the Minicraft B-24J, it's an Academy kit. I really want to try your technique for chipping, it looks very realistic.
17 February 2012, 15:48
Hello Dirk,
angry? In no way! Now I know better- that´s because I am here, sharing experiences and opinions. But I guess you know about that.... 😮)
19 February 2012, 14:08
Bill, knowing about your model skills and having seen some of your wounderful aircrafts here, I would love seeing you using this technique!
It´s the first B-24 model for me and I had no experience about it´s Academy, or Hasegawa representatives, but I think, the molds are rather old- parts with seems and all that- and the fit of plastic parts has to be described as rather mediocre... So I see, it means, that Minicraft and Academy are the same!
19 February 2012, 14:22
The B-24 build is coming to an end... I have but in some new pictures- props, antennas, tyres etc. are still missing, but the surfaces in general are in their final appearance.
Cockpit side windows have been "scratch built" to show them halve- open: it would be a shame to leave those tiny etched parts of the interior unseen! 😮)
Cheers Roland
19 February 2012, 14:28
Hi Roland, sieht schon super aus. Bin auf das fertige Modell gespannt!
19 February 2012, 14:28
Hallo!
danke Bernd, freut mich, dass Dir der Vogel gefällt- auf´s Endergebnis bin auch ich schon gespannt...!
19 February 2012, 14:33
Thank you Bill, makes me proud to read those words from you!
The B-24 D is now ready; I would like to show you some of the pictures I have made from the finished model.
Thank you for participating!
20 February 2012, 22:35
Very nice job Roland! I like the decal option a lot, congrats!
21 February 2012, 06:58
Hi Roland, your big bird looking realy great, do you have used the hairspray technic? great job, Greetz Phil
21 February 2012, 14:13
Yes he used hairspray! I desperately need to build a total worn and dirty bird to try it out for me, too!
21 February 2012, 14:47
Hello folks, first of all, thanks for your kind words and your attention!
Philip, I did not- Holger, I repeat: did not 😮)) use the hairspray technique. To be honest, I even haven´t tried that one ´til now. Instead I use to mask a metal finish- Alclad "White Aluminum" in this case- with liquid masking solution. That is done by using a little sponge. After having that agent tried, I go on with all the other colouring and finish the paintshop. After that is done, I can rub the masking solution of and have that fainted, chipped effect on the finished surface. If you want to have some pictures of how I have done this on the B-24, please follow this link to the workbench of the JAM Forum: razyboard.com/system..44136-6140333-0.html
Hope you got an idea...
Cheers Roland
21 February 2012, 16:10
Roland, the finished model is really beautiful. I hope you win many competitions with this one! Which liquid masking solution did you use?
I have the Minicraft 1:72 B-24J in my stash, which I plan to do in NMF (natural metal finish) with "Cocktail Hour" markings. I also have the Revell 1:72 B-17 which I will do in Olive Drab and use your chipping technique! Cheers, Bill
21 February 2012, 21:26
Oh da hab ich mich wohl "vergrüßt", wie man auf der Insel für Fettnapf sagt...!
22 February 2012, 07:18
Hello Bill, thank you again! a bare metall B-24 sounds great- quite impressive on this sturdy construction- and I am looking forward to your chipped oliv drab B-17...
For chipping on this B-24 I used Humbrols "Maskol", but I have also done these with Revells "Color Stop", it´s quite similar. Have fun with your modeling projects!
Roland
22 February 2012, 07:35
Album info
Hello,
here are some pics of my recent "72-times smaler than reality" project. So far it is quite a pleasure... besides my eyes getting red on assembling all these small etched parts 😮)
Some more pictures- getting on with this rather demanding build. Both wings had to be bent into correct form over hot water steam.
So long...
By now most of the masking has been removed and the "Lib" shows the intended surface. The leading edge of the wings, still covered with Tamyia tape on the pics, are wearing heavy stains... After applying the decals I will do some washing and presahding.