

Consolidated PB4Y-1 Liberator (Revell)

Love that blue plastic!

Overall shapes are pretty good, seems to match the Academy kit.

Engraved panel lines amidst all those rivets!

Some aftermarket goodies!

Sorry rivets, you gotta go!

This may work!

Look what I found in the stash! Forgot all about this.

Photoetch! Including full wheel wells, just what the doctor ordered.

Don't want to sand off the garage doors.

Rivets all off of the port fuselage, and the garage doors were saved! Looks rough, but we can fix that.

Yikes! Look at all the stuff that has to be removed...

...so all of this stuff will fit! Gotta love the kit cockpit on the left (in blue)!

Good comparison of what I had to remove. The filler was need to fix some over zealous grinding!

Reshaping the CMK resin to fit the old Revell kit.

Dry fitting is very important! Make sure the doorway will be centered.

Make a template of the altered side. Just cheap cardboard.

Now we can alter the other side to get it close to the proper shape. Final fitting when fuselage halves go together.

The airfield at Fernando de Noronha, Brazil. Sorry, no beaches!

Flag ceremony at Fernando de Noronha.

Flight line at Parnamirim Field in 1943, with seven PB4Y-1 Liberators of VP-107, along with a PV-1 Ventura.

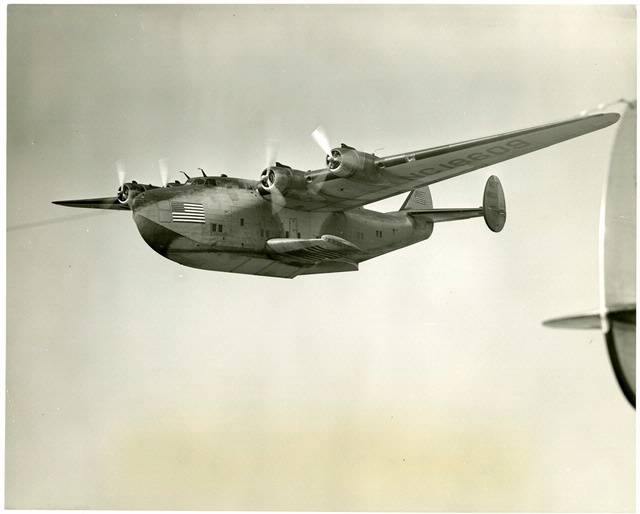
PBM-3 of VP-74 docked at the seaplane base at Natal. Looks like a Pan Am Clipper in the background.

U-848 of Korvettekapitan Wilhelm Rollmann was sunk on 05.11.43 by Liberator 107-B-12 "Aruba."

PBY-5A-P-83 7 BuNo 2480 of VP-83, offloading the only two survivors from U-164 on 23.01.43.

U-849 of Kapitanlieutnant Heinz-Otto Schultze was sunk on 25.11.43 without survivors.

The Gallopin' Ghost of the Brazilian Coast - the scheme I'll be modelling. Note there are no wing or tail de-icers.

The crew of the Ghost. I'll have to add the window where the cheek gun goes.

Forward cheek guns don't seem to be installed, however.

Looks like a Consolidated A-6 turret in the rear. Can't tell if there is a ball turret, radar, or tunnel gun in the belly. She's been repainted too, with new style US insignia.

Both upper and lower nose guns on the Ghost. Unusual arrangement.

Cut out the forward fuselage for the window/cheek gun. Notch will be filled, it's where the kit has the pitot tubes mounted.

Old guys like me who can't see anymore love Eduard pre-painted PE!

Lots more to add, we're not done yet!

Control yokes and seats/harnesses added.

We need some Liliputians to fly this thing!

Added a bit of plastic to match the curve of the inside fuselage.

Began work to add the port cheek gun window.

Added the PE, a quick wash and some post-shading!

Eduard supplys some nice PE structural elements.

Starboard fuselage half.

Nice compass and electrical controls.

And you get to fold up this cute bombardier's seat!

Nice map case and flight records pocket.

Now she's starting to look the part!

I'll have to scratchbuild the front gear well and forward floor.

When this is finished, it will be quite crowded up front!

I removed the rivets from the lower port wing...that was fun!

The wastegates for the turbo-superchargers are OK, wish they were recessed.

Inside the nose gear bay, looking forward. Note the nose gear retraction mechanism.

Nose gear retracted - we're seeing the top of the strut (yellow cap over fitting).

Kit parts in blue, and a pile of stuff to make a new nose gear.

Here is what I came up with, including a framework to mount it to the model.

Not entirely accurate, but I think it will work.

The basic idea for mounting. Gear doors retracted inward when open on the PB4Y-1.

Time for some relaxing photoetch bending!

This will sure look better than the empty space provided in the kit! I hope it fits!

Fits like a glove! This old Revell kit is much better than I first thought!

There's more PE to finish the gear bay, that will be added later.

Added structural detail, as this will be seen through the waist gunner's windows!

I didn't plan it this way, but the two sides match up nicely.

Chromate yellow primer and some weathering. Yuck!

Scratchbuilt floor for the waist gunner's area.

Added machine gun mounts and forward floor over the radar.

Gun mounts will position the guns in the center of the windows.

PE for the ammo boxes and the panels beneath the windows.

More resin! Oxygen bottles and the antisubmarine radar.

Chromate yellow applied - PE for ammo box brackets and non-skid floor above the radar.

Forgot to add this photo earlier - no injuries, but it was the end of the Ghost.

Added the oxygen bottles, guns (barrels/cooling jackets come later) and the starboard ammo belt.

I like the looks of it, even if it's empty (no shells)!

Also added the ammo belt on the port side...

...assuring that it lines up with the ammo box once the fuselage halves are joined up.

The armor plates, just aft of the waist window, were added. And I couldn't resist adding the relief tube!!

Get a good look now, the relief tube will be invisible when the fuselage comes together.

Maximum fiddly mode: Adding crosshairs to the guns!

A better view.

Time to start thinking about weight. The model is a big tail sitter!

This seems to be enough. But how much is it?

83 grams! Holy crap!

Ladies and gentlemen, may I present 83 grams worth of fishing weights.

If that doesn't work, how about 1 kilo of solid lead!!!

Waist windows made from clear film and two photoetch panels.

Not sure why I painted the interior panel zinc chromate - it will never be seen!

Something's wrong - the prop is too far away from the cowling.

Need to reduce the height of the front engine cover.

I think this is better.

Revell prop in blue, Academy prop in grey. I don't like either one, will replace with resin.

Waist window panel installed on the port side...

...and on the starboard side.

I used the kit gear doors in the nose wheel bay. Not sure they're the right shape, but no one will see them.

And on the port side.

Weight added to the engine nacelles.

And to the starboard fuselage. I put some sheet plastic to cover the doorway from the flight deck to the radio room - it's flat black on the cockpit side.

Nose gear added.

And a big chunk of lead for the port side!!

Separated flange from turret and painted Interior Green.

Mounted turret flange inside fuselage.

Finished main gear whel wells and primed. Gotta love Eduard PE!

Added brake lines and scissors links to main gear.

Primed inside of wing flap area. Detail not 100% accurate, but it will do.

Main gear wheel wells painted Interior Green. Based on references I could find, I think this is right.

Fuselage is closed! All that lovely detail I added has vanished forever!

True Details resin tires as received are a joke - after sanding they look better. Not good, but better.

Added strip styrene to fill non-existent slots for moveable flaps. This was just part of the "moving" features of the model in 1965.

New props! But why four blades? If I screw one up, I guess...

Props blades are too long!! Need to cut 2mm off - then you can't use alignment tool!

Completed replacement prop and Revell original. Revell prop is quite a bit undersized, after trimming the resin prop is the correct diameter.

These will look very nice indeed! And I've got four extra blades in case I do a "workbench loop."

Uh, we need a wee bit of filler up top...

Brake lines and oleo scissors added to main gear.

Main gear and wheel wells added to wing, then wing halves glued together. Finally! Fine sanding and re-scribing still to go...

Almost looks like I planned it this way.

The bird has wings!!!

And it's setting on its own legs! I never thought I would see the day!

Tail built and belly turret opening converted for anti-sub radome.

Molding pins removed from nose, sanded to 12,000 and dipped in Future. The canopy is OOB, I wish you could see a bigger difference in the photo.

Side windows cut out of canopy - I want to be able to see a little bit of the cockpit! Dipped in Future, too.

Gun stocks mounted inside nose.

Ammo belts "droop" from ammo boxes (inside fuselage) to gun breech.

Masking the nose took about four hours! Arghh! Not as good as I wanted, but it will do.

Engine cowlings temporarily mounted to nacelles for fuselage painting.

Tail assembly mounted and blended with the fuselage.

Interior Green sprayed to represent the insides of the framing.

All primed up and ready for some real paint!

The nose glazing faired in nicely with the fuselage.

Hey, I finally painted the beasty! Been wanting to do this for quite some time!

Gunze H54 Navy Blue (Non-Specular Sea Blue), Gunze H56 Intermediate Blue, and Tamiya XF-2 Flat White.

The nose art decal for the "Gallopin Ghost" is out of register, so I've change my mind. I'll use the markings for "Subduer."

I added the decals I had, just the national insignia, nose art, and serial number.

Elevators are posed slightly down.

Hard to see, but I added the PE deflectors in front of the waist windows prior to adding the insignia.

I also moved the ailerons slightly; port down/starboard up. Now I'm waiting for the stencils to arrive.

I popped off the cowlings and painted the engines. I think they look pretty good for a one piece moulding.

Cowlings back on the the stencils applied.

There aren't a lot of stencils, but they add some interest.

I do like the nose art!

I used small black decals to add the lower windows aft of the waist gunner.

I hand painted the turbo-superchargers, with some weathering and maybe some PE they'll look OK.

Flat varnish on and the Tamiya tape off!

I'm starting to like this one.

Far cry from what it looked like with all those rivets!

Lots of fiddly stuff yet to be added!

It does kind of look like a whale, doesn't it?

Radial panel lines (not included with kit) on vertical tail added with pencil. Stock tail in background.

Post shading on the underside of the port wing.

Radome and tail bumper added along with weathering on the fuselage.

More post shading.

Hard to take a picture of the gear door (made from Eduard PE).

Paint fading and post shading on top of port wing.

And the starboard wing.

Finished adding panel lines on tails (with pencil!) and weathered.

Top of the spine.

Yet another overall shot - not too much left to do!

Masking the Falcon vacuform canopy (made for the Academy kit)

I've lost track of how many canopies I've masked for this model!

Oh no! Mr. Bill! This isn't even close to fitting the Revell kit!

A little glue and some bending, and we'll make it fit!

Could be worse I suppose.

That looks better.

The canopy is nice and clear - so we can see the goodies inside!

Time to flip her over and add the flaps and marker beacon antenna.

Note the extended landing flap (and its angle) on the port wing.

Another view of the extended landing flaps.

First, remove all rivets and the pivot arms supplied with the kit.

Make five actuator rails, attach to front of flap, and this is the general idea. Not painted yet!

I think we'll need to do something different than the Revell turret.

Vacuform piece with Revell base. Will need to remove the step at the rear of the blue part.

Like this! We'll add guns, ammo feed, armor plate, etc. I think it will work.

Marker beacon antenna in-between bomb bay doors, bottom of catwalk.

I used 0.005" diameter Nitinol wire (smallest I had!).

Been waiting to add the props for a while - that looks better!

I added a little chipping on the leading edges of the prop blades.

Fowler flaps painted, weathered, and mounted in deployed condition - as if they were being serviced.

I added five actuator rails per flap.

Nearly finished!

I raided the magic box of fiddly bits for all the stuff inside the turret. Gun barrels to be added later.

Rolling the cooling jackets around 0.64mm rod - yikes!

Finished turret - early Consolidated A6 design with staggered guns.

Stinger in place!

Another view of the rear turret.

"Houston, we have an astrodome."

The guns for the dorsal turret - and the clear part from the Revell kit.

I like the Revell part because you can see the moulded ribs quite clearly.

In place - looks suitably busy! The ribs remain unpainted, just like on the real turret.

Test fitting an insulator for one of the antennae too. I have no idea what these really looked like, other than they were insulators.

Switched to a vacuform part for the top turret.

The overlap lines (where the actual Plexiglas pieces were glued) are represented by lines of matt varnish.


A closer look at the antenna insulator.

New pitot probes from styrene sheet and hypo needles.

Added all the gun barrels.

Added the rest of the stuff too! It's finished!

Enjoy the photos of the finished model!


Everyone else has gone home, but Mr. Modesty won't let go of his trophy!

Comments
2 3 October 2013, 14:47
What a perfect work bench. Great pictures, best quality. Nice project. Watching one of Bills masterpiece growing.
3 October 2013, 17:59
James - you just got this same kit? Cool! It's the start of an obsolete kit renaissance! 🙂
3 October 2013, 23:20
Acki, the workbench is not all so neat! I should show you the rest of it. Yikes!
3 October 2013, 23:20
yeah Bill, a buddy of mine showed up the other day with 34 aircraft kits for me..almost all 1/72 scale.........I've got most of them logged into my stash.....most are fairly old.....check out my stash......I've got to go through them again and hunt down the 6 or so that weren't in the data base here.....
3 October 2013, 23:54
Wow Bill, i´m curious how you tackle this kit!
Damn the kit was old, even when i was born!😢
4 October 2013, 06:39
That`s a nice project!
If the doctor has said, "Mr. Gilman, here is your medicine!", either he don`t like you or he knows your perfect dexterity!
It is always a pleasure to watch such a metamorphosis of old kits!
4 October 2013, 06:54
I would love to sit next to you Bill and watch you build this one!😢
4 October 2013, 11:58
Interesting project! Do you plan to build her in the ASW pattern?
4 October 2013, 16:10
Thanks for the enthusiastic encouragement! Holger, come on over - I'll set up a second chair and make some popcorn! Dirk, my doctor knows me and my plastic addiction! 🙂
4 October 2013, 17:18
That will definitely a masterpiece. Just like your Supermarine Scimitar, Bill,
4 October 2013, 17:36
This is going to be great to watch. Please post as many WIP as possible 🙂
4 October 2013, 22:23
Is it possible to sand off your fingerprints? Man, I've been sanding so much to get rid of those rivets my fingertips hurt! Or, as Ringo so eloquently put it "I got blisters on my fingers!"
5 October 2013, 02:17
Christian, I will build her in the USN three-colour ASW scheme. This is Non-specular Sea Blue, Intermediate Blue, and White. I'll use the markings for the "Gallopin' Ghost of the Brazilian Coast." The artwork shows a skeleton riding down on a bomb whilst looking through a spyglass at a sub on the surface. Very cool. It must have been tough stationed on the beach in Brazil.
5 October 2013, 03:09
Jep, must have been hard in Brasil...All the girls, the beach, surfing, beer...😢
5 October 2013, 07:00
The three-tone ASW scheme is one of the most attractive camo schemes, go for it. 🙂
There's a nifty tool for removing rivets - Tamiya Chisel - works great
Modeling Chisel 4 (Hasegawa 71209, No)
")
5 October 2013, 09:31
Hi Bill, you have choosen a really nice pattern :
[img1]
By the way, I just read Martin Middlebrooks Convoy SC122 & HX229. The history about the biggest but last really convoy battle in the North Atlantic. Royal Air Force VLR Liberators protect the convoy on the way to England and Middlebrrok recorded flying times of 18 ? 20hrs. Really impressing such long flying times for now 70 years ago!

5 October 2013, 09:43
Burkhard - now you tell me, after I've sanded off my fingers. 🙂
Michael - sounds like that old Kinks song "Australia" - "We'll surf like they do in the USA, we'll fly down to Sydney for our holiday, on sunny Christmas Day!"
Christian - that's the scheme!
5 October 2013, 14:34
Hey, I can fire up the barbie on Christmas Day. I just need to wear a parka while I'm doing it! 🙂
Some new photos added, as I'm working on getting the cockpit fitted. Fun!
5 October 2013, 16:14
that little Tamiya tool is easily self-made out of an old micro screwdriver
6 October 2013, 08:52
@ Ziimermaniac: That's what I used before, but I learned to like professional tools 😄
6 October 2013, 09:15
Hi mates - I've uploaded some nice historical photos that show the plane I'm modelling, plus some pictures of the base in Brazil and a couple of unfortunate U-boats that were sunk by Liberators from this base. Fascinating photos, and ones that will help me model the plane correctly.
6 October 2013, 15:59
Thanx for sharing the very interesting photos. By the way, is there a Boing Clipper in the background of photo 21?! May this is for your interest, B-24 history with a list of some boats that where sunk or hit by Liberators: uboat.net/allies/aircraft/b24.htm
6 October 2013, 16:58
Christian - I think so. I mentioned that in the caption for the photo. It looks like it is still in civilian livery, although it is hard to tell. I wonder if it was pressed into service for the USN.
Thanks for the link - great stuff! They need to change the page title (what shows in the browser tab) as it says "Boeing B-24..." Looks like a little cut and paste problem.
6 October 2013, 18:57
The Boeing Clipper was drawn into military service and at least one was respayed in three-tone blue/grey
[img1]
7 October 2013, 11:26
The new pictures are really cool,(except those with the beautiful sub😢)! History lessons with uncle Bill!🙂
7 October 2013, 11:43
Glad you guys liked the historical photos. They really add something to the build I think. So, I did some more work on the cockpit, adding the control yokes and the seats/harnesses. Photos uploaded to show the progress. Let me tell you, it's a lot of fun to make the control yoke shafts - 0.6mm diameter plastic rod cut into pieces about 1.0mm long. I need smaller fingers! 🙂
9 October 2013, 01:29
I made some good progress this weekend. The rest of the PE has been added to the forward fuselage, and I've done some post-shading and a quick wash to dirty things up a bit. I've uploaded some new photos that show how she's looking. Any guesses as to how many times I'll knock off the bombardier's seat before I close up the fuselage halves? 🙂
14 October 2013, 02:58
Great progress Bill, love the cockpit, looking forward to the next steps 👍
Greetz Phil
14 October 2013, 06:49
I've added some photos of the actual B-24 nose gear, along with what I came up with to represent it. I think it will be OK, and much closer to the real thing than the "working feature" nose gear that was in the kit. Remember this kit was first made back in the 60s when the manufacturers gave us teenage boys all these working features, like landing gear that retracted and turrets that moved, etc. Hey, the only working feature I wanted back then was a bomb that actually exploded! 🙂
15 October 2013, 02:34
Hi mates! For a change of pace, I decided to practice my photoetch bending skills by making up one of the main gear bays. Plus, I wanted to know if the PE designed for the Hasegawa kit would work on this old Revell kit. It turns out that it fits really well, and will make a huge difference - the kit had nothing but a big empty space instead of any detail. New photos!
19 October 2013, 13:55
neat stuff Bill! I like working with photo etch.....sure will make a big difference, those empty spaces are one of my many, many pet peeves.....
19 October 2013, 14:28
Nice progress with your build! I really like the exzellent cockpit as well as the nice add ons on the nose laning gear. Great modelmaking!
19 October 2013, 16:48
Hi Bill,
respect... For the age of this kit it looks just marvelous :-O
Greets from switzerland
19 October 2013, 17:38
I haven't done a lot of modelling lately, but I did manage to add some interior structural details at the waist gunner's position. I've uploaded a couple of photos. This area will get painted Zinc Chromate Yellow, as most of the early Liberators were, and to match the references I have. What an ugly colour!
27 October 2013, 22:44
Hi Bill
I take this assembly ongoing and I find that you did a great job on this Privateer. It should be very nice in the end.
JiP
28 October 2013, 08:17
Guido, that's what I think, too. A little motivation to get the job done right so they could get back to base and get out of that airplane! Of course, if they didn't get the job done right, they were getting out of that airplane anyhow...
28 October 2013, 17:09
And the motivation takes form - Zinc Chromate Yellow primer added to the interior fuselage at the waist gunner's stations. Complete with some weathering - next we'll start adding all the goodies like ammo boxes and chutes, guns, etc. Have a look at the new photo I've posted. What a horrible colour! I've ordered resin guns, oxygen cylinders, and anti-sub radome. It's starting to come together! 🙂
29 October 2013, 01:13
Thanks, Guy. What amazes me is how well the aftermarket stuff for the Hasegawa kit fits. I guess that means the old Revell kit is reasonably accurate in size and shape.
30 October 2013, 17:38
I've made some progress by scratchbuilding the floor for the waist gunners area along with the machine gun mounts. New photos have been uploaded. I'll be adding more details to this area today - not too far from closing up the fuselage halves. I still need to add details for the bombardier's position up front.
3 November 2013, 17:09
I posted an additional photo that shows the end of the real aircraft I'm modelling. It crashed on take-off and although there were no injuries, the plane was written off. The amazing fact I learned is that the plane was fully fueled and armed for an antisubmarine mission when she went down, and there was no fire. I understand that the armament for the mission consisted of depth charges in the bomb bay. Incredible! The photo I posted shows that the maintenance crews have already begun stripping the plane.
5 November 2013, 17:45
More progress! I've added the waist guns, complete with ammo belts and gun-sights. Armor plating has been added to the waist gunner's area, as well as several oxygen bottles. I've figured out how much weight is required to keep this baby on her wheels, and most importantly...I've added the relief tube!!! 🙂
18 November 2013, 01:46
Bill, you are mad!🙂
What a great detailing for this old kit! Whadda ya think, will the gear tackle the weight to let it not turn into a tailsitter?
18 November 2013, 07:25
Great progress Bill, there are some nice details on the inside of this beauty, it's a pitty when you later closed the fuselages
18 November 2013, 09:24
fantastic work, had managed to miss this up till now, but did some catching up and I love it
18 November 2013, 14:23
Amazing job Uncle! I'm not sure but ... was an empty B-24 not a tailsitter ?
18 November 2013, 19:02
Very nice details. It's a pitty that most of them will not be visible in the closed fuselage.
18 November 2013, 19:50
Thanks guys!
@Holger - mad? Perhaps "daft" is a better description! I reinforced the front gear with extra triangulation, and it withstands two bottles of Gunze without collapsing. For now anyway! And I think the main gear will be OK. Hasegawa recommends 90g of weight in their B-24D! 🙂
@Philip, @Christian - yes, a lot of the detail will not be easily seen once the fuselage is closed. The waist windows are pretty big, though, and almost all of the detail there is visible (except the relief tube!). I'll open the side windows on the cockpit, but they're very small. The nose has a lot of clear parts, but the image through them won't look so good. Everything will look great in my mind's eye though! 🙂
@Wilfried - you are correct! 10 points for you! I've seen photos of empty B-24s sitting on their tail bumpers. The crew would often put a jack stand under the tail bumper in order to keep the nose wheel on the ground. I believe the Tigercat was the same way, maybe worse.
Cheers, Bill
18 November 2013, 21:45

Ha! That's after I put the 1 kilo of solid lead in the front of the model! 🙂
19 November 2013, 18:57
Actually, I shouldn't joke about that one. I've seen that picture before, and I believe it was a fatal accident.
19 November 2013, 18:58
More progress! Check out the new pictures. I've added the waist window panels, front nose gear doors, and the front nose gear. I also found a problem with the engine/propeller which was positioning the prop too far away from the engine cowling. I fixed this by modifying the front engine case. Then, I took a good look at the props supplied by Revell. Two blades are 21mm long, and the third is 22mm long. The blades are not 120 degrees apart, one is off by about 5 degrees. The hub is too small in diameter. Each prop is the same. I compared to the Academy props, and although the blades are the same length and positioned correctly, its hub is even smaller. I've ordered resin props from Quickboost. Next it was time to put weight in every conceivable place to make this bird sit on her nose wheel and not her tail! The weight is in (and there's a lot of it!) and she sets correctly when I tape all the pieces together. Although the nose gear looks spindly, it is actually quite strong and should support the plane with no problems!
27 November 2013, 19:34
Hello Bill amazing work so far! looking forward to see more of it 😄
28 November 2013, 18:45
much inspiring Bill...I'm currently working on the old monogram/revell B26 Marauder, your build encourages me 🙂
28 November 2013, 21:08
Thanks, guys! Zimmy - I built the Monogram B-26 when it first came out! That's how old I am! LOL - it's still a great kit.
29 November 2013, 13:49
Great, really really great show!
Looks so crispy and it`s sensational!!!!!
29 November 2013, 17:28
Well, I've closed up the fuselage. All that lovely detail that I added has disappeared - it will only return with the aid of small right angle mirrors and tiny single LED flashlights! Have a look at the latest photos. Cheers!
2 December 2013, 00:33
Who needs modeling magazines if one can read + watch build-reports like this on scalemates? 👍👍👍
2 December 2013, 07:41
I agree with Burkhard and Aghis, this is really some kind of tutorial! Simply amazing!
3 December 2013, 07:15
Thanks - it wasn't planned as a tutorial, instead I view it as a photo journal of one man's dark journey into the depths of insanity. 🙂
3 December 2013, 15:26
Hi Bill, I've been following this build both here and on BM and I'm sure you're bored of hearing "amazing, superb etc" but it really is. Inspirational if you will!!
3 December 2013, 18:41
I never get bored with hearing "amazing, superb, etc." Heck, even "inspirational!" Keep it coming!! 🙂 🙂 🙂
3 December 2013, 19:04
personally, I liked "photo journal of one man's dark journey into the depths of insanity"😉
3 December 2013, 19:12
clutter !! junk !! mess !! debris !! rubble !! rubbish !! litter !! lumber !! rummage !! disorder !! chaos !! muck !! shit !! shambles !! ugly !! unsightly !! nasty !! disfigured !! amateurism !! abortif !! mistaken !! unchancy !! ridiculous !! ludicrous !! laughable !! absurd !!
3 December 2013, 19:24
Your Libby is truly amazing, superb, inspirational ... 🙂 Great work Uncle !!!
3 December 2013, 19:25
Wilfried, I'm so glad you're my nephew! I always know your comments are straight from the heart! But "lumber?" Really? Like in wood? From a tree? 🙂 🙂 🙂 👍
5 December 2013, 02:20
I love the PBY-1, and this model is looking really good for a kit that age. Keep up the good work.
5 December 2013, 03:30
Hi mates, well I've finally done it. The PB4Y-1 Liberator now has wings, and it's setting on its own legs. Although it now looks a lot further along in its construction, I sense I am only about half way through. Check out the new pictures to see how I did it, and see if you can find the mistakes I've tried to cleverly cover up! Cheers! 🙂
9 December 2013, 03:22
Looks great Bill! There's a lot of seams though,but you only paid one dollar so I guess you can't really complain.
9 December 2013, 03:30
It has about the same amount of seams as modern kits, they just don't fit together very well! 🙂 🙂 🙂
I'm building this model for the "Obsolete Kit Group Build" over on Britmodeller, and the object is to see what you can do with a kit that is hopelessly outdated. I would never have decided to build this kit otherwise. It's a fun project, but there is a reason why they don't make this kit any more! 🙂
9 December 2013, 03:39
This is astonishing what you has made from this old kit: respect!! In the same year I'm born 🙂
9 December 2013, 10:43
I've finished assembling the horizontal and vertical tail/rudders, along with converting the belly turret panel to accept the anti-sub radome.
13 December 2013, 19:28
Oh, and I forgot to mention the landing gear legs: great job Bill!
15 December 2013, 12:39
Since none of you are trying to stop me, I went ahead and did some more work on the PB4Y. Check out the photos for updates on the nose glazing and canopy, forward guns/ammo belts, masking of the nose glazing, mounting the tail assembly, and spraying yet some more Gunze H58. I didn't finish the model in time for the deadline in the Obsolete Kit Group Build on Britmodeller, so I'll be setting this aside for a short time so I can do something different. Change of pace as they say, then we'll finish it up. Cheers!
16 December 2013, 01:36
Oh bill you have made a masterpiece out of this 🙂😄 keep up the great work 🙂 and would necer stip you😉
16 December 2013, 01:39
..Question for Bill, or anyone else for that matter:
Newby to aircraft modeling wants to know about Future on the canopy.
Is it applied for protection?
Is it applied for lustrous appearance?
When is it applied, before painting the canopy seam lines (or whatever they?re called) or after?
Thanks in advance,
WF???.
16 December 2013, 02:44
Hi James,
Applying Future to the clear parts and canopies is usually done prior to putting them on the model. They parts can be dipped in Future, or it can be airbrushed. I prefer dipping myself, as the Future goes on very thick and self-levels itself resulting in a very shiny look. Future makes the clear parts appear more transparent and glossy, and provides additional protection. For example, once a canopy has been dipped in Future, you can use superglue and it won't get that foggy or smokey look from the fumes. I paint the canopy frames after the application of Future.
Here's a good website that explains it all:
swannysmodels.com/TheCompleteFuture.html
17 December 2013, 23:21
Hi mates, I managed to finish blending the nose glazing into the forward fuselage and then I primed the model with Alclad Grey Primer. I'll check for any areas that still need attention, and then we'll paint the USN tri-color scheme. I'm sensing the finish line, but we have to get around the last turn first! 🙂
22 December 2013, 03:13
AHA!! This is another issue you might be able to help me out with Bill?..
In my neophyte attempts at aircraft models, I am dissatisfied with the appearance of the interface between the clear parts and the fuselage per say.
I mean, it looks okay; no glue reaction with the clear plastic or anything like that, but it just doesn?t look natural or something.
Is this the ?blending? that you refer to in the immediate, preceding post? If so, what is the technique involved?
Thanks;
WF?????
22 December 2013, 03:23
Have a look at post #84 in my Scimitar build:
britmodeller.com/for..imitar-f1/?p=1414576
I use spackling paste for wallboard.
22 December 2013, 03:33
spot on Bill, thanks! URL is pasted into the build log of my upcoming sturmovik!
22 December 2013, 03:37
In the case of this Libby model, all of the spackling compound was dry sanded with 2,000 grit paper. I didn't use any water at all. This was necessary since there were some large areas to blend in, and you want to keep the surface smooth and flat, like the plastic you're joining to. I only dry sand the stuff if the model hasn't been painted yet.
22 December 2013, 03:41
Spackling compound......interesting. I'll have to give some a try as a test for alternatives to my other fillers. I have some of the 'pink' stuff that turns white when it's dry 😄
22 December 2013, 04:00
I don't recommend it for big gaps, I really only use it for blending in the canopy. Another thing to consider is that you cannot scribe a panel line into it.
22 December 2013, 16:01
Seen this a couple of times n my news feed but only just taken a look. Wow! Amazing work, truly stuff to aspire to.
22 December 2013, 17:30
Ah, I see. I'll stick to the Vallejo water based stuff for canopy blending then. Thanks for clarifying, Bill.
22 December 2013, 17:35
After what seemed like decades, I finally got to paint the sub-hunting Libby. We're not too far away from wrapping this up - hope you like what we've done so far!
I have changed my other mind about the markings, though. The decal for the "Gallopin' Ghost" is a wee bit out of register, and the grey doesn't line up with the black outline of the letters. Therefore, I'm going to use the decals for "Subduer." This will add some colour (red), plus the nose art is on both sides of the plane. Cheers!
29 December 2013, 21:16
Thanks, mates! I just finished "fading" sections of the top fuselage and wings, plus doing some patches of off-white on the sides and bottoms. Got to break up all that stark white! The off-white I used isn't much different, though, so I will use pastels after the final flat varnish is on. And, no, it won't be done by the start of 2014! Mid-January, probably. 🙂
30 December 2013, 02:42
This is an awesome build! Congratulations so far!
I like the camouflage with the white and blue its an eye-catcher!
30 December 2013, 14:02
I've added a couple of coats of Future in preparation for the decals. Then I realized that I only have the national insignia, nose art, and serial number - this baby needs the maintenance stencils. It took a lot of Internet searching, but I finally found an aftermarket sheet of stencils. I should have it in a week or so. On hold until then... 🙂
1 January 2014, 01:09
I've posted a couple of photos that show the nose art and insignia added to the PB4Y-1. I think I'll work on the engine faces while I'm waiting for the stencils. The cowlings are attached with temporary white glue, so they should pop right off. This will make it much easier to paint the engines! 🙂
2 January 2014, 01:11
I've added some more photos of the PB4Y-1. I finished adding the stencils, and I've painted the engines and superchargers. I also added another coat of Future to seal in the decals, and today I'll start work on a wash. Once I have that to my liking, we'll add a flat varnish and get the tape off of the clear parts! The big reveal, as they say - I hope it comes out OK. Cheers! 🙂
19 January 2014, 17:29
I?m curious for the final result! Any problems while leaving the tape for the whole time? I have always the problem that the paint will frazzle along the tape. Do you cut it first before you will get the tape of? Cheers, Christian
19 January 2014, 18:26
Hi Christian, I usually find that the Tamiya tape comes off well, even if left on for a long time. I think what makes a big difference is how many coats of paint have been applied. That will have an effect on the edges. I'll take the first piece off and then see how it goes, and if I need to cut the edges. Of course, I'll start with a piece on the bottom! 🙂
19 January 2014, 19:49
Just because my nickname is Navy Bird doesn't mean I like the Navy...or aircraft. NOT! You're right, I admit it, my name is Bill and I'm an addict! A Navy addict! Although this is the first USN aircraft model in a while. 🙂 🙂 🙂
20 January 2014, 02:06
The flat varnish and panel line wash has gone on, and the Tamiya tape has come off! Five new photos for your enjoyment - I like how the model takes on a whole new persona at this stage. The flat varnish really adds realism.
There's lots of fiddly stuff left to do, like the actuator arms for the main gear legs, gear doors, cockpit glazing, astrodome, turrets, gun barrels, props, antennae, etc. Thanks for your advice and encouragement, you need it for a project like this. Cheers!
21 January 2014, 04:22
Pretty awesome ...
Speaking of beasts ... this one has been tamed in a fantastic manner!!!!!!
21 January 2014, 05:46
Boah Ey!!!
As we say in germany when there are no more words, to describe fascination!
21 January 2014, 12:43
Hi Bill, the Ghost looks really beautiful. Very well done ? Bravo Zulu! Cheers, Christian
21 January 2014, 19:49
Revell left off the characteristic radial panel lines that are so prominent on the vertical tails of every B-24. Rather than try to scribe them (I'm a terrible scriber!) I'm adding them with a pencil. I've uploaded a photo of the first one. I think it will be OK.
22 January 2014, 04:09
It's looking great Bill!!! Before reading that^ I thought the lines on the tail were scribed! Great Work!
22 January 2014, 04:13
Wow Bill, excellent step by step. Haven`t got to read the hole thread, and sorry if you exlained before, but why did you left the main windshield for last in stead of glue it togather like the bomber windshield? Great work! Loved the detail you put into it.
22 January 2014, 04:28
Hi Eduardo, the short answer is I forgot about it. But no worry, I can make it blend in with the fuselage even at this stage of construction. Stay tuned! 🙂
22 January 2014, 20:13
Stay tuned I will........I didn't do so well with my spackle blending Bill......would be interested in seeing this!
I did check out in some detail the tutorial at britmodeller.com/for../page-5#entry1414576
so.........maybe I just need more practice or something.......maybe I had the wrong kind of spackle??????
Anyway, thanks for the help and look forward to your posts........
Sincerly,
JVJ
23 January 2014, 01:10
Amazing builds like this are the reason why my sole aircrft kit is relegated to the very bottom of my stash. 🙂
23 January 2014, 04:01
Hi mates! I spent today doing some post shading with the airbrush and some Gunze H75 Smoke, and then used some pastels to do some topside paint fading. I then added the radome, tail bumper, the main gear actuators, and the gear doors. Not too much left to do, just some more fiddly bits, the canopy, props, antenna wires, etc. Quite possible could finish tomorrow, he said, knowing full well it is unlikely. New photos have been posted, enjoy!
26 January 2014, 02:37
Not really Brandon, but you can get similar results using lighter colored pastels in middle of the panels.
26 January 2014, 03:51
Erik is right, Brandon. First, the paint must be matte finish. Pastels don't stick to gloss. For this effect I used a light gray (really!) pastel powder. My pastel chalks are solid sticks, so you need to use a razor blade to scrape the sides which gives you a pile of pastel powder. Using a small brush, I place some of the powder on the panel I want to lighten. When you place the powder on the panel, don't rub it in a lot. Just very lightly spread it around and then blow the remaining powder away. At this point, I just take my finger and gently rub the pastel that remains (and it doesn't have to be much) around the panel, first in the direction of airflow, and then in a circular fashion. The trick to this is simple...PRACTICE (preferably on another model first, one you don't care about)! If you use too much pastel powder you end up with a big spot of grey (or whatever color you're using). This is a delicate technique. And I'm sure I'm doing it incorrectly. I know this because I never follow directions, just ask my wife! 🙂
26 January 2014, 05:19
One step forward, two steps back. After I had the canopy all masked and sprayed, I realized that Revell had been up to their "fictional framing" game again. Different than the nose, though, which had framing missing, the canopy had framing added. Arghhh.
I really should have been paying better attention, but like a dummy I just blindly masked away without looking at my references. I forgot that whole measure twice, cut once thing. 🙁
Long story short, I stripped off the masking, removed all of the paint with mineral spirits, sanded off the frames that shouldn't be there, and set about micro-meshing. Then, at 2:00 AM, I re-masked and it's ready for paint. Live and learn - I won't make that mistake until until my next kit. Experience is what we call learning from our mistakes so we can recognize them when we make them again. 🙂 🙂 🙂
26 January 2014, 21:51
At some point this will need pitot masts installed. Not sure about fictional framing. Can you offer some insight so we can benefit from your observation. Nice job on an under-rated classic.
27 January 2014, 01:43
Right you are, Phil. The pitot "horns" will probably go on last, same time as the antenna wires. The pitots are just too fragile for me to worry about knocking them off.
By the way, the Revell kit has the pitots mounted in the original position, as seen on very early B-24s. I filled those mounting holes, and will mount them in the correct location for the PB4Y-1.
Regarding the fictional framing, have a look on the kit's box art. You can find this here on Scalemates, by clicking on the kit in my project. Have a look at the window that is between the windscreen and the sliding side window. Revell have the glass extending all the way down, so this window comes to a point by the bottom front edge of the side window. The real B-24 windscreen looks like the photo of the olive drab bird below.
[img1]
You can see from the PB4Y-1 photos from Brazil (below), Sea Beast and Subduer, that these ships were equipped the same way.
[img2]
[img3]
Hope that helps! A small change, but one that required a fair bit of work as the entire canopy was already masked off and painted, both flat black (for an interior color) and Intermediate Blue.
That shot of Subduer shows the pitot horns nicely...


27 January 2014, 02:37
Quick link to the box art, plus another view of the window in question, this time on the famous Strawberry Lady.
[img1]
[img2]


27 January 2014, 02:58
...for the bistered Windows,Yes. Thanks for the clarification. Once the cheek guns were added to the B-24D ( and at least one C) the pitots were relocated. This occured before block production but after HALPRO and the Blue Streak. Extremely well done build on kit that has well stood the test of time. Bravo to you.
27 January 2014, 03:01
Hi Phil, was the window only this way when the side windows were blistered?
27 January 2014, 03:04
There were many different framings on the side windows in that lower front joint.. The Kit was essential a HALPRO...exteremly early combat Ds. The 8th Af often had thick armored glass mounted differently.
27 January 2014, 04:27
Much obliged. I'll stick to my plan and try to make it look like my reference photos. Cheers! 🙂
27 January 2014, 04:43
Yep. The picture of the plane you are building is always the way to go.
27 January 2014, 04:47
You know how good it feels to have masked and painted the canopy three times? And you're all ready to get it on the model because you're almost done? But then you drop the canopy and don't see where it went...and you figure you have to get out the flashlight and get down on your knees, searching around under your bench. So you take a step and reach for the flashlight, grab it, and then take a step back. And then you hear the sickening "crunch" sound...remember how that feels? I do... 🙁
1 February 2014, 01:02
Oh god....I know how you feel,it happened 3 times on my spitfire. Thank god that cheap vac-form canopies exist!
1 February 2014, 01:04
I hate it when that happens. I have had to ask Revell for 2 replacement canopies for that very reason. I just can't figure out how stuff becomes invisible when it hits the floor. I even have a black mat under my workbench to prevent that. Plane is looking amazing.
1 February 2014, 01:09
The fun is just beginning - the vacuform canopy doesn't even come close to fitting. But it is thin and flexible...I have a plan! 🙂
1 February 2014, 01:46
The aftermarkets for minicraft are out of the question...too flat. If you can cement the Revell back together, fill the back with modeling clay and mount for a heat and smash. Blister pack material will work. I made several.
1 February 2014, 02:35
No need to piece the Revell canopy back together. The vac canopy will fit fine, and it will look fine. When you remove the side windows, and bend the canopy to make it match the curvature of the Revell kit's spine, it magically "gains" height. (With the side windows gone, the canopy is very flexible and bends easily.) And, the bottom of the windscreen now matches the curvature of the Revell front fuselage surprisingly well. In fact, it matches better than the Revell part did. The height of the windscreen is in-between the height of the Academy stock part and that of Revell, and to my eye looks much better. There is just one small issue to deal with that is easily fixed. Stay tuned, she'll look just fine. 🙂
1 February 2014, 03:07
Hmm, this I am waiting to see. A part that does not fit, fits better than the kit part, which fit, but now does not fit. My head is spinning 😛
1 February 2014, 03:09
Brandon, yes I will use the same method I used on my Buccaneer and my Scimitar. And countless other models, come to think of it. But it doesn't involve "white glue." 🙂
1 February 2014, 03:09
Yep...the bend will work fine. I didn t go into that because you hadn t mentioned your replacing the side window during the blister discussion. You have a fine build going and it well along.
1 February 2014, 03:24
I call it "adaptive modeling." Or, to use an American stock car racing expression: "run what you brung." 🙂
1 February 2014, 04:11
I call these fortunate accidents and welcome them because as you ve done here its moved you abandoning the Revell part altogether to get a better look. You may have notice the real B-24 canopy drops into a new shape at the overhead window coming forward to the front.
1 February 2014, 04:19
Houston, we have a canopy! 🙂
Once I bent it into shape it did not fit the Revell fuselage as well as I thought it would, but hey, that's what we have filler for.
3 February 2014, 04:03
Great work Bill, thanks for the pictures. It really gives an Idea of what you did to fix the problem.
3 February 2014, 04:30
Bill, outstanding job on the canopy bend. You captured the drop of the real deal.
3 February 2014, 06:07
Now this one comes to an beautiful end. Very very nice work Bill!
3 February 2014, 18:32
Bill, I have to ask. How did you get that transition between the blue and white? Please share how to masked off for that. Thanks
3 February 2014, 18:37
Thanks, everyone! Jermaine, no masking at all, it's a free-hand airbrush line.
4 February 2014, 01:09
Erik, so is the canopy, but I won't tell anyone if you don't! 🙂
Making some progress on the flaps - I've added a couple of photos that show deployed flaps on B-24s coming in for a landing, and my idea of how to do this on the model. Revell have the flaps pivot down from the front of two arms moulded into the flap. This is all wrong, from what I can tell from drawings the flaps slide out and pivot down on five rails that are within the wing. If it was anything like a modern airliner, there were probably some big honking ball screws used as actuators. But then, this was back in the 40s so maybe not. Anyway, have a look! Cheers!
5 February 2014, 03:39
...I am completely surprised that this old dog came with deployable flaps! They may have gotten a bit of the detail wrong, but it's still a feature a bit ahead of its time.
5 February 2014, 04:58
Hi nice work.
what you used for the washing?
huggs
5 February 2014, 11:43
Holger, I believe the Leigh Light was used only on British Liberators, not on USN aircraft. However, that gives me some good ideas if I ever want to build a Coastal Command Libby in North Atlantic camouflage!
Paulo, the wash that I used is one I mixed myself from artists acrylic paints. They come in a tube like oil paints, but they are water based. I use a small bit of paint, water, and dish-washing soap in my mixture. The soap reduces the adhesion of the wash, and makes it come off easy.
Erik, not only did the kit come with deployable flaps, but the landing gear retracted and the belly turret could be pulled out and deployed. Of course, the turrets all moved too. I think these were meant as toy-like features, rather than attempts to depict the aircraft accurately. But I think the overall size and shape of is pretty good. It looks the part, but there is a lot more that I could have done to make it more accurate. The detail in the area where the flap retracts is not right, for example, but at least they tried.
5 February 2014, 16:28
Finish it! Please finish it! Best Liberator model I`v seen ever!
5 February 2014, 19:39
I love this blue Lib!
Great realisation!
It is a pleasure to watch your models.
6 February 2014, 20:04
so much for "old kits"... looks like you beat all the over-engineered "tamigwa" kits'!
6 February 2014, 20:05
Thanks, mates! Christian, I will definitely finish it! Too close to the end to stop now! 🙂 🙂
7 February 2014, 00:09
The Revell flap were not designed to pivot down. They were design to trail out correctly as Fower Flaps. The tracks and stops are there.
7 February 2014, 04:19
Hi Phil, they may have been designed that way, but my copy sure didn't work that way. With the flap in the retracted position, they simply flopped down, pivoting on the forward end of the arms. Whatever was supposed to lock them in place didn't work. If you pulled them out to the deployed position, they came right out. Probably whoever had the kit before I bought it played with it too much and wore the plastic down. 🙂
I remember that was typically the case with these models from the 60s with the "working" features. They would work for a few times, and then slowly whatever held them in position wore down. Styrene isn't the strongest thing out there! I remember trying to lubricate the areas where two plastic pieces would rub against each other to prevent this - I think I used vaseline or something like that. 🙂
8 February 2014, 03:24
Hi mates, I've added some more photos today. I started some preliminary work on the rear turret, added the marker beacon antenna on the bottom, painted, weathered, and mounted the Fowler flaps, and added the propellers. This project is coming in for a landing soon! Cheers! 🙂
9 February 2014, 02:40
I'm afraid to add up all the aftermarket parts though! They were considerably more than $1! 🙂
9 February 2014, 14:59
Hi Bill,
this is definitly one of the best B-24 i've ever seen.
10 February 2014, 05:20
It takes a lot of patience and skill to finish off any 4-engined bird, and this one is no exception. Well done Bill!
10 February 2014, 17:03
It's not fair. A beautiful inside work and details and having to close it at the end 🙁
Nice work😉
10 February 2014, 21:09
Thanks, folks!
Hi Vitor - you're right, I almost didn't want to close it up. Someday I'll make one that's all open. But at least I have the pictures to remind me of what is inside! 🙂
I added two more photos of the work I've done on the rear turret. Remind me again why I work in 1:72 scale...I can't believe I'm rolling .50 caliber cooling jackets around 0.64mm diameter rod. But they do look kind of cool. 🙂
11 February 2014, 03:11
I've finished the rear turret, and I've added the ADF "football" antenna and the navigators astrodome up front. Photos added so you can see what I've been wasting my time on. Now I'm off to see if I can make the top turret. There is just no rest for the wicked! 🙂
16 February 2014, 02:17
Only just now I see that there is an error in the rear fuselage of the kit - too late to fix it now, I think! It's the fairing right at the end of the fuselage top, that extends part way over the top of the turret. It should not be straight along the rear edge, it should be "scalloped" or rounded inward. This makes it conform better to the actual shape of the turret glass. Oh well...should have been paying attention earlier. Don't tell any of the IPMS judges! 🙂
16 February 2014, 02:28
Hey Bill what IPMS contest are you going to? Is it in Massachusetts? I'm going to one in May
16 February 2014, 03:15
Hi Brandon, nothing planned at the moment. I usually stick around Western New York - Rochester, Buffalo, Syracuse - but I sometimes head into PA or MA, even Toronto. Where is the show in May?
16 February 2014, 04:55
Hello Bill,the contest is at Gloucester High School in Gloucester MA. Sunday May 18th 9AM-4PM. If you want more details pm me 🙂
16 February 2014, 21:47
Hi mates! I've done some work on the dorsal turret, have a look. I didn't get a lot of work done, as my wife spent the last week in the hospital after her appendix ruptured. After she got home on Saturday, I took on the chores of cooking, cleaning, and caring for her. Who knew being a housewife was so hard?
18 February 2014, 03:13
Damn shit, Uncle.... Äh, grandpa!😢
What a great work, and i dont mean the dorsal turret😢... More the housework!
Cheers to your wife and a speedy recovery for her!
Ah, btw, fkn brilliant work on the B-24!!!!!!
18 February 2014, 07:21
Thanks, Holger! I told my wife that I would do the cooking and cleaning as long as she promised not to work on any of my model projects. She could pick a kit of her own out of my stash if she wanted to make a model, but she hasn't picked one yet. 🙂
18 February 2014, 18:15
Thank you, gentlemen! I truly appreciate the kind words. Nonetheless, I am going to build the top turret again, as I'm not happy with it yet. I'm going to use the Falcon vacuform part instead of the Revell part. Since the clarity will be much better, I will have to do a better job on the internal details! It's the burden of building an ancient kit - your work is never finished! 🙂
18 February 2014, 21:41
Many libs had a flair gun port starboard btw the turret and cockpit in the area opposite of the port top hatch. The command and liaison stand-off insulators ran to this area too. These would bring detailed interest and attention to this area if that is your desire.
18 February 2014, 23:11
Hey, Phil - you wouldn't happen to have a photo of the insulators would you? I can't find a good photo anywhere - it's hard to model something that you don't know what it looks like! 🙂
19 February 2014, 02:24
Hey Bill,is this what you're talking about? forum.keypublishing...24-antenna-insulator
19 February 2014, 02:30
Hi Brandon, if it is, it's almost exactly the same shape as what I've been playing around with. Note the small green cone on the spine of the model in the photo above. (Don't tell anyone, but it's the tip of a rocket from the resin leftovers of my Scimitar kit!) I'll let others chime in as well.
19 February 2014, 03:36
I couldn t open the attached photo when I reached the site Brandon posted. The insulators are small, white cones with an eyelet near the apex. The spot you ve identified so far is a whit e navagation/ identification light teardrop cover. I look for picture of the standoff insulator.
19 February 2014, 20:24
Looking forward to anything that you might find, Phil. The small green piece that I've been experimenting with is definitely a cone, so that's on the right track. I think making an eyelet in 1:72 scale might be going too far, I will just glue the antenna wire to the stand-off insulator.
20 February 2014, 01:53
It's still awesome Bill. Do you think someday you might finish it? LOL.
20 February 2014, 03:41
Not at this rate!! 🙂
I rebuilt the top turret, switching to the vacuform piece. I switched the location of the ammo belts to match where they're supposed to be (D'oh!). The overlap areas (where the real Plexiglas pieces were glued) has been simulated by lines of matt varnish on the clear turret. I kinda like it. Check out the last two photos. Cheers!
20 February 2014, 04:19
Hey Brandon, I think the photo you directed me to is the piece I'm looking for. It matches what Phil described, and it matches this photo that I found. See photo 187. The photo shows the insulator for the liaison antenna below and forward of the top turret. You can also see what looks like the original location of the antenna lead-in which was below but in line with the turret. It appears as a small dark circle, which I guess is a repaired area to the fuselage. The plane itself is the famous Blue Streak.
22 February 2014, 00:23
Hey Brandon, I posted another picture that shows the insulator even better. It's definitely the same as the photo that you found. It's in photo 188.
With that settled, I went and added four white conical insulators to the fuselage and tails, so hopefully I can soon add the antenna. I also added the gun barrels to the waist guns. I want to finish the canopy side windows, then the nose gun barrels, then the pitot probes, and lastly the antenna. Fiddly-est stuff last! Then she's done - I think!!! 🙂
22 February 2014, 17:15
Cool. It looks Amazing!! I wish one day that my models looks as amazing as yours! By the way,if you go to the model show/contest in Massachusetts,will you bring this?? I'd love to see it in person
22 February 2014, 17:20
Why not? I'll have to figure out a way for it to travel safely. I'll probably do the show in Buffalo in April as well.
22 February 2014, 22:13
Yep that s the insulator. Good eye. Onward u go. Great job. I ve always defended this kit and you can see why.
22 February 2014, 22:50
I added a photo of the finished model - much more to come, but I gotta eat first! Cheers!
23 February 2014, 22:52
A beauty!
It was a pleasure to watch the build. And its a pleasure to see the result. Wow!
I like it!
23 February 2014, 23:34
Congratulations Bill! Really amazing work, this shows that is not the model that makes the modeller 😉
Something to be proud off!
23 February 2014, 23:44
Thanks guys! It was a long strange journey. I never ended to do this much work when I first joined the Obsolete Kit Group Build on Britmodeller. I thought I would just do a quick, OOB build to recreate my youth. But then I started tinkering... 🙂
23 February 2014, 23:49
What can I say but WOW!!!!!!!!!!!!!!!! what an amazing model great work Bill.
24 February 2014, 00:27
Bill, you went off the board with this build! Great and inspirational work!
24 February 2014, 01:16
Sure, no problem. That is just a link back to Scalemates right? (I'm not much of a FB user other than to look at pictures of my grandchildren!)
24 February 2014, 03:13
Thats amazing, what you did with this kit. Congratulations, with my deepest respect!!!
24 February 2014, 06:48
This is surely the best Revell-based Liberator model in the whole wide world, if not the best whatsoever! Congratulations with a perfect model!
24 February 2014, 07:50
The final result is at the height of the sum of labor expended. Very beautiful model.
24 February 2014, 09:48
Bill, all formulation for praise are sold out, so there you also understand German: herausragend!
24 February 2014, 11:37
Thanks Bill, this pic is just my FB page.
Follow link.
facebook.com/photo.p..amp;relevant_count=1
24 February 2014, 12:16
Your craftsmanship and dexterity is undoubtedly of expert level!!
It`s always a pleasure to watch the photos of your models.
The refinement of old models is the high art of modelling.
Congrats.
24 February 2014, 15:01
I am deeply impressed by your adorable modelling skills! That´s high end modelling: the best Liberator I have ever seen!
24 February 2014, 16:54
Thank you, everyone! I appreciate all of the kind words. I have declared the model as finished, but every time I look at it, I want to do some more work!
One thing that I did not do prior to construction was compare the kit to drawings to see how accurate its shape and dimensions were. Nonetheless, it sure looks like a Liberator!
Holger und Bernhard: Ich danke Ihnen, meine Herren! Ich verstehe ein bisschen Deutsch, also ich Ihre Kommentare schätze. Es ist wahr, dass gab es einige Wahnsinn in seinem Aufbau beinhaltet! (Sorry if I have the sentence structure wrong - I always try to make German into English structure. My brain is only wired for one language!) 🙂
24 February 2014, 17:05
Bill, your welcome! Please, don't worry: I also know the problem. My mother-language is Polish and the structure of Polish-language and the sentence construction is completely different, compared with German. If one speaks nearly 35 years two languages, mixed to himself a lot...
24 February 2014, 18:44
Obsolete???? No kit is left behind!!!!
Absolutely awesome!!!!!!
25 February 2014, 22:06
Thanks, everyone! The model is not perfect by any means (I'm already thinking about how to change some things I don't like) but it's the first four engine bomber I've built in 25 years. Now I feel the need to get some others to give it company! I have a B-17 and Lancaster in the stash, I'll probably start with them.
1 March 2014, 16:31
Exeptional, Bill...Simply exeptional...It was pure fun to watch your steps during this build! The best i´ve seen from you and there where many exellent builds from you so far! You topped yourself with this B-24! Absolute remarkable what you´ve done with this old kit... Its so stunning that i would say: This is a gold medal model and i think all the others here, would support my statement!
8 March 2014, 19:40
Thanks so much you guys! It makes the effort worth it all the more. The PB4Y will go to its first contest in April, hopefully the judges will like it.
For what it's worth, my Skua project is guaranteed to underwhelm! 🙂 🙂
9 March 2014, 01:30
You should have seen this kit back in the 60s after my brother built it and blew it up with firecrackers (barrel bombs, we called them)! 🙂
9 March 2014, 20:20
Yup, the President of our local IMPS club came in one meeting with a big box full of these old kits, mostly armor. There were all a buck each. So I grabbed it, never, ever thinking that I would build it. The world works in mysterious ways sometime.
9 March 2014, 20:29
That's awesome. How much do you think it added up to? All the extras and paint,stuff like that? Also at IPMS meetings/conventions are kits usually sold?
9 March 2014, 20:31
Yup
brandon
all good ipms meetimg
at convemtions
you will go freaking crazy at the amout of kits and how much they cost
you will talk in with 200 dollars and leave with 100 kits
literally
9 March 2014, 20:49
Umm yea lol
You can even wim free kits in a raffel multiple times
I litterally spemt 100 sollars and got 40 kits
and they were dragon tanks
and since your only 14 people will just give you great deals like 4 model kits for 15 dollars
And they will give you free stuff and will make you the best deal they possibly could
9 March 2014, 21:49
It'll be awesome!!! I'll be sure to take my camera,I'll take a pic of everything! 😄 lol
9 March 2014, 21:54
Lol
and take atleast 100 to 150 dollars
I know it sounds like a lot but it will go a loooooooooooooooooooong way
9 March 2014, 22:05
Brandon, if I add up the kit and all of the aftermarket parts (but no paint, glue, wire, etc.) it comes to about $150 retail, but I'm pretty sure I bought most of the aftermarket at a discount. Who knows? I don't keep model receipts. SWMBO might find them. 🙂
10 March 2014, 00:12
That's still not bad...considering a full die cast one would be around 299 dollars.
10 March 2014, 00:14
The antique Revell Liberator did OK at Buffcon 31, the annual show put on by the IPMS Niagara Frontier Chapter (Buffalo, NY). First place in 1:72 Multi-Engine Prop, and Best Aircraft Overall. Woo-hoo!
Great show - about 450 total entries. As usual, I forgot my camera and my phone (but I did bring my wallet!). As everyone was packing up and going home, my friend took a picture of some goofy-looking guy who wouldn't take his hands off my trophy! (See photo #211) There's one at every show... 🙂 🙂 🙂
15 April 2014, 01:48
Congratulations Bill! Two top awards in a big show. It certainly looks great in the photos and the judges saw that the real thing was a winner too. I live near Toronto and have often seen ads for that show, so someday I may check it out. (As an observer though!) 👍
15 April 2014, 01:55
My compliments to those well earned awards!
Picture 211 shows two individuals in the background with folded hands: I would fully agree if this is a gesture of adoration... 🙂
15 April 2014, 06:29
What did i say some month ago? This is a gold medal model!
Well done uncle Bill!👍👍👍
15 April 2014, 07:27
Well deserved. Your Liberator thread is already an internet classic in my book. 🙂
15 April 2014, 12:12
Congratulations Bill!!!! It"s well deserved, you make from this old Kit a real beauty 👍
Greetz, Phil
15 April 2014, 16:17
Thanks everyone! I appreciate it. Roland, I hadn't noticed the two people in the background before. It kind of looks like they're praying, but for what I don't know. Probably praying that I pack up the model and go home, so they can take the tables down! 🙂
15 April 2014, 20:40
Album info
This kit is from 1965, and I'll be building it as part of the Obsolete Kit Group Build on Britmodeller. I bought the kit for $1.00, so I'm deeply indebted to ensure the success of this project! I have a lot of aftermarket that is designed for the Hasegawa kit, and some of it may fit and some may not. But this is modelling - we'll make it fit!


