

BAC Lightning F.2A (Trumpeter et al)


Comments
Braille scale rulez! In german i would say: GEIL! The Lighning was one of my very first models. I remember me, glueing the bombs ON the wings without pylons... That must have been in the mid 80´s... My god, time is running! 🙂
I've decided that the Heritage resin belly tank just won't work for me. It has the correct depth, but the wrong cross section. I need something that is halfway between the Trumpeter tank (too deep and too wide of a cross section) and the Heritage tank (too flat in cross section). I've ordered a "factory sealed" 1:72 Matchbox F.6/F.2A off of e-Bay, as I've been told that it has the best belly tank of any available kit. I hope I can graft it on to the Trumpeter kit!
nice Cockpit!!! looks great in this scale. Good luck with the 3rd Belly Tank 🙂
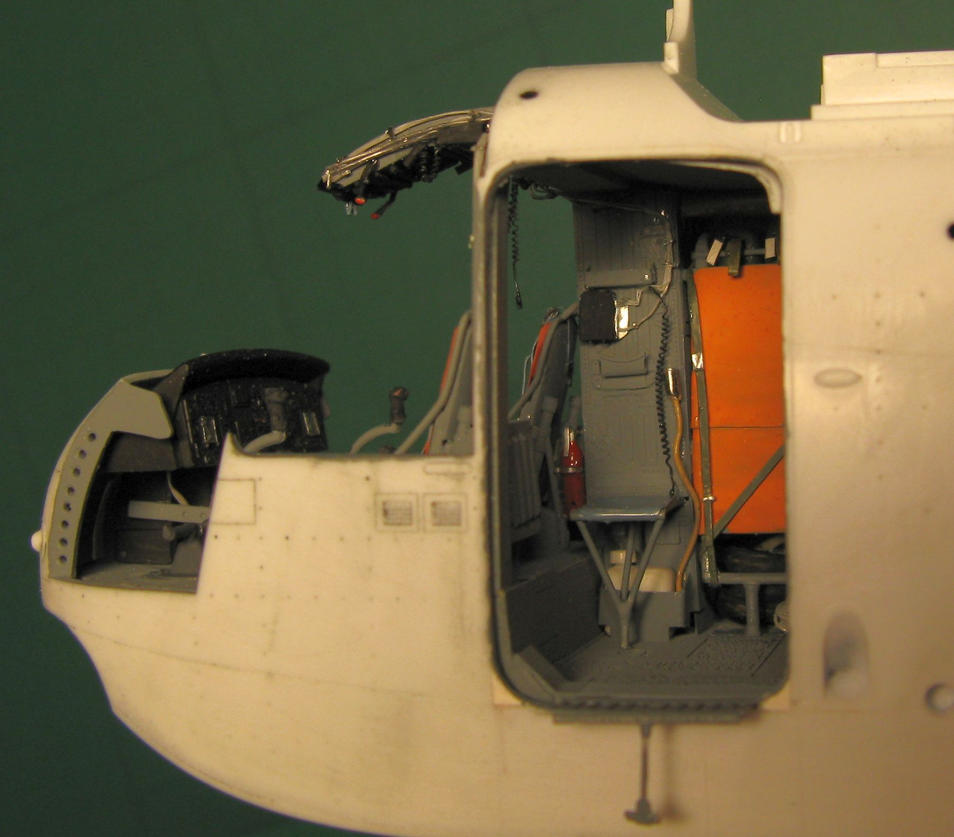
Matchbox kit has arrived, and its belly tank has been amputated. Looks like it will fit nicely onto the Trumpeter kit. Thanks for the comment on the cockpit, it looks much better in real life. I just couldn't seem to get a good picture of it.
You can follow the WIP (with my attempt at commentary) at: britmodeller.com/for..?showtopic=234909248. I'll post the major pictures here as well. Cheers!
Following this one on the background,interesting build.Good luck with the sanding.Grtz.
I've added a few more photos of my Lightning build, including the mods that are necessary to move the wings back to their correct position and how to set the wing anhedral to the proper angle. The Trumpeter kit has no anhedral, and it has the wings mounted too far forward!
The main landing gear legs are too long!! I'll be shortening them by 2mm or so. Never a dull moment building this kit!
Hey Bill, looks very convincing so far.... I think fixing the 2mm as you want to do is a good plan.
Bill, great work and nicely documented. You provide a thorough blueprint for this job, very inspiring.
Worth to note that the drawings may not be perfect either, e.g. it seems they don't reproduce the variation in leading edge droop and camber along the wing's span.
Great job Bill, a lot of details you're add there in this little beautiful plain, can't wait to see more pic's, are you gonne used the alclad paint? Greetings Phil
Hi Dave, the Trumpeter 1:72 scale Lightnings have very nice engraved surface detail (better than any other 1:72 scale kits). But it has some serious shape and accuracy issues, which is what I'm fixing with this build. Lots of aftermarket and kitbashing from other kits required. If you're asking about the 1:72 Airfix kit, that is VERY old and not very good. The Airfix 1:48 scale kits are probably the best Lightning kits overall. It is one of the few kits to get the complex leading edge shape right (The Eschelon 1:32 vac kit is the other). The Matchbox 1:72 kit that I'm using some parts from in my build has a pretty good shape, but the detail is raised and not good. The fuselage is too skinny also. To summarize, there are no injection molded 1:72 Lightnings that don't require a lot of work. I wish Airfix would scale down their 1:48 kit!
Hi Philip, yes I will be using Alclad. The plane is primed, and now I am making it smooth with 2000 grit sandpaper in prepartion for the Alclad.
D Burkhard, yes drawings can be wrong! I've been using two sets that come from different sources (one from UK and one from Russia). Both sets of drawings agree reasonably well. Certainly the changes I've made result in a better looking, more accurate Lightning than if you built the Trumpeter kit OOB.
Hi Tim, I've removed 2mm from the main legs - wow, what a difference. She is now sitting the way she does in the photo references that I have. I'll get some new pictures, but it may be in a week or so, as I'm heading out on a business trip.
Hi Guido - yes I am aware of the Micro-Mesh products, I have ordered a set and they are on their way, arriving next week when I'm out of town for work. So the final polishing won't be until I get back! And feel free to speak up anytime, no need to sit back and stay quiet! 🙂
Hello Scalemates, I've uploaded some more photos of my Lightning F.2A project. Painting has begun - please have a look at my first attempt at using Alclad!
Bill, You did a great paintjob on your lightning, it looks very clean the alcladpaint, looking forward with the decals on it, let the pic's come, greetz Phil
Bill you did a great job on this one! The alcladjob is satisfying and i´m looking forward the decaling!
Looks great Bill! Especially after all the hard work you did it looks really nice. Coating a Trumpeter kit with Alclad and achieving a good result is not obvious, very well done!
Hi Bill, looks great. Did you vary the color on seperat panels? I´ll have to do the same when I start to build the Mig 19 that I have in my stash.
Christian - I did very the colors a bit, I'm thinking about doing some more. The overall color is Alclad Aluminum. The jet exhaust area is Magnesium, the panels around the cannons and vents are Steel. There are some panels back by the speed brakes that are Magnesium. Part of the belly tank and the top engine access panel are White Aluminum. The intake ring is Chrome. Also, the area on top of the wings that is inside the walkway stripes (which aren't on yet) is Dark Aluminum. The last color is very close to Aluminum, it was hardly worth the effort to mask it off! The panel variation is more obvious to the naked eye than in my photos. The last photo in the album as of today shows it best. I have a lot of reference photos of this particular aircraft (XN793) and it doesn't seem to have a lot of panel variation.
Oh, I almost forgot - the ailerons and the panels on the side of the fuselage back by the jet exhaust are Dull Aluminum.
I would first apply the decals Bill, and then see how it looks, I don't think you'll need a panel line wash and if you do, as Holger said, only subtle. Maybe just to define the moving surfaces ?
I agree with Wilfried, just put on the dedals and when you´re satisfied, we will be satisfied, too!🙂
In deed Bill it is not so obvious on the fotos, but I think it is the right way to do the color variation more as well as the panel lines. Do you have an old kit which you don´t need anymore? You could try on it how to proceed with the panel lines without ruinig this beautiful plane.
Nice progress 🙂 About the wash,in my opinion it needs a little wash to bring out the panel lines.
Hi Bill, pls excuse my late participation.
I like the paintjob on your Lightning. Blue and Aluminium are the perfect option! I prefere this option absolutly. Cool!
About your questions, I would like to commend.
As I`ve painted the Alclad on my Lightning, and applied the decals I sprayed then a layer of future wax (thinned with alcohol) over the entire model. This acrylic coat preserves the Alclad colour. I mixed Burnt Umber 80 % and Black 20% from oil colours (thinned with "Humbrol" thinner ).
If I made a wash I let run the thinned colour into the panellines and if I was ready with a wingsurface for exsample, I began to whipe the wash with a cotton cloth in airstream direction. Have in mind that I brushed a small amount of clean Humbrol thinner on the cloth. Diectly on the leading edge. I do not recommend the general method to smear the complete modelsurface with wash. You will loose the control of a selective weathering!
But this is only one way of many options😉
Greetz
Dirk
Thanks guys! Since this is the first time I've used Alclad, I'm wondering about the use of decal solvents. On the Alclad website, they say it's OK as long as I use nothing stronger than MicroSet (the blue bottle). Has anyone tried this?
I also have a bottle of the new Alclad Aqua Clear Gloss, which others have recommended as an overall varnish. Does anyone have experience with this product?
I used Alclad Aqua Gloss Clear for the first time yesterday. You have to spray it at a high pressure, I used around 35 psi, and spray a few light-to-medium coats, not a heavy one. As the light coats build up, the finish looks very good, and does not detract from the metallic sheen at all. It did "shine up" the Dull Aluminum, however, but it still looks the part. I added some decals (wing walks, belly tank stripes) and found no concerns with using Micro-Set or Micro-Sol.
The Aqua Gloss Clear is milky white in the bottle, but dries crystal clear. Plus, and I found this interesting, you do not shake or stir it prior to application. And, of course, no thinning is required, just shoot from the bottle. Very interesting stuff, indeed. I liked it using it a lot!
Alclad says you can also use it as a primer prior to spraying the metal colors, and I'll give that a try later. It seems counter intuitive to me, as you wouldn't normally spray lacquer over a water-based primer. They also recommend it for use as a clear gloss over flat paints, just like we would use Future/Klear. You can also dip canopies in it (haven't tried that yet.) It's a lot more expensive than Future, but I don't mind supporting Tony and his Alclad operation. He's done a lot for the hobby!
If you give Aqua Gloss Clear a try, the advice is to immediately clean your airbrush with water. Apparently if this stuff dries in your airbrush or color cup, it can be fun trying to remove it! Although I would think that some ammonia-based glass cleaner would loosen it, but then I'm not a chemist!
Usually ammonia is suitable for softening/dissolving acrylic-based paint coats, including Future.
Hello Scalemates! Added two photos to my Lightning album today. First, a picture showing all the crazy transfers that have to go on, and the second shows the model after the decals have been added. I think she's looking pretty good, next up is a whole lot of fiddly bits!
Hi Guido, I'm going to try a dark grey panel wash tomorrow, we'll see if the panel lines are deep enough. I guess the answer to your question will depend on what the lines are like to begin with. There would be no problem with deeper lines, but I suspect some that are very fine, like Hasegawa, may need to be deepened first. I've had that problem before with Future, and this new Alclad Aqua Clear seems to go down thinner than Future does.
Being UK many times I use to try to buy it [Airfix 1/48 scale] on e-bay but always someone pay more than me.
Hi Bill, It looks great with the decals on, keep the pic's comming, greetz Phil
Marek, Airfix have re-released the 1:48 Lightning F.2A/F.6. No need to try and buy off e-Bay. You can now get it at any hobby shop! Also, Academy listed a 1:72 Lightning F.2A/F.6 kit for release later in 2012.
Bill there is a little problem, two years ago I'm back to Poland from UK. At the moment I have 17 models in stock waiting for making.
Yes Bill 17 usually I got 2-3 models queuing, one in progress, second as a "free time filler" [when something going wrong with the first one] and third waiting for his time. Now on my table is Sea King HAR3 RAF Rescue, and Harrier is free time filler.
[img1] [img2] [img3] [img4] [img5] [img6]
Hi Marek, wow that is quite a nice job you're doing on the Sea King. Super detail!
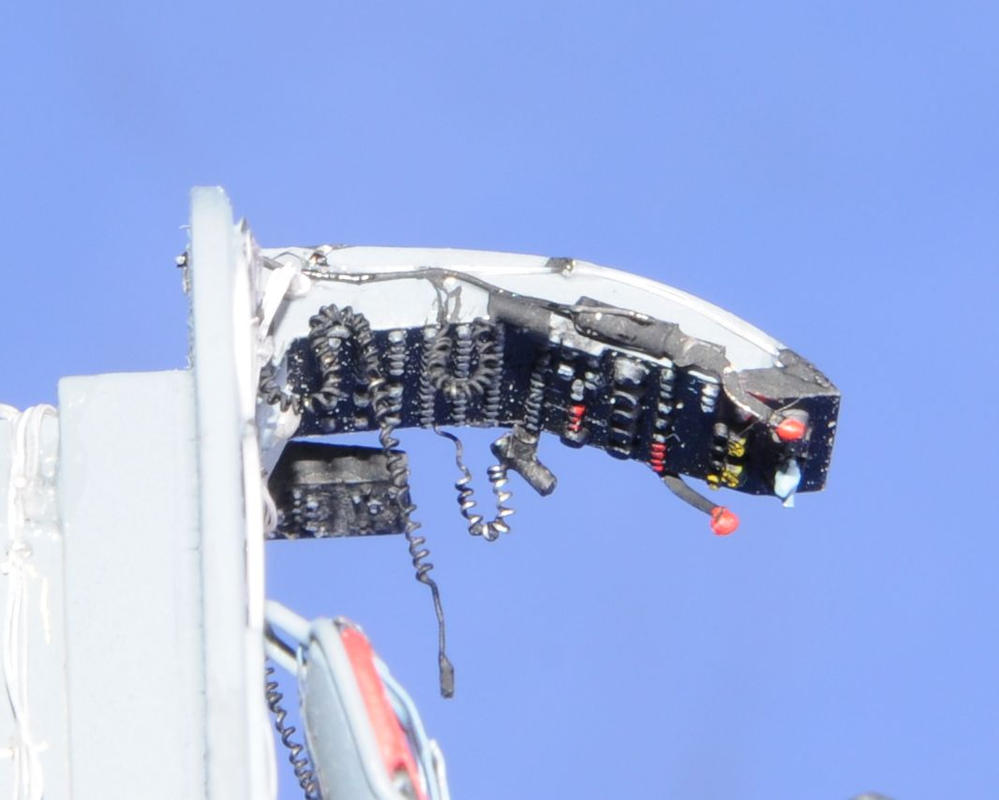
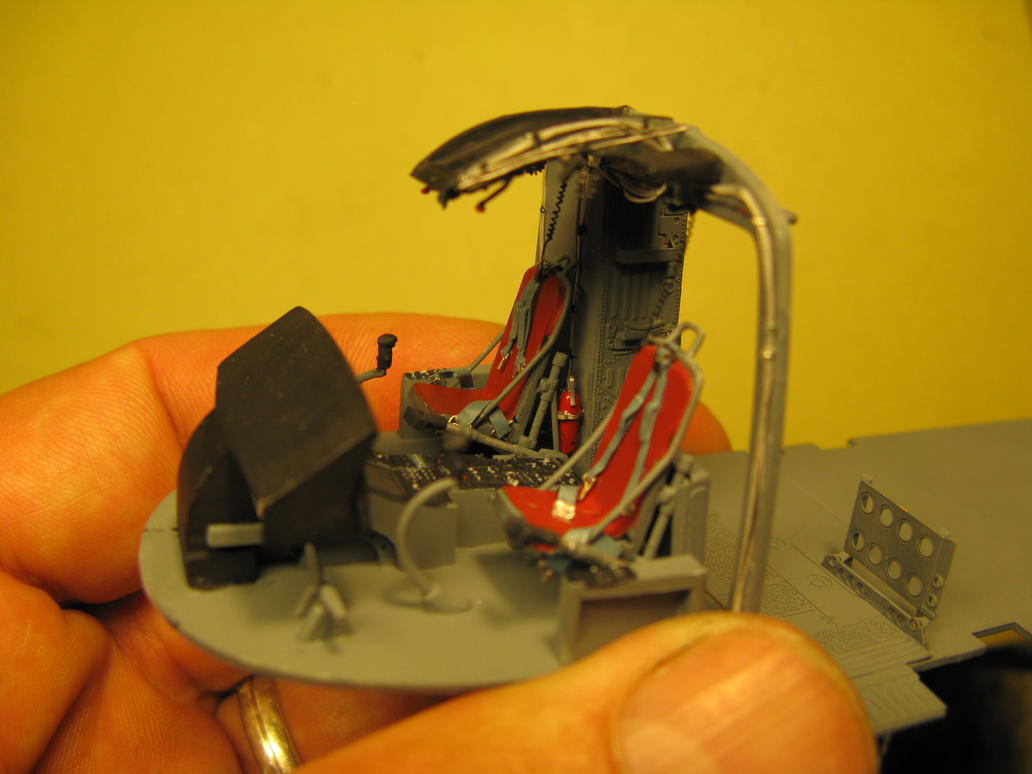
Hello Scalemates, I've added some more photos of my Lightning project. I did a panel wash with a medium grey color, added the anti-glare panel, added the HUD combiner, added the whip antennae (then changed my mind and took them off because they were too big), made an inflight refuleing probe using parts from both Trumpeter and Matchbox, and added a bunch of photoetch here and there. I painted and finished detailing the Aires resin bang seat with Eduard belts. Enjoy - this puppy is almost done!
Hi Bill,
the wash is perfect! Be proud of the result. And hey, let`s drink the beer together! 🙂
Waaaaw very nice colour combination! Great work Bill! My avatar looks perfect on natural metal😉
Hello Scalemates! My Lightning model is finished and I've posted 20 new photos. I hope you like it! Cheers, Bill
hey Bill, fantastic result you achieved! love it, it was also great to see your progress here on scalemates!
Thanks, Tim! It was a frustrating but fun project! I think the end result justifies all the time and $$ I spent on it! Cheers, Bill
Beautiful model Bill, I love it! I like the slightly off-set position of the nosewheel, very subtle but it adds a lot of interest
Great job Bill, I love it, wow, it' a great result that lightning, it' deffently word the money, greetz Phil
This is the first time I used a "soft box" for the pictures - it's a cube roughly one meter per side made of white diffusing material. The model goes inside (along with the paper that it's sitting on) and you illuminate through the side and top of the cube. The light is very diffuse and the shadows are very soft. The light was two 80 watt compact daylight fluorescent lamps (400W incadescent equivalent). I shot all the pictures at f/8 and ISO 200 (aperture priority selection). Good depth of field, and great color rendition. I did not have to adjust the color at all on the computer. I set the white balance to daylight and the colors looked perfect every time!
Is it a cube like this?
modellversium.de/tip..-fotografie/64-.html
Super result of one of the most noteable 60 years jets! One time I will listen her sound ! 🙂
Your Lightning is now a realy lightning model! Fotos are great!
Dirk
Hi Holger, yes the cube is very similar to that. I think the big advantage is the very bright lights I used. The two lamps are the equivalent of 800 total watts of incadescent light - they're bright! This means very short exposures at a high f/number. My camera only goes to f/8, so if I got a "real" camera I think it could be even better.
Hey Bill, one question, please! How have you realised the yellow line on the canopy? Did you use a old decal or something similar?
I have two 27W daylight flourescent lamps illuminating my workbench, cost like 20 Euros each in a superstore last year. Makes life much easier when handling tiny bits or working surface detail.
20euro is a very good offer. I never find some, even after hard seekings!
Hi Holger, the yellow stripe is a decal from the Trumpeter kit. However, when applied, it broke into several sections and I had to paint over the top of it to make it look complete again. I used a 10/0 brush and Gunze Cream Yellow to patch it up.
The surgery was absolute succesful! It looks perfect! Thanks for explaining😢
Thanks, guys! This was a rewarding project. When you finish a project like this, you get more satisfaction than just assembling a shake and bake kit. Don't you think?
Of course Bill, now you can say: This model is unique! And not one of thousands!
I really love the smooth finish of the silver color! Maybe I should dare to give them a try, but I am a bit overwhelmed of the variety of colors. Anyway - great job, especially in discovering Trumpeters mistakes!
Thank you! This was the first time I ever used Alclad! It is very easy to use, so do not be worried to try them. Plus, you can mask over them unlike some of the other metal paints like Testors Metalizer or Gunze Mr. Metal Color. Don't worry about all of the different colors, you can just use Aluminum for your first plane. The important thing is to follow their directions. Use one of the primers they recommend and make sure the surface is smooth (glossy) before painting the Alclad. I used their grey primer, and then Micro-Mesh to smooth the surface. I also used their Aqua Clear Gloss over the top of the metal coat, and it did not change the appearance of the surface (like some metallic "sealers" do). I love the stuff and can't wait for my next opportunity to use it!
Album info
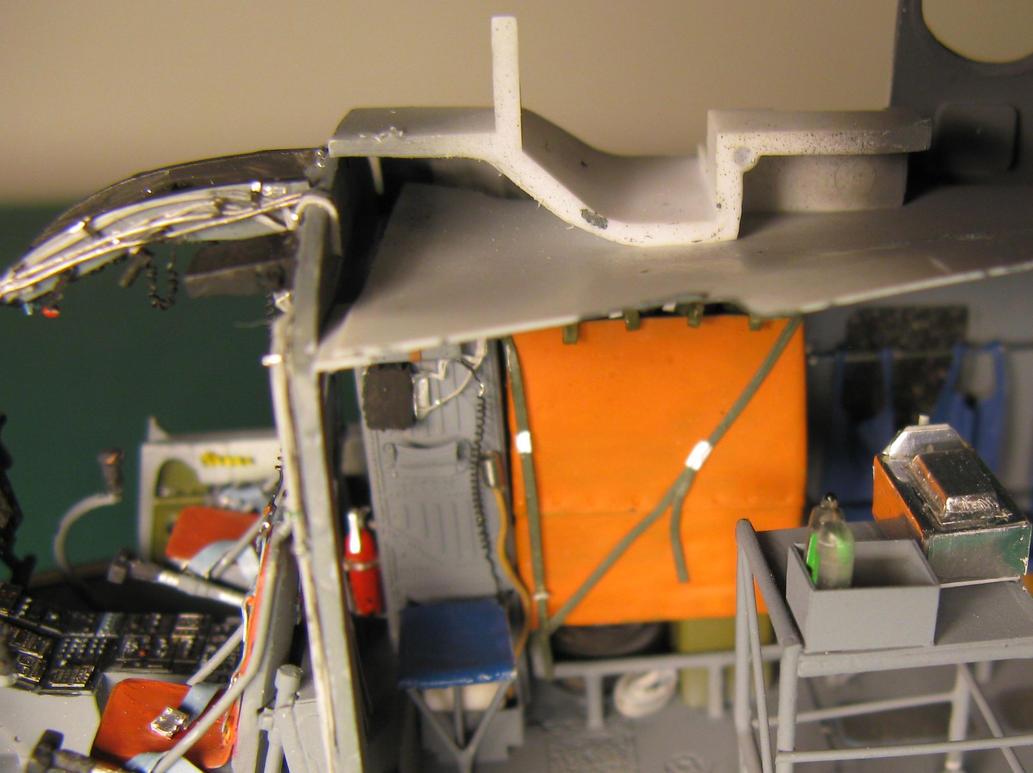
The Trumpeter kit has several faults which I'll attempt to fix in this build with the help of accessories from Aires, Quickboost, Eduard, Xtradecal, and Heritage. I'll be finishing with the colourful markings from 92 Squadron based in Germany in 1970. The rear section of the fuselage is too "pinched," and the exhaust nozzles are too small. These will be fixed with the Quickboost resin. The belly tank is too large and bulbous looking so it will be replaced. I'm also adding an Aires resin cockpit and bang seat. Enjoy the WIP pictures along the way and give me a nudge every now and then to get back to work.
I decided to use the belly tank from an old Matchbox kit, as it seems to be the most accurately shaped available. I also decided that I need to fix the oversized APU exhaust on the side of the rear fuselage. I don't know what Trumpeter was doing when they designed that part of the kit!


