
Tråd startet av slavatarko
la til et nytt fotoalbum


2 10 July 2019, 15:38
I see that the Aardvark has landed. Can't wait to see what you do with this kit.
10 July 2019, 15:49
It´s on my table 👍 Only managed a basic inspection of parts yet... nice!
The title pic is what I will be going for - in flight, folded wings, gray finish, possibly the Boneyard Wrangler himself if I manage to sort the tail art...
That means that lots of the best aspects of the kit will never get the chance to shine & I need to get the max out of the surface finish, engines & intakes... last 2 being somewhat of a trouble-spot in terms of accurate depiction of the original...
I´m waiting for some Eduard PE´s but I think I will only use the engine set for this one. Also have to get 2 Aussie pilots in 48-scale somehow.
10 July 2019, 15:51
Gentlement, take your seats, Earl Grey tea will be served at 5´o clock daily, other beverages according to general demand😉
Finished my box inspections and I have my highs and lows with it, more on that later. But it´s a great start for something... But man has Hobby Boss made some progress over the years. This is a journey back from the Fullback, the origin genes are visible in the F-111, but there has been some evolution since...
I started with the wing assembly, not because I want to be disruptive at all costs, but I am waiting for Eduard PE´s and will decide on the cockpit when these arrive and the folded wing is a major topic in this build. It´s not a big deal, fortunately - there even are pins for the folded position, although the flaps and slats will require minor polishes to fully fit closed - the dry-fit test in the picture.
Most important event of the day however: Mail from Australia arrived, courtesy of Mr. Michael Hickey! Aussie decals in their full glory, thank you very much sir! 👍 👍 👍
11 July 2019, 06:12
Follwing with great interest Slavo! Sure there will be a lot to learn by watching your progress👍
11 July 2019, 10:56
Greetings & welcome aboard!
@wilky - the Earl Grey may be mandatory...😉
@ Hans - group build with 3 started, 4th starting in the next few days - rounding up to 5 would be nice!
- the cockpit actually does not stress me all too much, it will be a closed canopy, in-flight piece with 2 dudes obstructing much of what could be seen inside anyway, the visible spectrum should be easy to detail. But an open cockpit would be a different story totally...
- my areas of concern are:
A; the engine nozzle assembly, where I may have come up with a solution idea, which I would be more than happy to discuss with you and any other knowledgeable mates soon
B; the intakes , where I do not have a really clear solution (the DMold set not really an option, they are a continent away & online store is offline until AUG apparently...)
11 July 2019, 10:56
The decals were a generous gift from Michael. Plenty to choose from. ! 😉
11 July 2019, 11:41
Well, I am not changing the dimensions of the wings 🙂 I ordered the FB-111 to have a G-version, if that´s wrong, it stays that way...
The question is what version the result now should be - pls. help/confirm me the following:
111C: short wing + tripple plow I intake
111G: long wing + tripple plow II intake
+ what about the GPS antenna in front of the cockpit? I guess none on the C, but OK on the G?
The TP I intake is easier to build with OOB parts, so if my wings are short, I may as well declare this a "C", and apply respective decals... Better than a hybrid with scratch TP II conversion and short wings that definitely did not fly 🙂
11 July 2019, 11:58
WINGS: My understanding is that both the Aussie C & G variants have the longer wing Like the US FB-111A.
INTAKES: C variants should have Triple Plow I with hydraulically translated cowl. G variants have Triple Plow II with 3 blow in doors on the cowl.
GPS: My understanding is that the bump in front of the cockpit was on the G model and not the C.
11 July 2019, 12:52
I also got to the conclusion in the meantime that both C and G had long wings, but so supposedly did the FB-111A from the beginning:
Sources:
1; f-111.net: "The FB-111A, F-111B and F-111C featured wingspans extended by seven feet."
2; basic wiki (yeah I know...): "The FB-111A featured longer F-111B wings..."
I also did not find any source on a wing replacement/modification when FB-111A´s went to become "111G´s" and it´s hard to imagine such a thing would be reasonable, so I tend to believe FB-111A = F-111G on the outside...
The strengthened landing gear & co is of no consequence for my build, the areas I do not want to mess-up are the wing-inlet-outer visible equipment combination...
11 July 2019, 13:19
Woohoo! My source was World Airpower Journal Volume 14.
Slavo did you find any conclusions about the HB kit wing span?
11 July 2019, 15:15
Still in the office... driving home to do some measurements & man-math... I´m not with my model when it most needs me... 😮
11 July 2019, 16:06
Measuring the span at fixed full extension only showed that the scale-multiplied result (20,9m) is too large for any version, so either I can´t take measures, or the angle is too swept forward, or this kit is not 1:48... I can live with any of these options, but I really want to know what´s on my table...
Thus followed the final check with silhouettes, F-111A shape vs F-111C/G shape vs model and a sigh of relief... everything fine, this is the long-wing version. Well done Hobby Boss! 👍
11 July 2019, 19:13
Nice! The title photo looks like "beast mode engaged" 👍 I'll take a seat in the back, sip on my earl grey awaiting the "max out of the surface finish" part 🙂
11 July 2019, 21:07
Well, if nobody has any objections about another Pig joining the group build I'd like to join in as well. I'll build my 1/48 HobbyBoss F-111C, Aussie version. My Grief needs a break at this point now anyway.🙂
12 July 2019, 02:39
Come right along Michael, all pig herders welcome. 🙂 👍
Th grief you mention. Not too serious I hope mate. 🙁
12 July 2019, 04:39
No nothing to worry about just a lot of resin and making the DB606 engine is about as much fun for me as it was for the Germans, at least mine doesn't have to run only to catch on fire because basically the props spinning to fast creating so much heat it starts melting and heating flammable materials.
12 July 2019, 04:49
2 new groupbuilders added to header 🙂 1 more coming soon - the Aardvark summer outbreak is unstoppable!
12 July 2019, 05:16
Really cool GB idea. Sadly I haven't time for a GB at the moment....
Good luck guys! 🙂
12 July 2019, 06:22
Vark Vark... All i hear is Vark! 😄 Very interesting to see the different lenght of the wings. I never detected that. Its Pig-time, Baby! 😄
12 July 2019, 06:24
@wilky
That was for the B version which was only build 7 times.
Here is a good comparsion between the versions:
f-111.net/ext_diff.htm
12 July 2019, 06:55
@Hans - Group build within a group build... This starts to take on "Inception" style characteristics😉
12 July 2019, 10:10
Since I am basically turning my back to all the good stuff & details the kit offers by doing the in-flight, the Engines are basically the last remaining detail area to go after - hence I wanted to put some affection into them. At the same time, it is not the strongest asset of the OOB kit. Put mildly... Very, very mildly...
The Eduard PE (arriving here shortly) set does a good job of fixing some key areas, but it decides to go along with a key error of the kit - there are 6, not 5 rear nozzle connections on the real plane. Thanks to Nathan Dempsey for passing this warning well ahead - finding it out mid construction could have triggered a serious kit-builder relationship crisis...
The other issue is that the kit basically leaves out the actual variable nozzle completely...
There is an aftermarket kit solving BOTH these issues - if you can get your hands on it, lucky you! 🙂
F-111 Afterburner Cans (OzMods OZCONV4812/S, 1:48)
")
I decided to try the following path:
- scratch-build ideas to go from 5 to 6 discarded. Could as well bail out of the group build. We´ll take 5. I CAN live with that...
- I will however try to merge the kit with an F-14A engine to get the actual variable nozzle on board - parts ordered, we´ll see whether they can be married to the main kit...
I wanted to post this & a couple of pics collected during research since the group is at work looking great & this seems to me important enough a topic to share... Australian mates & anyone with further info, please let me know if there is more know how to share or if I have anything wrong so I can correct!
12 July 2019, 10:29
@Hans & Nozzle bother - I feel guilty because of the 5/6 topic... I'm making both open, there is still a nice inner structure of the variable nozzle + further engine interior "tube" structure which should be usable in all cases & be visible... Worst case I end up with a nice start for a Tamiya Tomcat, another thing I CAN live with😉
As said, only techie-detail of the build...😉 If I would be doing the LG, open cockpit, spread wings, flaps & slats + ordnance, things & focus would be different...
12 July 2019, 10:32
The only thing that ever bothered me about the HB exhausts was the inner support structure. The HB has only 5 but it should be 6. Check this pic from another build showing them and the Ozmods ones:
[img1]
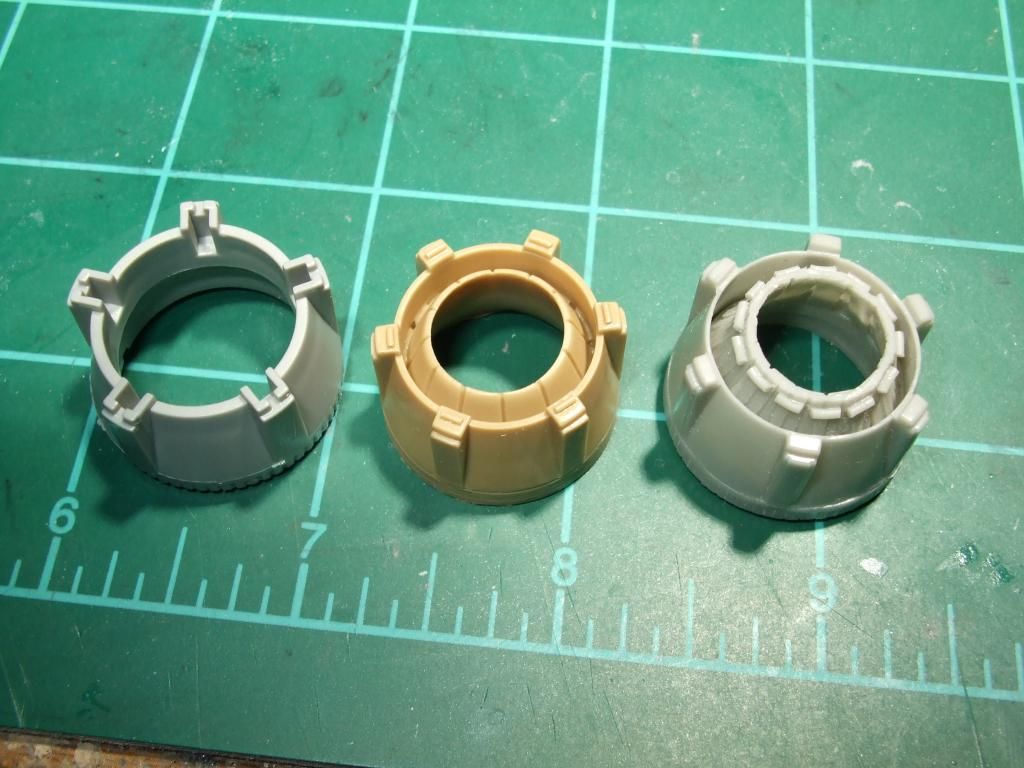
Since yours isnt parked on the ground I wouldn't worry about all that other detail or open/closed nozzle option. I have a spare set of correct rings if you need them.
12 July 2019, 11:17
Aaaalright, alright...! All the rambling that I can live with it, turns out I can´t... 😄
Thanks a lot for the tips and offers, it was the nudge I needed... Spending 35-56$ shipping for a little resin from redroo doesn´t seem right (but the site is cool, maybe for a mass order later...) and it would likely mean see you on Christmas for the time-frame of this build.
Nathan, I really appreciate the offer, sincere thanks, but keep them for "Raven time", that will surely come.
I´ll try something... I got some ideas... 😉
Youtube Video

12 July 2019, 11:40
@Hans - circling around this topic the whole day allready 😄 (got a day-off, usually not stalking here so much...)
And Eduard went with it! providing the metal caps for 5, instead of making a proper fix to 6...! Dastardly...
12 July 2019, 12:14
Something a little disturbing about that, he could have been talking about me, now that my 2 girls don't live with me anymore.🤔
12 July 2019, 12:17
No problemo Slavo. I still have the spare Academy set of rings since the F model I'm collecting parts for already has its resin replacement set. Any Vark builders need them just give me a ring.
12 July 2019, 12:45
Anybody checked this out on Hyperscale...
clubhyper.com/reference/f111indetailjr_1.htm
There's 9 sections that are very useful to us here building the Vark. If you go to the bottom of the article you can click on Reference Library and scroll down to find lots of useful info on a variety of subjects.
13 July 2019, 01:28
I see all those articles ate written by Jim Rotramel. I understand that if he doesn't know something about the F-111 it isnt worth knowing.
13 July 2019, 03:42
Thanks Michael for sharing the link! Jim Rotramel has been my guide over the past few days, I should give a toast for all the great and well sorted info he provided!
I think I now have the engine modding under control, first experimental pics maybe later today...
But the TP II intake I need to create for the G version remains a concern. The kit does provide the blow doors alternative, but the spike is too short and there is just empty space in the fuselage between the inlet and the engine fans...
On the plus side, the rest of the model is a pleasure to work with!
13 July 2019, 06:33
I have the same problem with my TP II intakes, but I'm just going to live with it.🤔
13 July 2019, 11:54
I thought about detaching the spike and moving it a little forward, but that is just wrong and compromises the proportions, since its the outer part that is longer for TP II... It's just some 5-6mm that need to be added, now I'm thinking about cutting off the front, gluing in some length of sprue (i.e. the outer rims that hold the wing parts, these are thick enough) and take it from there with some sanding & filling. Will post pics if it ever happens 🙂
But this is all due to the fact that I am closing all bays & leaving out all weapons, so engine & intakes are the few last details to look at - in the "all open" version which you do, there are much more entertaining options where to put some care than this IMO.
13 July 2019, 12:39
Mystery solved then! 🙂 👍 Thanks Hans, good job on helping to clarify this!
13 July 2019, 15:49
I've got an Xtraparts set that is for the F. Definitely has those slimmer style exhaust mounts, which is a big help for the Academy kit, but doesn't solve the parked (one open one closed) situation. This plane can basically be a black hole for corrections, some of which aren't worth the trouble IMO. My focus has been cockpit/intakes/exhaust, and my personal need to always update the tires. I may talk myself into the wheel wells by the time I do an Ozmods order...
I'm happy to see all those detail shots and info being shared. A huge help! Also very interesting.
13 July 2019, 17:25
Along with the interesting nozzle discussion, I worked a little on the kit too...
I decided to convert the Hobby Boss parts - I needed the connections hollow, since I want to apply the rods that connect to the variable nozzles inside. These will be applied next week, when the Tomcat engines arrive (I hope...) For now I did one nozzle, the other should be easy, finding out the solution was the best part of the fun... 🙂 The outside of the connections will be covered with metal sheet later to look as it should...
I really hope the Aires parts will fit. Thanks Nathan & Michael for the nudge at the right moment when I almost accepted to go with 5... Hans, really cool feedback & group work on the topic, hope for more of the same as we progress!
13 July 2019, 21:53
No shame to be dealt here - I will have an easy time with the variables & inside of the tube, you played creative there - 2 approaches, 2 results, both doing their job to the builders satisfaction! And how many HB Varks are out there with 6 supports and variable nozzles inside in the first place?😉
13 July 2019, 22:00
If this turns out anything like the SU-34, it will be a masterpiece. Does anyone know if anyone makes replacement nozzels for the Acadmey FB-111A kit.
13 July 2019, 22:42
If it is OK with all, I'm in. I just ordered the OZ Mods correct boat tail/fuel dump and wing pylons. The OZ Mods correct long range fuel tanks and wheels. I still need to get a vacuform canopy, The Acadmey one stinks. LOL.
14 July 2019, 00:46
Nice info Hans, Cliffy, I don't think there is an end date or at least I haven't heard it. Plus last night I was on the phone to one of my very reliable mates and he told me that back in the day when the Aussie F-111 was still flying he walked around the Pigs at R.A.A.F Base Amberley and took a lot of happy snaps. He told me that most if not all F-111's parked had both engine nozzles open and he confirmed this by going through his photo albums from the time.
14 July 2019, 02:12
Wait....a 111 group build????? I clearly did not read this close enough...
14 July 2019, 02:17
The Vark group has the properties of a Black Hole - when you see it, it's too late to pull away... 😉
Version-wise we have C, E, 2xG and an FB-111A
A & D are still free, so is the Raven (I want to build one later), the what-if British K and, for the truly brave, the B NAVY prototype! 👍
In terms of "ending" - I am sure you can finish your current model, maybe build another one, then join and still be across the line before me... 😄
@Michael - interesting (& slightly confusing) info! Opens new possibilities for parked C&G's, although the closed/open variant should be legitimate, shown on so many pictures, explained on f-111.net: "The nozzle of the engine shut down first remained fully open, while the other partially closed as it lost hydraulic power before it could open again", and Kerry's Wrangler also this config:
The "Boneyard Wrangler" . | Album by RedRoo
I dispute nothing, more likely Aussie version builders have both options confirmed.
14 July 2019, 07:22
Is it just the light or have you painted the burner can in pink??? LOL
14 July 2019, 08:08
@ Holger - it's a Pig, it's bound to have some major areas in pink...😉
@ Hans - ok, all set up in the build description
14 July 2019, 08:47
Well, I took a look at my stash. I have two. The Monogram A and the Hobbycraft E. I checked the E and the engines are correct per the info given. It looks fairly decent detail wise, so I think I can manage something decent right out of the box. So, what the hell. Its not like my other stuff cant wait a little longer. LOL I will put up an album.
14 July 2019, 13:48
A warm welcome to Vark- build No.6, Mr. Donald Dickson II!
smokeriderdon
How much better can this get? 🙂
14 July 2019, 17:26
I have a F-111E, EF-111A and a F-111A that are already built. I hope I can do justice to my "E" model on this FB-111A. This one will defenitley have more aftermarket goodies.
15 July 2019, 03:17
Progress sluggish over the last days... :/
For TP I / TP II topics - text & pics in the following link should clarify Q´s about dimensions, distribution among versions & on ground/in flight positions of the cowl/blow doors:
f-111.net/models/inlets/index.htm
This source page is really great & not at all my discovery, thx again Nathan, Michael & Hans for providing many good technical inputs & clarifications.
Great close-ups of the TP II on a G version also here by Kerry Cox, including weathering & the radar-absorbing plates in TP II:
The "Boneyard Wrangler" . | Album by RedRoo
I started modding the kit intake into a TP II, will see where this journey goes. Eduard PE delivery also arrived today, and while it has some flaws, it still IMO adds greatly to the overall look & feel... The fit was manageable even with the thinned walls. Actual engine on order, due to arrive this week 🙂
16 July 2019, 20:02
It's no more only a nozzle but a piece of art🙂. Excellent research.
18 July 2019, 07:24
Thanks Bart, Cliffort, Nathan & Bernhard! Much valued praise, happy to have you on board mates! - now the engine assembly experiment is complete (on one engine, but the way was the goal, repeat should be easy...) The Aires F-14A set did, after all & a healthy round of modifications, do its job. Ready for the paint-job now! 🙂
18 July 2019, 07:47
Just be careful when installing the engine that all the add on gear dosen't restrict the upper half of the fuselage from seating properly. ! ( past experience says this. !
18 July 2019, 09:41
@Kerry - you can bet on it it does not fit 😄 but the issue is on the lower fuselage and a few well placed hobby-knife cuts & scrapes will dispatch the resistance back where it belongs!
@Daniel - I can´t wait too, that´s the reason everything takes so long in my builds - the sheer lack of discipline and part groups utilization...
@ Michael - one more mod challenge on the intake, then the major conversions should be done... Time to look at the actual model😉
18 July 2019, 11:15
The actual model is just a lot of fun to build. But if all the brass added is of some consequence and proves anything, then, so be it.
'Out of the box'. Says it all for me. !
18 July 2019, 13:39
<insert confused look here> says the man that dumped a metric ton of brass into a P-51...
18 July 2019, 14:43
I do this since a friend gave me a nudge to return to the hobby and now it gives me a surprisingly good compensation to all the stress & crazy stuff from work & co...
I like the way the F-111 engine is built with the nozzle structure, the more I dove into it, the more I liked, so I made myself a party on the table with kit, resin & brass and it gives me all the fun I hoped for so far... That´s all it proves😉 Nothing more, just a bloke at a table enjoying messing up small bits & pieces...
18 July 2019, 15:25
It like the SU-34 just keeps getting better. I am wondering if I can adapt the Hobby Boss exhausht PE to the Academy kit.
18 July 2019, 21:23
Thanks mates, nice to see that the "island of tranquility" concept of the hobby is a shared affair 🙂 I started painting & some cockpit works, but not worth a picture yet...
Clifford I think they should be adaptable - Hans in his build replaced parts of the HB nozzles with Academy bits and they appeared interchangeable, so the dimensions should be matching enough. You'll find PE's for only 5 supports instead of the correct 6, but you can just leave one of the inside 2 out, no big deal...
18 July 2019, 21:31
Got the engine experiment finished! Every added piece seems to doits job and is visible at least from some perspective and in a certain light...
I wanted the inside of the rear nozzle lighter, but I messed in too many oils... Overall still quite an enjoyable time blending stuff together, I am really happy the AIRES F-14 led-lease deal worked.
Now to... something else, probably the cockpit... 🙂
20 July 2019, 17:07
Thanks Bernhard , Hans, Urban, Maciej and Chris!
Hans, that is no longer a model, that's an educational tool 😄 Looks great though, particularly the inside of the rear nozzle... Much better than the slightly agricultural-looking ribbed structure we have on our kits😉 Good the 111 has so many versions to take on...
Chris, true, good I need not to take on something more "tire"some😉
20 July 2019, 18:23
I'll let you guys know what its like, ordered one yesturday so fingers crossed 😄
20 July 2019, 19:06
It is almost a science to get the exhausts and nozzles exactly like that, but you do a fantastic job Slavo ... 👍
20 July 2019, 22:08
Question: Why did you guys decide on the F-111 for a group build? Is it a favorite plane or some other reason? Or was it just a plane that everyone had on their stash shelf?
21 July 2019, 02:43
Thanks mates, I'm really happy you like my take on the rear end of the Vark - there range of options is rather open with almost all black through brown-ish to very metallic, this is just my interpretation & compilation of things I like...
My progress is generally sluggish, but this somehow gives me the most fun...
@Chris: answered in Donald's thread: 🙂
smokeriderdon
21 July 2019, 06:33
What colors did you use to get that nozzle to look like that. LOL.
22 July 2019, 01:29
Thanks Bart, Patrick, Nathan & Daniel - I am glad you like it!
Clifford - I used MRP metallic colors - Burnt Iron as a base, then put streaks of different other metals into it with a semi-dry brush (early on, new layers dissolve the layer below a bit, nice effect...). The rest was fiddling with oils, black & dark brown and a final drybrush with titanium on some sections... the inside more brown & red brown oils, with occasional burned metal and violet, which are visible only at angles I did not manage to photograph... Lots of fun and experimentation 🙂
22 July 2019, 05:47
Progress very, very slow, even by my standards... Cockipt now +/- finished...
Eduard PE set applied with some easy mods to make it more "3D" and re-coloring of the main instrument panel, the bluish color of the PE´s did not match any "G" pictures I happened to find...
I had some hi´s & lows with it but now it´s here... I wanted it to look like it has "been in the wars" - end of career, wind-battered veteran look 🙂 Plus the fact that it will be closed called for some more pronounced effects... I think... Anyway, this is it, incl. preview of final appearance with Pilot & canopy.
25 July 2019, 19:01
the 3-D effect is very nice, I didnt recognize that its PE at first. Those Seats could also be in a space ship 🙂
25 July 2019, 19:44
Thanks Augie, Jos, Daniel, Roland & Bart! I am really very happy to hear you like it!
Q: So far I found Australian Vark pilots sporting +/- only dull grey helmets - is that the sad reality or does anyone know about any legitimate alternatives?
25 July 2019, 20:16
Damn good work on the nozzles 👍👍 And the clear part on the last pic looks really like glass! 👍 And good to know, that the MRP metallics are nice. I used Alclad until know, but have now also MRP graphite metallic in stash (not yet used).
25 July 2019, 20:24
This is amazing work, again Slavo! I love watching your build diaries, you are so thorough in explanation and the work is top notch, always. I only wish I had the skill and patience to do some of the detail and scratchwork you accomplish.
Oh, and that canopy is frickin' CRYSTAL CLEAR! Did you polish it?
25 July 2019, 20:35
I agree, that canopy is so perfectly clear! Cockpit is looking great too 🙂
26 July 2019, 00:06
Thanks mates, your kind words really mean a lot! Will try to keep you entertained...
@Michael - I'd rather say you are the benchmark for what can be made with knowledge & skill in the field of modern aviation. Lot of inspiration in my work coming from your corner😉 Very much looking forward to the Tomcat kick-off!
@Canopy - I guess I pulled a jackpot sprue from Hobby Boss - the parts were flawless, just gave them one round of fine polish with Tamiya wax to check what will be visible when done... The alternative open-canopy panels came unusable though, with a deformation & twisted glass right in the middle...
@Bughunter/MRP - I can only confirm they are a joy to work with on smaller & multi-shade objects like the engines. Have not tried anything larger/polished, but I want to try at some point.
26 July 2019, 05:45
Thanks Stephan and James!
I did not manage to completely finish it over the weekend, but at least the pilots are done... Coming from a Hasegawa USAF crew set, they required some work, but the plastic was easy to shape so it went +/- smoothly... I lost a lot of skill since I last did figures (WH40K stuff), at least I hope I got the shoulder flags right for RAAF... 🙂
29 July 2019, 06:32
Do you have room for one more? 🙂
#23 F-111A Aardvark | Project by Floppar (1:48)
29 July 2019, 06:39
There´s room aplenty 🙂 This would be build Nr.12 then!
Pls. also register here when you start:
Scalemates Varkfest Group build 2019 (0., )
29 July 2019, 06:41
Brillant stuff Slavo..Really impressing detailwork.. The Nozzles are just exceptional well done.. wow👍
29 July 2019, 07:30
Everyone's talking about nozzles. I'm going to need to study this one carefully for mine...
29 July 2019, 07:42
Damn you are good!
How does one actually register? I couldnt find a register button or the like.
29 July 2019, 11:25
I think you still have the 40K touch Slavo, because the figures look great. Overall the cockpit looks great. I like that you managed some print on the survival kit.
29 July 2019, 11:49
Thanks Kerry, Daniel, Greg, Donald, Soeren & Nathan! The nozzles were more like a "moderated dialogue" with different color types than a 100% targeted result, to be absolutely honest - but really a lot of fun...
Kerry, I fail to completely understand your post...😉
Nathan, I am happy to see the print on the kit got noticed! - there was no specific decal for it, so the text is actually somewhat of an easter-egg, but it´s barely - if at all - readable once behind the canopy glass... 🙂
29 July 2019, 13:08
Looking good Slavo! I had to laugh at your co-pilot...I looks like he's searching for keys to start the jet! LOL
29 July 2019, 13:09
You must be able to read braille then Slavo. ! hehehehe🙂
I started out commenting on the crew and I was wondering about how many sets of throttles were in the cockpit, so I did some visual checks to find out there are two. And now I know why the pilot has his hand reaching out to the left. ! 😉
A very convincing build mate. 👍 :-0
29 July 2019, 13:15
@Kerry - I guess to manage all the sound & fun the Pig can produce, you need a full set of throttles & two DJ´s to synchronize the bass...😉
@Tim - you mentioned the topic, so I have to reveal the truth.... It´s not the keys...😉😉
29 July 2019, 13:47
Ok... attending the event... this is super cool. I didn't know we could do this on Scalemates...
29 July 2019, 14:02
That is an awesome looking pit and of course build 😉! It's cool to watch every single step how the bird grows and grows🙂!
29 July 2019, 18:08
Beautiful cockpit and crew figures. Hope I can do my crew figures the justice you have done yours.
29 July 2019, 20:30
Thanks mates, glad you like the flight deck & cabin crew 🙂
Clifford I have no doubts you'll handle your crews just as well - IMHO it's about planning the small details - a shiny bit or a little contrast here & there to guide the eye, I think here the belts and buckles are the deception, masking 2 fairly dull "green men" behind them😉
29 July 2019, 20:58
Yes, Eduard PE, slightly modified from the intended empty-cockpit config (for which the set is really nice!) - washed over a bit since they had the typical too sharp contrast in the print. Would blend them even more for open-air use, but in the closed cockpit this should look just fine. I used up about half the pieces from the PE sheet, got a few leftovers now for future experiments 🙂
29 July 2019, 21:24
Wow, look who it is! Choppa! Long time no see.
Soren, thank you sir. I saw that but it looked like a dead button.
Slavo, I like the use of the PE over the pilots. Not sure why that never occurred to me, but I am gonna give it a go sometime.
29 July 2019, 22:21
This issue would never happen to me 😛 I always know where a lighter is 😛 LOL!
30 July 2019, 04:00
Cheers Don and Clifford 🙂
and yeah, always good to have a plan B when it comes to ones accoutrements,
really these things should be on ones preflight check lists ! haha 😉 😄
30 July 2019, 10:53
Stash - Check.
Lighter - Check.
Backup Lighter - Check.
Chips - Check.
Cheetos - Uh...
Tower, THC-420. We're going to be delayed five mikes while my RIO gets the Cheetos.
Roger that, THC-420, delay of five for essentials. Tower out.
30 July 2019, 12:06
either that or it's going up in smoke !! 🙂
still though, the roll out was a blazing success !!😉 😄
is this what you might call a Joint Strike Force Fighter ?
"Green Leader to Firebird 1 you're cleared for a toot and shoot patrol" 😄 😄 😄
30 July 2019, 14:56
As the layers of smoke cleared and lifted their treacherous curtains from the modelers mind, I realized some serious work needs to get done too...
The wings then - as the cockpit suggest, I want to try to get that end-of-career, windswept, yet undefeated spirit into the aircraft look... this is my take on it - with 3 layers of greys & some salt seasoning, now ready for the wash... That should blend the pattern a final bit more, which I hope will be the result I want 🙂
31 July 2019, 09:05
Just how 'old' do you intend making your bird, as from what I saw before they were 'dumped' in the ground, the ground crews hated having unclean birds. And the reference images I posted of the 'Bone Yard Wrangler' showed very little in the way of being worn out or tired. The "Boneyard Wrangler" . | Album by RedRoo
31 July 2019, 10:39
Thanks Patrick!
No worries Kerry, I do not intend to make it an insult to the crews who took care of these beauties!😉
I hope to do a dumped/derelic/gutted airplane model at some point, but as Tom Cruise could lately be heard "Not this day..." 🙂
I checked your excellent Wrangler photo-shoot over & over in my preps & my idea is to capture some of the "bleaching" of the grey color on the most exposed surfaces, like the Wrangler pics 14, 16, 17 indicate. The topside and tail section seems to get most of this effect, that´s at least what I make out of your collections pic 7 & some other grey Pig pics like i.e. the one in my album... The nose will get some, but the fuselage & undersides should get successively less - to no fade, +/- as on your pics 26-28. Some dents & chipping on the slats (pics 76+) and a few dark streaks mostly on the top side should round up the experience... + not forgetting the shiny nose!😉
31 July 2019, 11:32
Till so far Slavo, you're doing an amazing job...I like your weathering technique on those wings...👍!
31 July 2019, 11:42
You have honoured a great lot of men with your words, and I fully understand what your intentions are from what you have said. 👍
Thank you for enlightening me and so far, from what you have posted, it will be an outstanding rendition of a most wonderful aircraft. 🙂
Cheers and happy painting. 👍
BTW, Did you notice in the images of the Wrangler, the streaking of light grey from the seams on some of the panels. ? Especially under the co-pilots window and the pilots window. ? That is a sealant that is used when panels are replaced that gets stripped out as the aircraft moves through the air at speed. ! In fact, there was a lot of this stuff all over the Wrangler that is there if you look hard at the images, and something that really surprised me when I saw how much there was.
31 July 2019, 12:10
Glad you brought it up Kerry because I too thought the wings look like the weathering you see on a F-14 Navy bird.🙁
31 July 2019, 13:03
Thanks mates for your inputs - It´s not job finished - I do have a couple of steps in the work pipeline that should all lead to a reduction & breakup of the effect seen now... or so I think...
Will try to iterate this so that first-hand witnesses will be satisfied!😉
31 July 2019, 13:29
Cockpit looks superb and very interesting! I agree that it now looks a bit too navy-esqe on the wings, but you can always fade it out if you wanted to, thats the good thing with weathering 🙂 I think this technique would look really amazing focused on the leading edges, forward parts of panels and the parts that are literally "windswept". Just my 0,02€ here, really looking forward to the incoming progress! 👍
31 July 2019, 17:44
Thanks Daniel, Stephan, Sergej!
I do have "a cunning plan" to finish the wings (and prototype the approach for the rest of the plane) - we'll see how you like it, should be done by tomorrow evening if things go fine...
@Hans - like in my title pic Vark, I want the spoilers to have slightly different shades - painting them separately is easier than provoking the tape gods😉
31 July 2019, 20:28
Just tried to purchase the Reskit set and it's out of stock.
So the Ozmods one it is then
31 July 2019, 21:16
Very nice Slavo! Looks like it is matching your cover photo. 🙂 I can definitely see it on the right wing.
1 August 2019, 11:46
So this is it - major works on the wings finished!
I blended the "NAVY effect" over with another 2 light layers, added an oil wash + only very light panel lining, leading edges & spoilers.
This is as close as it will get, I hope Australia can green-light this, otherwise accept my sincere apologies 🙂
Thanks for all the constructive comments & help so far, feel free to criticize - I definitely wanted some irregular fading effect and not just even grey - I know many Varks were clean, but there were at least some that had fading, slightly toned spoilers, etc... - maybe a different method would have been more true to the original, looking forward to your opinions!
On the plus side, I have not overdone the weathering and leaking... or so I hope!😉
1 August 2019, 11:52
Have you sourced the images of the birds that were eventually laid to rest (All at the US Govt's demands BTW. 🙁 ) ?
1 August 2019, 13:06
I´ve seen some pics & a video... They really made sure it´s over... 🙁 Afaik the issue was the G´s being converted from the FB-111 which was in turn a SAC nuclear bomber and fell under treaty conditions how it has to be disposed of - is that correct?
1 August 2019, 13:18
I'm beginning to think Slavo organized this Aardvark group build so he could mop the floor with the rest of us poor saps.... 🙂
1 August 2019, 14:57
Thanks Greg & Stephan,
@ Greg - that was indeed my original plan😉, but it went sour - now we have shining formation lights, working dump & burn flames (on hold, but mark my words, they will rise again, will they not, Michael?), engines pulled out of the fuselage, models older than me being wrestled into submission by their masters, all kinds of open-panel goodness and camo variety, Missile-hunted Vark with mirror re-scribed wings... All I got is glued plastic with some lacquer & oil paints smeared on it😉
1 August 2019, 17:18
The issue with the F-111 in the RAAF was the problem of the chemical used in the sealing of the fuel tanks.
Many RAAF personnel were suffering from cancers due to the chemical and are trying to get recognition and compensation for the adverse medical outcomes of exposure.
I was lead to believe years ago that even our C's were capable of delivering nukes
I remember in the eighties seeing a row of Hercules that we were unable to sell because every time we found a customer the US vetod it.
1 August 2019, 18:39
I often wondered why the US didn't want to buy the shells back from Australia if they were that worried about the technology falling into the adversary's hands, as we had to wait for so many years until they were finally delivered, all at a blow out cost. !
I do remember all the dramas about the ground crew and the sealant issues and the problems with the carcinogenic materials used. 🙁
The same shit will happen as the F-35 starts to run into fatigue issues. Oh well, that is defence for you.
1 August 2019, 21:29
I'm still impressed by that right wing matching the cover photo so well.
1 August 2019, 21:58
Thanks Daniel, Lode, Nathan & Clifford! I am really glad you like the results so far and am humbled by such high praise - will try not to disappoint as the project goes along! I quite like the cover-pic Vark so I took it as a lead, working with 2 different Greys seems to have done the trick...
wilky & Kerry - I think the US are fairly skilled in Arms-deals and in making their allies sign & pay the right conditions... Surely will be the case with the current F-35 deal too. I think the ritual burial was less for hiding the tech, more about making nuke-carriers absolutely unrecoverable to strike them from the list... I did not know about the cancer story, hope they at least treat them with proper care & compensation, it's the least that can be done now I suppose...
2 August 2019, 05:06
After Nathan's comment I had to check it again and yep.... he's absolutely right! That wing looks like an exact copy! Well done! 👍
2 August 2019, 14:40

Thanks Patrick, Nathan, Schnemat! 🙂
Now I run into a dilemma though - I tested the decals on a section hidden in the fuselage and without a gloss coat, there is no way to keep the silvering away... I hoped I will somehow get away without gloss-coating it, to keep the nice original irregular semi-gloss effect that MRP's + oils create as seen on pics 38-39... Seems I can forget that though... Or are there any secret tips & tricks?
3 August 2019, 09:10
What I tend to do is working with Daco decalsetting (strong version) and pressing the decals with a stiff flat brush. Also read about glycerine, but haven't tested that. It is all before the gloss/Matt coat...
3 August 2019, 09:24
I tested with Tamiya markfit strong - the decals I have are fairly delicate and tear & deform happily upon even a soft touch 🙂 thx for the tip, I'll get some chemical supplies & experiment in the future.
3 August 2019, 09:29
Slavo. There is a way to prevent the dreaded 'silvering'
It is a clear glue made in China that is used by mostly school children to glue paper together.
Water soluble and when mixed with a bit of the decal softener and spread over the area your decal will be set on before you place the decal in position, and it will create a barrier that will prevent the air from being trapped under the decal that is usually the cause of the 'silvering' .
It can be bought at ANY artists supply and craft shop. And all the decals that I have used this glue with have completely avoided any silvering that may have happened, including this current build of my F-111. All you see on my build is that I didn't use full matt when covering my decals, allowing the shiny surface of the decal to still be seen.
This is what the glue bottle looks like. [img1]

3 August 2019, 09:45
Thanks Kerry! I heard about the paper-glue method, did not try it myself yet - about time then!😉
3 August 2019, 10:04
Hans. It is better to plan avoiding the dreaded 'S' than try and resolve a problem later. 👍
Slavo, when using the glue, the % I use is 1% glue, 20% softener, that way, you can still squeeze out the excess from under the decal and it also gives you some 'slip' time, to get the decal into the correct position. 👍
Then once your happy with where you need the decal to be, remove as much of any excess without disturbing the decal too much then coat it with the 'set' solution and let dry, occasionally checking that all is good with how you expect all the chemicals to behave. 😉
After all, the glue that the decal is printed onto over the carrier paper is much the same as the glue you will be applying, but just a tad more. 👍
3 August 2019, 10:43
Interesting approach, I will keep that in mind when I happen to get the dreaded silvering! I just wonder if the decals arent standing out too much on the irregular paintjob without a unifying clear coat over them?
4 August 2019, 11:14
There will be more clear matt going over the top of these, as the first coat was to 'anchor' them in place and the final coat will eliminate that shiny look.
But in actual fact, the Aussie F-111's were satin in their finish.
4 August 2019, 11:16
ok, sounded like slavo didnt want any further clear coats at all, to keep the "irregular semi-gloss"
4 August 2019, 11:23
It´s going sort of OK at the moment, The Aussie Decals are super thin (great) and super fragile (...) the wole sheet has the translucent film layer on, so everything must be cut by hand... There are small angles that cannot be helped, you see the film then, but generally, the effect is fine when I pour layer upon layer of softener on them over half a day 🙂
4 August 2019, 12:36
Slavo, that was one of the issues I had with the 'Aussie' decals, the cutting right up to the paint line of the decal without creating any jagged or squared off angles that would allow the carrier film to tare.:-/
But looking extremely tidy and neat with what you have doine. 👍 👍 👍
4 August 2019, 13:44
It might be daunting and it does involve an unwanted gloss or flat coat but what you could do to get rid of the carrier film is to lightly gloss coat it and when dry sand the decals with 2000 grit. Then polish or respray to your liking and then.......find a solution for that mottled satin sheen...
4 August 2019, 15:16
Alclad II ALC 311 is a nice semi gloss. You could mottle that with a flatter clear.
4 August 2019, 15:18
It's interesting to watch on this group build to see this talent and skills each one has, even though they share the info, the diversity in each plane is amazing!
4 August 2019, 19:22
Love the idea of clear piece in cockpit for depth and gloss. Looks great
5 August 2019, 05:12
Thanks Kerry, Patrick, James, Stephan, Tim, Clifford, Michael & Scott!
Welcome Bryn!
Thanks for all the tips about decals - I'll check out some of them in the course of the build. The Aussie decals are both a medium of joy and an instrument of torture... But they are both finer and less thick than the kit- material, so I am very happy how they apply - thanks Michael!😉I chose to do wings first since I want to do them swept and want to try one trick - will see if it works out...
Tim, you are right about the group build, it's just a lot of fun to work on a model this way 👍 each day there is something new to see & learn and everyone gets the benefits...
5 August 2019, 06:48
Lode I'm fairly certain Slavo has a shrink ray and has miniaturized an actual jet just to mess with us.
6 August 2019, 12:37
Lode, that´s some of the greatest possible compliments I´could imagine, coming from a person who applies nano-cybernetical precision and pedantry standards on his own work - leaves me fairly speechless...
What I can say is that I am fairly sure it´s a hobby, since I have some serious difficulties finding proper time for it and payment is abysmal... 😉
Paul - so you overheard all the digging at the "secret site in Australia" where they ditched them...(!) 😮 And I wrapped the shovel in an extra yard of radar-absorbing cloth to be full stealth...
6 August 2019, 13:12
Sluggish progress due to continuous high workload in my job... Work-in progress on the intake ducts... the partial modeling is sufficient to cover the visible angles - especially once the TP II intakes will be in place. Still rough, more sanding + the other side coming
The way it´s done is only possible on the HB kit since I leave the LG closed and did not install the oversized bay.
8 August 2019, 05:51
Thanks Bart, Nathan & Michael!
@ Hans - I checked solutions with tubes and tubes-halves, the circle-to-(almost)triangle and different diameters config definitely seemed like more work than this plus there is one thing a tube would not do you will see later 🙂 It´s not slow-because-hard, just me not having time... 🙁
8 August 2019, 12:23
One benefit of building in 1/144... I can just use a tube and forget about it.😉
This is looking great though, Slavo!
8 August 2019, 14:55
Thanks Greg! I´m definitely bound to stay with 1/48, it´s the smallest scale in which my finger wrapped in sandpaper actually fits into the air-duct...😉
8 August 2019, 15:38
Fantastic craftsmanship!
Kind of sad that there are no resin aftermaket available
8 August 2019, 20:16
Thanks stephan, Maciej & Soeren!
Soeren there were 2 sets from Cutting edge which I think are out of prod and there is another from Dmold, who are on vacation through AUG afaik 😄 That would kick my build out of 2019 schedule...
8 August 2019, 20:50
Very nice intakes Slavo. I tried to scratch build a set for my bird, but yours are much better.
9 August 2019, 01:15
Clifford it's milliput "fine" - it accepted the shape without much resistance and can be smoothened out with a wet finger nicely after placement, after a day it's hardened for dry sanding. I hope to make some good progress over the WE, this week was no good for the hobby...
9 August 2019, 04:42
Thanks James & Stephan! The ducts are proceeding nicely now, I made the intake fans in the meantime. They will remain moderately visible with full flashlight into the intake... 😄
10 August 2019, 09:53

Thanks Urban, Clifford, Nathan & Hans! - so this is my sunday-evening attempt at the intake group... Rough interpretation of a picture of F-111G "Boneyard Wrangler", courtesy of Mr. Kerry Cox
I used thin stripes of masking tape to create the borders for the radar-absorbing panels and some leftover eduard static dischargers cut to shape from the Su-34... 🙂
The modeling & painting was all fine & fun, it brought to the borders of the humanely possible to hold model, flashlight and a phone + press the button to take the pictures... Hence the sub-par photo quality...
Hans - you surely will be able to discover a fatal flaw in the vortex generators layout...😉
11 August 2019, 16:35
thats amazing work slavo, even with closed gear doors you seem to find places to include some crazy detail 👍
11 August 2019, 17:39
Picture 44: Tamiya tape as reinforcement - sheet? A cool idea! Watching and waiting for more tips🙂
11 August 2019, 17:47

Thanks mates, I appreciate all your kind words and am really happy you like the results 🙂
The mentioned flaw is that I only have 4x4 instead of 5x4 vortex generators, but the angle to see the missing group is almost impossible to achieve once everything is in place...
The use of the tape was an experiment, originally I wanted to use PE-sheet borders cut to shape, but then I tried this (tape fixed with super-thin CA glue at key positions) and the result is IMO fairly usable for a non-smooth elevation... The Vark group explores all types of creative tape-uses😉
11 August 2019, 20:51
Good point Hans, I saw the sheet and was thinking about it, but then both Kerrys photo & the Jim Rotramel F-111 compendium show that only the outer panels on the upper plate are brown (right column, 2nd from top):
f-111.net/models/inlets/index.htm
Regarding the side panel, the sources seem to differ, Kerry has lower panel grey, f-111.net shows 1xlower brown, 1xupper brown... so there was some variety apparently, I sided with Kerrys pattern, but made grey brown... The major brown surface on the outside curved profile I have, but really cannot make a pic of it 🙂
I guess variety is legitimate in this case and I wanted to have a white-brown color combo inside, hence this layout...
11 August 2019, 21:02
Sure, your know how is always valued highly! 👍 I am still thinking about a brown upper side panel, at least some Australian G-s seem to have it that way...
11 August 2019, 21:04
Yum. ! How delicious the whole thing looks. ! 👍 👍👍
Slavo, you have my admiration mate, 🙂
That is something I said with my tongue in cheek. 😉
I kneel before the wizard. 🙂 🙂 🙂
11 August 2019, 22:28
Looking at the pics for the first time make me wonder when the test flight is scheduled.....very high level of realism in this build!
12 August 2019, 08:54
Thanks mates for all the support & the kind words! 🙂 You are giving me a really great drive & motivation!
👍 Nathan, will keep this running while sanding the other-side! 🙂
Lode & Martin - the geekiness is almost over, soon there will be nothing left but to build the actual model 😄
& Kerry I'm but an apprentice with a few spells in my book yet, following and learning bits of Arch-wizardry from some great names here😉
12 August 2019, 19:39
You have made yourself quite at home here Slavo. 🙂
Not to mention that your a most welcome brother in arms. 👍
I am really pleased that the 'Wrangler' images have proved helpful to all of you. 🙂
Support is one commodity that there is plenty of mate. 👍 🙂
We love your work and kind words. Thank you. 👍
12 August 2019, 22:19
Agree with everyone else, just awesome Slavo. I had been going to put those in my intakes, but forgot about it and realized to late that I had forgotten them. LOL.
13 August 2019, 00:12
Kerry the pleasure & pride to call this place 'home' is all mine sir! 👍
Clifford - just avoid flashlight & we won't tell anybody...😉
13 August 2019, 05:23
Quite a lot of work done with not so much fresh material to see - the final fitting of the intakes and some other major parts, the HB kit really does a good job, will not go entirely without filling & sanding, but all major areas fit really well.
Also the inside of the canopy is now painted & equipped and will be put in place soon
16 August 2019, 07:12
simply exquisite- the detail in the top canopy, and elsewhere. Pure wizardry!
16 August 2019, 08:53
Thanks Holger, Bernhard, Kerry, Andy & Michael! Fortunately most of the canopy stuff remains visible not only to my inner eye, but can actually be seen from the outside (or so I´d like to think...)
A weekend of countles "sanding - re-scribing - priming - !"§$%&/()" - loops lays ahead😉 After that we should have something roughly resembling an airplane shape on the table finally...
@Holger - a survival kit´s got to hold whatever is vital for survival😉
16 August 2019, 10:34
Yeah pic 33 was hilarious 🙂
this model is lining up great, great detailing all round !!
16 August 2019, 11:31
Thanks again dude..... 🙁 Now my new hobby definitely is making bobbin lace....
16 August 2019, 13:14
@ Slavo, How did you achieve that purple sheen? Or is that just a reflection from something around? Breathtaking! I really like the contrast between the immaculate glass and the lightly weathered frame.
16 August 2019, 13:20
Thanks a lot mates! 🙂
Lode these details are dinosaurs compared to the nano-mechanics stuff you are adding up to HMS Rodney in each iteration😉
Patrick, I have to disappoint, no secret formula, it is a mere "intentional reflection" - I am doing these shots in the natural light on a terrace-table.
16 August 2019, 13:35
Magnifique!!!! Those details on the cabin doors 👍
Great progress Slavo... This will be a gem when finished for sure..
16 August 2019, 14:02
Thanks Daniel & Stephan! Small pack arrived today... Unleashed my inner Lode Schildermans on the chaff & flare dispensers... only 7 more to go! 😄
16 August 2019, 17:22
That looks so great, every photo here shows just more and more added detail to something that will be a fantastic model!👍 👍 👍
but there now are a lot of places for evil particles to settle near your windows, stay on your guard slavo, they will try to have their revenge😉
16 August 2019, 21:05
Your abilities and willingness to attack every aspect of exquisite fine detail is so noted, and makes us all want to improve our skills and research abilities.
I am just dumbfounded and in awe of your skills and patience.
Amazingly wonderful. 👍 (I love it.) !!!!!
16 August 2019, 21:26
Lode and Slavo, I have never seen such fine super detailing in all my years. 👍
But what is being demonstrated here is now setting the bar to the highest level I have ever seen.
What a great time to be around. !
17 August 2019, 00:02
Like I said before.... After seeing Slavo pulling this off, I have to find me a new hobby. Knitting, bobbin lace, embroidary, that kind of stuff.
17 August 2019, 04:13
Slavo is certainly making us check our sixes so to speak. 🙂
Where he has been all this time I would like to know, as he certainly hasn't wasted time in making his mark here.
Bravo Slavo. 👍 👍 👍 🙂
17 August 2019, 04:58
@ group builds - select a GB entry, like this one:
Scalemates Varkfest Group build 2019 (0., )
under Atendees, hit "Change" and check the boxes... buy kit, start kit, make an album & let us have a look 🙂
17 August 2019, 09:31
Thanks a lot mates, I still do not think I deserve so much praise - in any case it is a superb drive to try new combination of ideas (which I spy from all the great stuff coming up here daily from you...) - you're the best bunch for sharing a hobby, point. 🙂
Palo M btw was the culprit who talked me into starting a model after a long time - now I found it's just a perfect compensation after work-stress & kids/family squabbles 😄
17 August 2019, 09:38
Great chaff dispenser! Each section of your kit is it's own piece of art. So glad to have you here inspiring us all.
17 August 2019, 12:48
Nice weekend weather led to more time spent with family than with the model... 🙂 Therefore only this homeopatic progress
Finished the chaff & flares, thanks to Kerry´s extensive photoshoot of the Wrangler I decided it is legitimate to make only 2 per side and the other slots only as slightly sunken surfaces. Creating which turned out to be about as much work as putting together the PE dispensers themselves...
I am also cca. 1/3 through the fuselage sanding & re-scribe, all going fine but not worth a picture yet. But the transition from "parts" to "plane" is slowly kicking in now 🙂
19 August 2019, 08:32
+ @Patrick few posts ago:
Watched my wife knitting during the WE for a few minutes... nah...😉
19 August 2019, 10:51
Man, I wish I could be over Slavo shoulder while he works! Or other mates' for that matter (Roland, Kerry, Benrhard, Christian to name a few, sorry for the rest that I didn't mention, you are so many great modellers here).
Fantastic work!
19 August 2019, 14:45
Yes there are! And also great people that are willing to help you here at Scalenuts! LOL
19 August 2019, 15:09
Yes Tim, great people, who jump in for the rescue! That's why I love this site!
19 August 2019, 19:30
Ur a grate builder aswell Maciej Bellos, i have seen your work look amazing.
19 August 2019, 20:42
Excellent job on the nozzles Slavo, you sir are a true craftsman.
20 August 2019, 00:44
All the latest details are great, but the inside of the window frame looks like 1/32 👍
29 August 2019, 11:14
Thank you very much mates - I'm enjoying a short vacation with kids & family, I hope the dust from all the sanding-rescribing-resanding-... settles while I'm away from the bench - next week it's season 2 & major things coming together😉
29 August 2019, 11:42
So... vacation survived, start of school and collected tasks at work sort of dealt-with, I actually made it to the bench and could register some reluctant progress...
The lower fuselage has now all the doors closed, positioned, sanded and re-scribed (no re-riveting though, I do not have the tools yet & not so many rivets are lost... or so I tell my self 🙂 ) It all looks dirty now after many cycles & testing of the new panel lines, but should be fine when painted...
Finished the chaff & flare dispensers & had to re-do the swing-wing curtains after a failed attempt to cut the opening for the swept wing into the kit part. The scratch-built parts will do just as fine & even look a little bit more than the solid plastic kit pieces...
Finally, I painted the Elevators - the most weathered section of the plane. The fitting/sanding/re-scribing loop was slowly consuming my sanity, had to paint something for balance... Does not look so dramatic unless in direct sunlight... 😄
So soon everything is ready for the marriage of upper & lower fuselage & then the main paint-job, I´ve sorted & tested the techniques I want to use, very much looking forward to getting there!
5 September 2019, 15:11
It might be tedious but you could always restore lost rivets by lining up a Dymo tape along the rivet line and punch the holes using a thick but sharp needle. That way you could make a line of indentations as rivets. I'm also looking for the right riveting wheel for some of my other projects but that's for a kit with no rivets present. As your kit does have rivets (before sanding them off) you could measure the distance between the ones that are still present and recalculate the distance between the ones you're about to apply. Hope that makes sense...
5 September 2019, 15:24
I really like PE, and your work with that small parts created fantastic results!
8 September 2019, 09:50
Thanks Patrick, Stephan, Clifford, James & Bughunter!
Patrick thx for the tips - I will probably do some limited re-riveting in the end, especially on areas where lines of rivets fade out after sanding. Most "damage" happend under the nose, where I just re-scribed some panels & circles, but there I will stay with these, after paint & post-prod, I think the area will be fine too...
Bughunter, getting praise for PE work from a modeler with your track of metal mastery is truly a special reward!😉 👍
Finally to the pic - the WE work suffered a bit because I took my kids to the Airpower 2019 airshow here in Austria - all super cool, even a F-35 showed up (static only though:/ ), in the air a nice mix of jets, props, copters & gliders - then during a nice WW I dogfight scene a wind & rain squall came somewhat surprisingly and this was the result - luckily only material got damaged, no casualties/injuries. Kids got something to re-enact at home too... 🙂
8 September 2019, 12:59
Wow.... 😮 So, no injuries at all? That's the most important thing in such a situation. 👍
8 September 2019, 15:04
Hey Slavo! I always was at this great show! Awesome Displays Static and Flying🙂! Hopefully to get there in three years too...
8 September 2019, 15:07
I thought that bi-plane was the result of a F-111 flypast! They used to rip up the sky downunder! I took photos of one at the night alight airshow at Avalon years ago and nothing looks better than a F-111 low level pass at night jettisoning fuel with the afterburners lighting up the sky like a giant blow torch then disappearing up through the clouds like a space shuttle launch!
8 September 2019, 15:26

Patrick - it was +/- damage control in an unlucky situation with the wind & weather. The Fokker Dr.I landed just a moment afterwards without issues.
Konrad I managed 2016 & 2019, I really like the organization and program, the blend of machines (always good to have Red Bull air-fleet at hand... 😄) is also something for all tastes & fun for the kids... I did Saturday, arrival was not as bad (Vienna/car) as before, probably due to the weather not being all great...
8 September 2019, 15:33
Good to know that nobody was hurt - nice job for the maintenance crew to bring it back to life 🙂
8 September 2019, 15:39
And here we go with some work on the actual model! 🙂
The all-deciding seam is now glued, so are the minor parts around... The wings took a lot of fitting, the swing-wing curtains in the kit were only provided for the forwards position, so I had to cut & re-do this area a bit. But now the die are cast, glue drying & waiting for the filler...
I also made removable paper sleeves for the painted wings - so I can check between color layers to get the right amount of light differentiation between fuselage/wing I want to try to achieve...
8 September 2019, 15:40
Yeah the weather was not as good for all the displays. I was there on Friday with my Dad! Anyhow a well organized event👍! And my personal Highlight was to meet the belgian Pilot from the Dark Falcon!
Cool guy and also his Team😉!
8 September 2019, 15:44
Slavo thanks for the flip over picture, heard about in the news. Such landing accidents were normal with that slow biplanes. The famous Camel killed more pilots during accidents than the germans shot down. And now, back to the topic ...
8 September 2019, 18:45
Really fascinating Slavo.. Both the progress and quality of your built and the explanations and comments..
8 September 2019, 18:57
With the wings on next to the bare plastic, it shows just how much skill and attention to detail goes into your painting, turning some structured plastic into something so lifelike 👍 very inspiring, cant wait for the next big step!
9 September 2019, 09:08
Slavo what's your paypal address? I want my logo on that bird! Heck, I'll go for a full Euro! Hopefully I don't start a bidding war!
As for what logo I want, just use my avatar. I'll even pay for the graphic to be printed.
9 September 2019, 12:33
I'm immature 😄 I'd pay to have poop emoji's all across both wings 😛 Then it would be the most epic crap-tastically awesome F-111 ever 😛.... Don't mind me.... wheee....
As the plane is now, another sweet build Slavo... Can't wait for the final result 🙂 You really are a master of your craft 🙂
9 September 2019, 18:03
I agree, this one is going to be another masterpiece from you.
10 September 2019, 00:36
Thanks mates for all the kind words and encouragement!! I hope to deliver up to the expectations...
The glue firmly dry, I set out to fight out one last decisive battle before everything comes to life in new color & finish - "the seam" - every Varkgroup builder knows...😉 Well one day into the works, I think victory is within my grasp, albeit there is quite some work on the re-scribe schedule - but mostly straight lines, mostly going easy with a stretch of guding-tape & a toothed razor (gives me a very good response & result for line depth...) My educated guess is +2 days with time at the bench & we´re done here.
To the business side of affairs:
Paul´s claim to the add-space on the wing will be recognized, although the PR-department needs to clarify the conditions - add will be text only, hand drawn in dark pencil finish - with no title to approve or change the actual text - the package therefore being free of charge😉 😄 There will be at least 3 featured pictures, displaying the sleeves in ON & OFF positions, at least one of these with an iPad with your Scalemates profile open in the background 😄
@Konrad & Airpower'19 - alas, I missed the Dark Falcon, only saw it on youtube... A pity, but with kids 7 & 5 old, compromises have to be made in terms of time on site & co... 🙂 Still, a great display, a pity I missed it.
10 September 2019, 13:27
Yeah the display was indeed great and spectacular. Anyhow I follow up your great and spectacular build here 🙂! Looking forward to the next steps 👍!
10 September 2019, 15:55
Rescribing is coming along nicely. I'd like to rent the space on the wing. Can I have"Eat at Joe's" for a logo?
10 September 2019, 17:40
Looking great Slavo. I agree with Lode that the explanation of your steps is helpful to all.
10 September 2019, 21:06
Thanks mates, your encouragement is well needed these days!😉
- Day 2 from the re-scribe project front... - all lines done!
All in all I found a balance & sort of a liking in this job, although I would not even dream about filing the positive lines & re-scribing a full Viggen like Clifford...
The razor-saw / saw-razor (not sure on the proper terminology) has really proven its value particularly when going over putty, where the sawing action with light pressure gave me a far better result than any knife/blade tool that tended to chip the putty. The interim check with black contrast liner shows the current state, I plan one more very light sanding & cleanup once everything is done-done.
The most dreaded job - the rivets - still lurks behind the corner - I´ll go for Holgers method, we´ll see...
But I think the seam as such is sort of dealt with in terms of recognizability...
11 September 2019, 20:23
I think perfection is the right word Slavo ... every detail is right! Stunning...🙂
11 September 2019, 21:00
Hm, photo 63 made me wonder, if perhaps, it could be an idea to add dark panel lines before the primer, assuming the layer of primer doesn't outright kill the contrasting black panel line color. Perhaps the result would be subtle enough, but then again, if there are small margins for errors perhaps not a good idea at all if risking patches of uneven primer paint. (Edit: Ah, well, I guess adding the decals would require adding panel line color one more time, I didn't think about that.)
12 September 2019, 06:16
Thanks a lot mates!
@Roland - courage mate, with your Tomcat-surface effect skills I´ve seen you´ll surely be able to create a blend of finish effects to make your Vark fly safely over many a´bar set before😉
@Jos - Most re-ensuring that one of the inner circle 4th-gen master approves!
@Clifford thanks, still just a small portion of a plane compared to an all-lines re-run...
@Treehugger - I did precisely what you describe on the underside of my previous project, an Su-34 - prepped only the panel lines with black for a light-blue Russian finish. I did not wanted to pre-shade, since while probably nice, the effect IMO is not so suitable for the lower parts of this type of plane which rarely show mid-panel color fading. The light blue covering well, I managed mostly with one coat and the effect was that all lines kept a lightly darker shade - in the line & rivets only. I still did proceed with a wash & lining, but with different intensity on different sections - more around the LG & in the back, less at the front and was OK happy with the result. I still did give all surfaces a pass of very thin oil mainly because of the slightly irregular semi-gloss coat it creates on the surfaces when you remove it changing pressure & intensity with a towel. Definitely a method that works, depending you want that type of look. Also works on cars, was discussed in one of Chris Greathouses projects.
12 September 2019, 11:58
keeping up the tension before the final paint😉 But I think this will really pay out big time on a plain gray plane, as always top notch stuff here 👍
12 September 2019, 21:34
I like your tutorial with the panel lines, I will copy it in my projects, very nice 👍
14 September 2019, 07:51
The Devil is in details. You are the Devil, Slavo 😄 Great walkthrough!
18 September 2019, 10:26
Thanks Stephan, Daniel, Lode, Zsolt, Torsten & Sergej!
Dear friends, I apologize for coming up with such a measly update after many days, but extra workload on my job & "fear of the rivet" made me do fruitless circles around the workbench for the best part of the week...
Torsten, I hope the method will work for you - let us know if you maybe find some improvements!
Still, the rivets are finished - everything a hand job with a needle (I really need Rosie! 🙂 ) so some parts are shaky, but they will not be so contrasted in the final paintjob.
Also a question/opinion check - I sprayed the nose semi-gloss and polished it with Tamiya wax - I almost tend to like the outcome more than a gloss coat, it has more of "polished material" feel to it than a "car-like" gloss job - what do you think?
Btw, the metallic pitot tube is actually sharpened metal wire, "someone" broke the plastic bit off within an hour after it came on... 😄
21 September 2019, 14:45
I like the outcome of the nose cone. The "even" finish looks great.
21 September 2019, 15:56
Slavo, did you use the rivet wheel or the saw as a template for rivet distance?
Do not apologize for the speed please, this forum here is my fav because on Insta and FB, all the builders are posting a new build every week and they all look perfect.
Here, errors are welcomed by other mates and the fact that we get reminded when news is a proper following method for my busy life - grab a seat and wait for the bell 🙂
Just make sure you finish this one soon enough for the aggressor showtime by Xmass 🙂
21 September 2019, 17:14
To echo the statements/sentiments above.....A perfect forum, guys.....we all watch in our remote corners of the world...., learn, praise, and grow as modellers.....bravo all!!
21 September 2019, 17:41
May be your radome is to shiny? A radome of a german Tornado in museum in Munich was very matt, seems to be a special color for the radar. Found this picture: alamy.com/stock-imag..ed-in-164351256.html
alamy.com/stock-phot..rcraft-79476050.html
A F111 one looks very compareable:
[img1]

21 September 2019, 19:43
Your radome should be just like this. The "Boneyard Wrangler" . | Album by RedRoo
21 September 2019, 23:35
Hans. For ALL of them. Gloss like mine. Hobby Boss. F-111 with SEA Cammo | Album by RedRoo
22 September 2019, 21:27
I have just posted a link to my SEA build from a while back and the shiney cone. 😉
22 September 2019, 21:31
I'd say MOST of them are gloss, but I've certainly seen pictures where the cone appears semi or even flat black. Even condensation could make the cone appear semi-gloss. Effects of weathering and all that jazz.
22 September 2019, 22:20
Nathan, I am sure that is possible that there are some differences. But basically, all start out with the gloss rubber coating.
22 September 2019, 22:48
Even that craptastic kit I did called for a semi gloss finish. Full on gloss is certainly correct. But as noted, it could well end up dull. And stages in between. Again, saying there is only one correct answer for this stuff is off base.
23 September 2019, 00:17
This site has some good images of the F-111, especially the nose cone destroyed due to bird strike. 👍
google.com.au/url?sa..ust=1569285680601101
[img1]

23 September 2019, 00:46
Another interesting discussion evolved, that´s one of those things I really like about Scalemates - thanks to all contributors! 🙂 👍
Even Mr. Cox surfaced for a flurry of comments, how´s the sub mission going?😉
I put together my Grey-Varks nose collection - this is cca. the range from matt to gloss I found... Seems there is something for every taste... I´d be interested to know what´s behind this - was "polishing the nose" a thing, being done on a +/- regular basis? Was it a case of new=shiny, loss of shine, re-coat? Or was it a non-mandatory case-by-case topic depending on the weight the ground crews put into the upkeep of the aircraft´s exterior?
What matters for me is scale impression - I do not want to go too shiny, but have some contrast to the main grey, which again will not be full matt either, and a general "good feeling" of the whole... Since nose fits so well I will actually put it on among the last steps, no filling/sanding needed, I´ll wait how it looks in concert with the main color & then maybe add a thin gloss coat.
23 September 2019, 10:21
There are a few photos of a retired Australian f-111 at Evans Head The site is Evans Head Aircraft Museum. The first photo shows a gloss nose.
23 September 2019, 15:43
Slavo: I like the "Many faces of the F-111" picture collage. One day I'll get my projects going... 🙂
23 September 2019, 16:05
All in all it appears there was some jolly variety in details - the one in the bottom right corner i.e. lacks the shoulder slimelights... I hope I get to the main color this week, almost there with all the preps...
@Andrew - I saw those pics and that one has a mirror-polished gloss nose. Several late-service grey ones display less shiny examples, although i.e. Kerry´s Wrangler has a rather polished one. I´d really be interested what the story is...
@Treehugger & Greg - It´s Tamiya Modelling Wax with applicator...😉 now be creative in your imagination😉 Seriously - it´s a rather liquid blue stuff that smells a bit like a good car dashboard polish & makes things slightly more shiny with a thin film... works well on canopies and semi-shiny nose cones...
23 September 2019, 16:29
I always learn something reading Slavo's comments... See, I thought Tamiya Modeling Wax was what you used to get rid of body hair in anticipation of your next runway fashion show. I guess now I know why it works so poorly.
23 September 2019, 19:21
Nah Paul, for that you better take CA glue gel... The wax is better spent on smoothening-up the bald spot...😉
23 September 2019, 20:03
Just not going to say anything. I will be in the corner with Greg stifling my totally NOT appropriate comments.
24 September 2019, 00:25
You can find it in the aisle next to the Tamiya bikini line... urm... panel line... uhh... nevermind.
24 September 2019, 00:56
and now I feel a chill down my spine... don't know why...
@Donald: you know the saying, what has been seen... cannot been unseen? 😉
24 September 2019, 06:38
Donald, Greg & Bart - shiver & chill all you want, you are not getting between a man and his vial of wax...!😉
Andrew - yes, Australian is the plan!
24 September 2019, 12:18
Thanks Nikolaos, much appreciated from a man who adds another kit's load of scratchbuilt parts to his builds!
Quick pics capturing a rare moment of absolute clarity in the cockpit. Shiny clear finish of the glass courtesy of... you guessed it...😉
Canopy is now firm in place, no rascall particles flying around inside this time 🙂 All the added parts compromised the fit just a little bit, so some filling will be needed now.
24 September 2019, 16:23
Slavo, It's looking good as your work normally does. Just beautiful!
24 September 2019, 16:31
That f-111 at Evans Head was retired about 6 years ago and is in Australian colours. The tyres have a special lip on them to stop water spray from getting into the turbines.
24 September 2019, 16:48
The Ozmods resin tire set (at least for my F model) comes with the nose tires that Andrew is talking about. In fact it has a choice of nose tires so you can have it with the lip or without.
The cockpit is looking great Slavo, cant wait to see more!
24 September 2019, 18:03
that will be one detailed bird. That saw is indeed handy for scribing. With regards to the rivetting, you show a tool to make the round marks, do you use only this and the old trusted eyeball MkI?
25 September 2019, 06:56
Moin Slavo, You show as a handcrafted a class that intimidates and I lose in every attempt, even 5% implement more and more the desire 😉 this is really work as a watchmaker should deliver 👍 👍 👍
25 September 2019, 07:06
Thanks mates for all the comments & support - I´d really like to move on to the paint job, but as things go, while I was sanding the filled canopy gaps, I accidentally pushed in the closed front landing gear doors so I had to rebuild & re-fill & sand that section, but I will, in the end, at some point, start painting the plane... 😄
@ Bart - the re-riveting was done with the needle + in some cases going along a pencil-line. I need to get Rosie for future projects though... The Modellbaumesse trade-show in Vienna in coming in late OCT, I plan to re-stock there...
@ Jens - thanks mate & you hit the nail, exactly as a Watchmaker, I usually end up with something ticking inside 😄
25 September 2019, 09:29
This just keeps getting better and better Slavo. Beautiful work.
26 September 2019, 21:17
Progress!!! 🙂
I am continuing my experiment started on the wings... grey slightly cloudy base, only areas that should have stronger shadows got a few black lines. Then some salt, only on surfaces facing up = current state - many more coats will follow, I plan to use different effects & weathering methods based on the surfaces angling - will see what it's going to be worth...
Also, it's time for bringing the rented space on the wing covers up to speed...😉
29 September 2019, 08:46
Ah finally, the main course, a whole pig in a salt crust! Looking very good slavo, I m thrilled for the end result! (And congrats Paul, business plan is running as I see 😄 )
29 September 2019, 10:21
Gentlemen, Himalaya salt from the Vienna Naschmarkt market, medium grain...😉
29 September 2019, 13:59
Do you use the salt to rip old paint away, or do you simply spray paint on top of the salt?
29 September 2019, 14:04
I have a strange urge to go look at all of Paul's builds. I wonder why?
29 September 2019, 14:09
OK, this got even more interesting. Never done the salt thing before. Hopefully you will find time to document each step. 🙂
29 September 2019, 16:25
Thanks a lot mates for all the support!! I hope my plans will bear fruit as I intend... Today I had to accept the passing of the seasons and concede that there is just not enough natural light after 18:30 to do good pictures or another airbrush pass - hope to get to the next steps tomorrow. There is quite a ToDo list to be checked off on the paint job still 🙂 I'll document the hi's & low's as they come...
29 September 2019, 18:58
This is a great project to follow, with all the attention to detail and interesting techniques! I'm learning alot just by watching it progress. 👍 👍
30 September 2019, 07:43
Cheers mates, your kind and most appreciated support really is the best drive, so I put-in one work-intensive afternoon & there is some visible push on the build now... I also added some gibberish about what I thought I was doing in the process too... Things roughly went the way I planned, but no guarantees😉
@Treehugger - the salt was a cover, not a peeling treatment. But not in the traditional way masking a slightly lighter coat as often used on i.e. WWII Pacific stuff, but to create a sort of "pre-shade" for the subsequent coats
@Donald - I hope I provide some halfway-meaningful input... 🙂
The whole thing was a lot of fun too & the final shot is not finished, just a quick dry fit, there is still some finer work on the surfaces too...
30 September 2019, 17:54
Very nice surface effect on that Vark Slavo 👍 lookin very good 🙂
30 September 2019, 17:59
Slavo your eye for color is second to none. I think you've captured the look of the real Vark in picture #1.
30 September 2019, 18:38
Superb Slavo. 👍
You have captured that appearance beautifully. 👍
I am in admiration of your work.
SALUTE. 👍 👍 👍 😉
30 September 2019, 19:30
Very detailed Information on every single step 👍! Thanks for this!
And of course the result speeks for itself!
30 September 2019, 20:32
Wonderful. Simply wonderful. Ornate attention to detail. Craft at its best. Bravo!
1 October 2019, 08:01
Thanks a lot mates, it´s really a pleasure to dive in one´s favorite hobby as a part of this global community & exchange knowledge & inspiration... 👍 I am really very happy you like the results, all of you being masters of your own trades!
+ my apologies for all the typos in the pics - I was working under pressure in a futile race against the rapidly setting sun...
@Kerry - happy to get a degree of approval from RedRoo land - I know there were grey Varks in one smooth color tone over all surfaces, but you know that´s not my territory😉 😄 I´d happily pass with this result as "+/- still imaginable" level of color & effects play😉
1 October 2019, 10:11
So amazing. But I'm noticing a distinct lack of my face on the wing... weird. Must be the lighting. hahahaha Seriously though, Slavo, you truly set the bar for excellence.
1 October 2019, 17:40
Slavo, you again nailed it with that finish 👍 perfect execution of painting techniques, very inspiring! Hope you decide to build some dirty gray navy stuff soon, would like to see that 🙂
1 October 2019, 18:37
That's sure getting me in the fall mood Slavo. What is your plan on mounting this beautiful beast?
17 October 2019, 15:36
Sorry mates for the break - My work life has taken over the last weeks, with no immediate end in sight 🙁 No updates worth a photo + hardly any time at the bench + not even time for silly comments in your threads... will try to catch up a bot during the WE...
@ Nathan - I have a cunning plan for a special design stand, hope I get it done, will require some external help😉
25 October 2019, 18:19
Slavo! We were just about to launch the SAR birds to come search for you 🙂
Can't wait to see that monster mounted.
25 October 2019, 18:30
Yeah, are you still alive or did you sniff a bit too much glue? 😮 Haven't seen you here for a while. Traveling for work is my excuse, what's yours??? 😉
26 October 2019, 02:00
With some warm early-spring sunrays, the Vark is coming to life and entering it´s final sprint to full completion! 😄
I want to get this done-done for an event in Vienna on 13-14.3, fingers crossed... Need to get a stand too...
Added the yellow lines around the canopy windows - I used the HB-kits decals here. Thinned them by 50% and applied several brown oil layers (the decals were just too bright yellow in contrast to the grey & vs photos... Still think they are too wide in the end, but this is what we have now. Moving on 🙂
Also done the all-important dump & burn boat-tail - hope I got it right. Looking for approval by Kerry Cox!!😉😉
5 March 2020, 10:25
My names not Cox, but the tail looks like cut out from the photo, awesome 👍
5 March 2020, 10:33
Excellent paintwork and weathering with oils. I use the same method for the panel lines and to highligt the surface. I much like to work with oils (just the ones you can buy in an art / hobby shop) because they let the base colour shine trough. Divergent to your method I do not pre shade the surface but do the effects with oils. By the way, I use lighter fluid to dilute the oils. What do you use? I also never tried paper to clean and polish the surface but only cotton cloth.
Cheers, Christian
5 March 2020, 19:37
Thanks Daniel & Christian!
@Christian: I use Winsor & Newtons from the Art shop & Schmincke "Diluent N - geruchloses Verdünnungsmittel" (also from the same Art shop). I worked out that the combination of MRP paints & oils on top of them really works really well even without varnish sealing (actually especially without it...) - I use differently thinned mixtures, doing all panel lines first & ending with a really thin one and then rub with different levels of force as the oils get "medium-dry" on the surface. This creates a most welcome effect of uneven glossiness, adding much to the scale appearance & realism of the surface... But this method also prevents me from using oils for shading - the rubbing would take the underlying layers away in an undesirable fashion... So I shade with MRP´s +few drops of white/yellow/pink depending on the base color and use oils for the surface finish.
I used cloth, before I had to rush once and found out that a piece of "Küchenrolle", wrinkled-up and softened a bit does the job just as well. Still burning through loads of "Wattenstäbchen" though😉
I know your method works top notch too & I plan to check it out on a build sooner or later!
5 March 2020, 20:58
Most excellent sir. You a among the "Master Class " of modelers. I much admire your work.
5 March 2020, 23:30
Thank you for the extra explanation. I do not use the oils to get the final shine of the surface, but only to add a wash and effects. The final touch to get the right shine will be done with W&N semi gloss varnish.
Cheers, Christian
7 March 2020, 20:55
Thanks Thomas & Clifford
Clifford, I am really honored by your praise! Thank you my friend & know that I am following your works happily & see much to admire particularly in the way you set-up & blend the final appearance of a model!
Christian - that´s what I would do, but I am so happy with the oil-effect that I am afraid/reluctant to overlay it with varnish. I plan to do some experiments with blending varnishes for a variable effect on the surface, but for now, I keep things simple 🙂
Did some work over the past days - the expo in Vienna is now cancelled due to the Corona-Virus containment restrictions being put in place these days in Austria, but I still plan to finish this "as if on time" 🙂
The Aussie decals are probably the thinnest & finest stuff I´ve ever seen & used, when applied successfully, everything is fine, but every piece has to be cut out with a hobby knife (one consistent layer over whole decal sheet) & they are insanely brittle... I gave up on the lines & sprayed those in the last 2 pics. Transition is fine and it´s faster. Stencils will be added from the sheet, so enough zen-work still ahead!
11 March 2020, 14:49
OK, so a question. Once you had the oil on, did you use thinner at all to remove it? Or just working it before it dried completely?
11 March 2020, 17:35
Thanks Spanjaard! Indeed, the light at the end of the tunnel is shining wide into my face 🙂
@Donald - I almost never use oil thinner for removing - rarely, a mini drop on a cotton wad & that almost dried in towels. I let the oils dry for 20-45 minutes depending on desired effect & thickness of oil-color applied. Initially, everything darkens & looks lost, but well managed rubbing with towels & cotton wads brings the desired effect after a while. The surface usually remains receptive for afterthought re-polishes for 4-6 hours at least... Then, and only then, I pull out the wax...😉
11 March 2020, 19:45
Slavo. I swear that I am looking at images of the 'Bone Yard Wrangler' each time I open your post.
You really have done justice to the aircraft we Aussies loved to call the 'pig'.
I salute you and your skills for bringing them back to life. 👍 🙂
Cheers my friend. 😉
11 March 2020, 19:59
Yeah Kerry, impressive not? And Slavo stays humble with this kind of standard...
11 March 2020, 22:43
Great work Slavo! From an ex F-111 technician, your attention to accuracy and detail is amazing... looking forward to seeing the completed project...
12 March 2020, 01:38
Thank you Donald, Kerry, Lode, Mark & Bart!
Kerry - I spent hours & hours looking at those images myself😉 Some good mate put a great source-collection here...:
I guess the Wrangler now rests beyond the dirt of his newfound home - I´ve heard Australians loved their Pigs best from all the flying things that showed up on your continent, a notion I can very much understand...
Kerry & Lode - this is my "Zen Garden" - a calm place where the path is the goal & I can rest my mind from everyday chaos... Apart from that, one can be but humble in this formidable company of pro´s & enjoy the friendly chat´s 👍
@Mark - thank you sir for such words of approval, this makes me very happy indeed!
@Bart & Donald - thx & I can only recommend experimenting with Oils, they are the most versatile instrument in my finish... Just take care what you use for thinning - smelly turpentine is a thing of the past, but at least then one knew what´s going on in the room - some of the new odorless thinners are the same shit, just without the smell & no good way to tell when the air is OK again...
12 March 2020, 16:21
Slavo, you will never know how many Air force and government butts I kissed to get permission to obtain those images of the now (sadly) buried Wrangler mate, but one thing for sure and what makes me happier than a pig in shit is the fact that they were actually useful and put to the best use by one of the best modeller I know.
Thanks mate. 🙂 👍
12 March 2020, 18:44
Slavo what a great result so far, a joy to follow your build ... and how inspiring!
12 March 2020, 22:08
Thanks Matthew, Kerry, Peter & Jos!
Kerry the pleasure is all mine - I don't know exactly how permission & access is obtained in the RAAF 😄, but with those pics, the project was a walk in the park! "One of the best modellers" - who's building it too?😉
Courtesy of the Corona-virus related shutdown of Europe, the Pig will roll out this Saturday... or so I hope... The expo I planned to finish it for is canned too, but that cannot stop this train now 🙂
13 March 2020, 08:51
I have been drinking corona beer as fast as I can, hoping I will build up an immunity to this virus thing.
Sleeping it off is the fun thing. 🙁
Stay clean folks, wash your hands and avoid touching your mouth and other peoples hands.
Good luck. !
13 March 2020, 09:29
Take care all of you. It's strange how it pops up in places map makers have never heard of. !
13 March 2020, 10:08
You might want to rethink that theory, Lode. The top three garlic eating countries in the world are China, Korea and Italy...😉
13 March 2020, 10:33
I makes my point. They are already used to the flavor and therefore reduce the perimeter of 1 m
13 March 2020, 11:14
so we need the increase the amount of garlic then 😛 . well, I do not need that since I am now sentenced to stay home, after being declared guilty of new crime, coughing in public 😛
13 March 2020, 14:59
borders not closed... yet
or not, Trup has banned flights from EU I believe 😛
13 March 2020, 16:21
Trump has banned everyone with an eu passport as well. Not just on flights from Europe
13 March 2020, 16:43
I love that paint job and obsession with details and accuracy. I hope to find that magic combination of materials & techniques to consistently achieve the result I want. Just like you have. Really inspiring.
14 March 2020, 10:56
Thanks mates for staying tuned in for all these months...!!! You´re the best 👍
In short - it´s done:
F-111G 1/48 Hobby Boss finished | Album by slavatarko (1:48)
14 March 2020, 13:21