

SA.365F Dauphin II (completed)


Opmerkingen
21 25 January 2016, 19:49
Several weeks ago I was "tired" to correcting and detailing the XP-61 and opened the box of the Dauphin II. After separating the interior parts from the sprues I follow quickly the instruction sheet and airbrushed the parts, especially the entire seats in white. Now after consulting different walkarounds I'm sure that white is not correct for the ENTIRE seats. Does know anyone the correct colors? Each help would be appreciated.
25 January 2016, 19:52
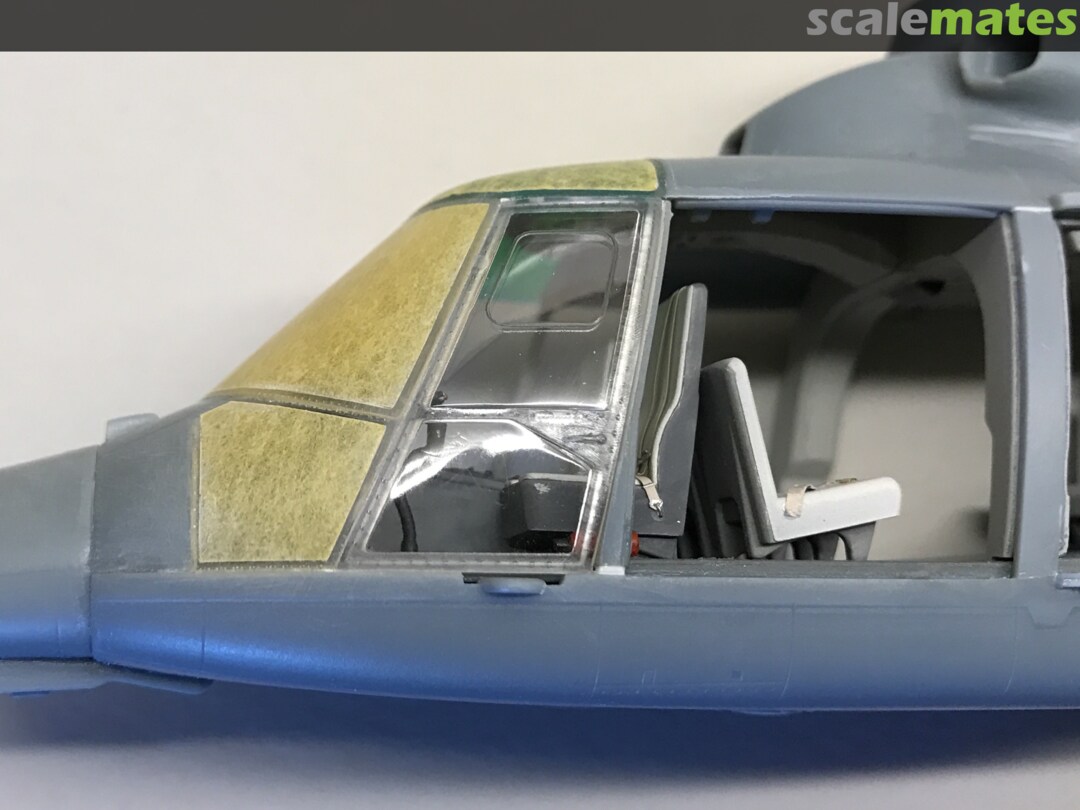
Probably you have been there already, But on Primeportal I saw at the walkaround SA-365 Dauphin II page 12 the following: pilots bucketseats white with bleu cushioning.
Passenger seats black framing, bleu canvas stretching, grey seat cushioning and very light colored back seat with a litlle pattern on it. Hope this is of any
help for you?
8 April 2016, 11:34
Yesterday I reactivated the heli project after more than 1 year.
The fuselage is an true puzzle: you need a lot of patience to puzzle no less than 2 dozen parts together. This is probably the reason that in 4 years only two finished 365 reached the SCM galery.
29 April 2018, 07:38
Tamiya clear blue (75%) and Tamiya clear green (25) thinned with MrColor thinner as perfect mix for colored glas parts. This mix has a great advantage: it's possible to remove the paint with MrColor thinner from the clear part without damage.
30 April 2018, 05:52
Almost unbelievable: I finished the puzzle! 27 of 27 parts in place. The remaining 5 doors I intend to display open or removable.
5 May 2018, 11:34
Sometimes even grownup people make beginner's mistakes. Instead of looking at Airlinersnet first I glued everything to the heli obediently according to the KH- instructions. Result: I realized that I have to rip off several parts and rework several parts because the #318 is very well documented (grrrr 🙁 )
7 May 2018, 05:06
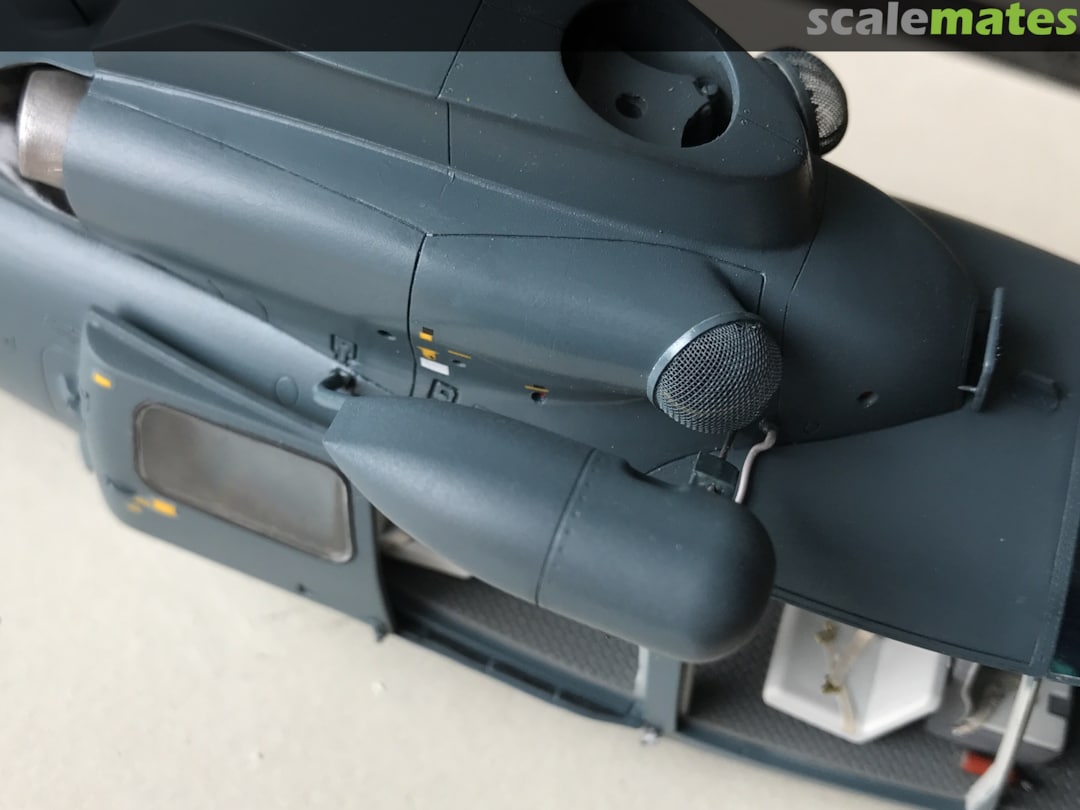
Man i hope you won't keep your engine intake mesh cover method a secret. Looks absolutely fantastic!
10 May 2018, 17:59
THX Alexander. Obviously I forget to post the text about making the covers this morning...
This morning I solved finally the question "how to do 3D shaped FOD's made of mesh in original and used by most present helicopters. I heat formed nylon mesh over a core of aluminum and applied a rim of thin plastic. No I can start the Sikorsky Mojave🙂
10 May 2018, 19:01
Hallo Bernhard, deine Bauberichte sind einfach immer großes Kino, ich schau immer wieder rein und versuche mich, versage aber regelmäßig dabei 😄 Frage, da ich ja auch gerade einen Kitty Hawk Bausatz in der Mangel habe, sind die Auswerfmarken auch so viel, und so unpassend positioniert wie bei der Super Seasprite ???
10 May 2018, 19:15
Jens: ausführlich morgen.
Burkhard: yes sir, Sikorsky Mojave in 1:72. 🙂
10 May 2018, 21:32
Moin Moin Jens. In den letzten paar Jahren habe ich mehrere Bausätze von KH auf dem Schreibtisch. Den Anfang machte Seasprite, Viper und Cougar. Ich kann mich nicht erinnern, dass ich mich bei den Bausätzen über ungünstig angebrachte auswerfermarks aufgeregt habe. Zum Delfin folgendes: Auswerfermarken nicht an kritischen Stellen. Angüsse an den Klarsichtteilen sehr intelligent angebracht. Viel besser als beim Seasprite. Der einzige negative Punkt von mir ist die Tatsache dass recht kleine Teile an 3 und sogar 4 Stellen am Spritzling hängen und teilweise an sehr massiven Angüssen. Oft war die Tschechische Rasierklinge die einzige Möglichkeit die Teile ohne Beschädigung herauszutrennen. Ich denke, dass KH an der Stelle sich noch verbessern könnte. Ansonsten ist der Bausatz sehr ok. Die Passung ist auch sehr gut, was dem Gepuzzle am Rumpf sehr entgegenkommt. Die Tatsache der vielen Unterschiede zu der #318 steht auf einem anderen Blatt. Grüße B
11 May 2018, 11:20
Moin Bernhard , Danke für die ausführlichen Worte 👍 Im Netz schreibt Werners Wing selbst, er bedaure es , die Entwicklung der SH- 2 G Kits abgegeben zu haben, nach der Erstauflage oder den Musterspritzlingen wäre ihm klar, Nichtmodellbauer haben eine Andere Sicht auf die Teilenutzung....., das erste WOW, ist bei mir einem Schreck gewichen, der Suchmaraton nach den Teilen ist dabei die kleinste Sache, an den Türinnenseiten und im Fensterrahmen der Tür Auswurfmarken, so das praktisch jedes Fenster neu eingepasst werden muss ...., richtige Zapfen auf den Auswerfmarken, echt erschreckend 😠 , aber okay, dafür wird das Modell in der polnischen Lackierung sicher ein Blickfang ,und nach den Dragon Kit´s der Ju 88in den letzten Wochen , einfach nur eine Bereicherung 🙂 ich hoffe der UH-1 Venom wird dann wieder einer der positiven Renner werden 🙂 Danke nochmals, Dein BB zum SA.365F Dauphin hilft mir aber auch manches beim SH -2 zu meistern 🙂 einfach nochmal Danke 👍 👍 🙂
11 May 2018, 15:50
Two days ago immediately after airbrushing bluish grey I was not really happy with the entire result: a lot of dust particles and dirt, partially "orange peel"-surface and too glossy.... 🙁
After two hours of sanding (Tamiya sanding paper 1500&1000 grit) polishing with Micromesh 3200 and mending several places with the airbrush I'm on course again. 🙂
14 May 2018, 13:43
Nix mehr zu sehen, zwei gut investierte Stunden ! Hast Du den Nietenroller von SBS aus Lingen hier engesetzt ? 🙂
15 May 2018, 13:58
Hej Hanno. In der Tat. Nieten diesmal mit den Alten rollern. Befürchtungen haben sich nicht bewahrheitet: Nach der Pleite mit den Decals beim Seasprite habe ich das schlimmste erwartet. Die decals haben sich als sehr gut entpuppt. Minus Roundels da verdruckt und blau zu dunkel. Bin dabei Ersatz zu organisieren.
15 May 2018, 20:36
THX mates. I'm happy that you like the Dauphin.
Dauphins entire silhouette looks very esthetic so I decided to close all doors on one side to save the clean lines of the heli. On the other side I will leave all doors open, to make it easier later to remove eventual dust particles. I heard people say that this kit is nearly impossible to build: I can agree to this because it took me one hour to attach both doors. Per each door I used two peaces of 0,3 mm copper wire (on the lower edge, see rivets) to hold the parts in the correct position before applying tiny drops of CA.
FOD-covers in place: very satisfied with the result. The most difficult task now is going to be to keep them in place undamaged until the final assembly. 🙂
17 May 2018, 19:20
Great looking Dauphin, Bernhard! Paint, and especially the windows, look fantastic!
19 May 2018, 14:21
Looking better than how I thought it was going look. You've overcame great obstacles to get here! Looks great! Great work!
20 May 2018, 00:59
Winch: the kit provided two of three supporting arms (the rear one is missing). I recommend to use wire (0,5 mm) for better stability and short wire pins (0,2-0,3 mm) for fitting the other arms (better alignment).
Rear door: the fit in the open configuration is good. I attached the door without glue (only with three pieces of wire to make them detachable). Rear sliding arm is not glued yet (I forgot them🙂 ).
20 May 2018, 06:31
Thank you Ice, Gordon, Timothy and Clifford: only few elements left to attaching on the heli.
Landing gear in place. The fit is good except the "rod length" on the main legs for attaching the retracting struts. They must be shortened approx. 1 mm.
I replaced the thin part of all 3 retracting struts with 0,65mm needle (metal is the best material to duplicate metal). Each main leg got one break line made of 0,45 mm "Litze" and "Ich habe fertig" 🙂.
22 May 2018, 10:48
Impatience is the modelers worst enemy in my opinion. After a long day, gluing on the wipers and painting the pitot probes in metallic grey is enough. Time for some wine on the porch. 🙂
22 May 2018, 17:59
Once again a pleasure to watch your project take shape ! Große Klasse !
22 May 2018, 20:11
That is a very important lesson Bernhard, when to stop and take a break and let it rest 🙂
22 May 2018, 21:14
Ganz großes Kino! Nur die Scheibenwischerblätter müssten meines Wissens parallel zum Mittelholm sein. Die Notschwimmer setzt du farblich noch ab?
23 May 2018, 08:42
Last part before completing rotor in place. I suppose that this is a emergency transmitter. Does anyone know more about this part?
25 May 2018, 18:54
Sehr geniale Arbeit Bernhard 👍
Mit dem emergency Transmitter hast du recht, ansonsten echt Super 🙂
27 May 2018, 07:58
Fertig ! Der Chianti hat gewirkt 🙂 All the carefully placed details look amazing, excellent result Bernhard !
27 May 2018, 10:29
very nice... just wonder how you manage to produce one masterpiece after another... all equally excellent...
28 May 2018, 06:56
Hallo Bernhard, ist ein sehr schöner Heli geworden! Besser als jedes Fernsehprogramm wie ich sehe 🙂
29 May 2018, 08:45
Hallo Bernhard, absoluter Hammer!!!
schön geworden und super detailliert.....
29 May 2018, 09:20
I'm very glad that you like my Dauphin and I'm stunned about the resonance. Especially since at the beginning of the project I intended to build this Helo OOB. And then the thing somehow gained momentum...🙂
29 May 2018, 15:58
Hi Bernhard, can you tell me the colour you used to paint the airframe, please ?
19 September 2018, 10:00
Ronan, as usual I mixed the paint and used as base HU 125 satin gray (FS26118) and add approximately 25-30% HU 181 (gloss seablue). The mixture produced a nice satin finish and so I could apply the decals direct without problems (no gloss coat bevor decals an no clear varnish after applying decals).
19 September 2018, 17:47
Thank you Clifford: I'm glad that you like my newest Helo-puzzle🙂
19 September 2018, 17:48
Great job, Bernhard! Im just starting this puzzle of a kit and your build is a fantastic reference. Did you scratch make everything you added in your notes or use after market supplies? Curious about the seatbelts, FOD mesh covers, tie down hooks, and all the fiddly bits you added on the outside.
9 September 2021, 03:29
Hello Casey. Thank you for your nice feedback. All extra parts are scratch build. I used f.e. tea bag - mesh for creating the FOD covers.
9 September 2021, 11:25
You and Ronan are the best helicopter modelers I have ever seen, your attention to detail and scratch building skills are amazing.
9 September 2021, 19:42
Thx This. I mixed as usual different Humbrol paints for a matching color. The basic was probably H125 with a bit H181.
28 May 2023, 20:30

