

Work in Progress of a Junkers F-13

OMG! How this little axle pin should be glued into that HUGE hole of the wheel?
All very flexible. The left V strut breaks easily. Strong doubts that it will hold the relative big model.
All very flexible. The left V strut breaks easily. Strong doubts that it will hold the relative big model.

After some hours a metal replacement.
Upper right: The axle is 1mm nickel silver rod, the V-strut 0.7mm nickel silver rod. Squezzed brass pipes 2.0/1.2mm are the covers.
The legs are 0.8mm brass rod, again covered with squezzed brass 1.4mm pipes.
Upper right: The axle is 1mm nickel silver rod, the V-strut 0.7mm nickel silver rod. Squezzed brass pipes 2.0/1.2mm are the covers.
The legs are 0.8mm brass rod, again covered with squezzed brass 1.4mm pipes.

Plugged together. Since all connections are going into the lower wing kit part this can be built alone.
I like the look and the rigidness!
I like the look and the rigidness!

A picture from below shows the aerodynamic covers better.

As I modified the wheels heavily with a turned plastic part I drilled completely through for new 1.2mm brass bushes. The kit part showed a securing pin so my new bushes now also (0.15mm wire).

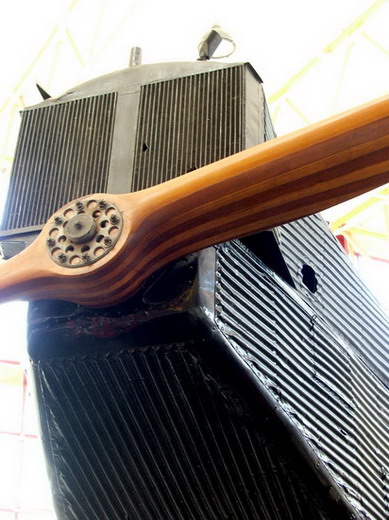
I had run out of veneer from my beloved "Buchsbaum". So I have sawn new ones.

After sanding the veneer thinner I glued a new wooden airscrew and shaped it.

The back side looks more interesting.

A bearing was turned from brass and thick piano wire. Little brass plates are soldered on.
The kit only provides a airscrew with a clamping cone. I do not know the other markings, but "my" don't have that cone!
The kit only provides a airscrew with a clamping cone. I do not know the other markings, but "my" don't have that cone!

After wood primer the airscrew is painted. That is the second try of painting it - my first one was to dark and too orange.

The bearing fits into the kit part.

Back.

I don't have the correct prop boss, but this one nearly matches.

A second type of F-13 airscrew. I turned a cone and a plate from aluminium and a bushing from brass on the lathe. The shaft is made of steel wire with a soldered-on plate.

The shaft is now secured with a plate on the back so the bearing is complete.

After more sanding towards the final shape that is now the back side.

On the front side the middle part is more free of the dark wood - a very special shape.

All plugged together.

The airscrew is now painted and got a metal protection on the leading edge.

A side view with cone and shaft.

The kit part has only the big instruments so I added some HGW frames. Also no instrument decals provided. I used the very nice dial decals from Tom Anyz 👍 and some spares. The glass is Kristal Klear. Need some more detail painting.

🙁 Have the designers lost their appetite? The sofa is too big or the seats too small!
The left seat is mounted as it is intended -> the arm rest is much too low! I modified the seats then (then also the left one).
The left seat is mounted as it is intended -> the arm rest is much too low! I modified the seats then (then also the left one).
Opmerkingen
52 10 April, 17:15
Welcome Marcel!
I'm not really leave the WWI path. I built the Junkers D.I already, a type from 1918. This F-13 was build one year later and I was fascinated by pictures of the internal structures - the principles are nearly identical.
After I noticed the kit with the nice box art (painted by Eugeny Knupfer - the guy behind Small Stuff) on the EME for a fair price I had to take it.
The box is somehow big, so I need to build it to save space 😉 Another reason to start it was a chat with Christoph, because he had trouble with the undercarrige in his build. So I spend today some hours for a new undercarriage.
10 April, 17:37
Thank you very much for your interest! A warm welcome to each one of you!
I was hoping for a quick project as there are not many parts, but it will take a while due to it's size.
11 April, 09:50
The fit is different, from perfect to ugly deformed parts. At least the provided masks cut form ORAMASK fits on the cabin windows inside and outside.
11 April, 20:06
A warm welcome mates!
@Martin I will put it aside to the other Junkers Junkers D.I - Short fuselage | Project by bughunter (1:48) so together they have two wings 😉
@Christoph No need to apologise! Your build invited me to look into this type and finally to buy the kit!
16 April, 15:23
I want to have a rotating prop as on my other models, so I made a new wooden prop with a little bearing.
Over the time the F-13 used different airscrews and mountings. Wood or later also metal was used.
The kit provides only a airscrew with a clamping aluminium cone but a check of original photos of my marking do not show one (I have not checked the other possible markings). It looks exactly like the one in the Budapest Aviation Museum: [img1]
So I tried to replicate that one.
The airscrew of the F-13 in the "Deutsches Museum" München with a aluminium cone looks beautiful too, but has a different shape and metal leading edge.
16 April, 16:25
Thank very much for your nice comments - highly appreciated!
Now the build is hold for some days, due to the famous Mosonshow. My first visit there. CU!
18 April, 10:11
The trend is towards a second air screw so I made another airscrew of a different type. New pictures from 14.
I used the F-13 of the Deutsches Museum as a template, see the great pictures here: igor113.livejournal.com/180302.html
Yesterday I made the airscrew, today the metal parts, final shaping and painting.
This special shape was a bit demading, but I wanted to see if I'm able to replicate it.
@Christoph(Postbote), you will need a 2.4mm drill to open the kit mount for the bearing, and a 3mm for a little recess on the front, And CA of course.
And I need your address. Please send me a Private Message.
I hope you will like this airscrew!
23 April, 20:11
Thank you mates, I like it too. Now only the new owner of this second propeller needs to pop up ...
25 April, 19:56
Not much happened the last days. At least I worked on the instrument panel (not sure what will be visible later).
The dreadful interior design has robbed me of my desire. What is this? Maybe I should have waited for MiniArt.
30 April, 19:30
Carve it out and scratch build. I know it's a lot of work, but once we accept what we are faced with, the journey begins much better! I feel your pain!
30 April, 19:43
Nice progress Bugsy!
The people that'll sit on the side are from a higher stature and as such are larger than life. Hence the big sofa 😉
30 April, 21:40


