Norbert Steffens First comment, and I'm in.
I'm not sure, but my approach would have been to build up the walls with thin plastic.
Eager to see more
13 March 2021, 05:39
Sven Schönyan I´m in, too!
The VeryFire detail set provides resin parts for all the gun tubs. Don´t know what would be more easy: thinning down the walls or replacing all this stuff?
14 March 2021, 10:46
Treehugger I saw the Very Fire upgrade set but, ehe, seems too expensive for me. Instead, I am going with an average improvement of detailing, instead of trying to jam in as much tiny detail as possible. This build should be fairly straight forwards. Waiting for the Master aftermarket stuff, which might take a month perhaps. By the time I get to fiddle with the photo etch I ordered I should have my issue of using gloss coat figured out.
14 March 2021, 11:23
Norbert Steffens This is a good approach, and your thinned walls looks good.
15 March 2021, 06:27
Norbert Steffens Photo 5. It could be a riased edge. Water can drain through openings... but not shure
20 March 2021, 17:54
Treehugger I have now looked through what seems to be the easy found photos of this ship class, and, I am thinking, if I could add thin strip styrene all around the hull, it could help hide the base of the photo etch railings, and also add some extra detail that way. 🙂 I will meditate on this.
20 March 2021, 20:32
Treehugger Btw, this kits comes with several cages on top of the deck, for what has been described as floating nets, but the kit comes with empty cages. Some other modeler had the cages fill with cylinder like objects, presumably some kind of packed netting or something. Seems like an easy "fix" to fill the empty cages with something that maybe looks like what is supposed to lie in the cages.
20 March 2021, 20:34
Treehugger I have some ideas for the photo etch railings. Not really sure how it might end up looking like. I could add some detailing and raise the railings, which are too low. Ofc, add the outer edge with thinnest styrene strip. And then eh I could look into the possibility of gently scraping the horizontal parts of the railings, to both thin them and make them appear more round. 🙂 Photos seem to maybe show both hard/solid raillings at the bow, and wire, unsure.
6 April 2021, 11:14
Treehugger Argh, I am still waiting for the stuff I ordered, like metal barrels, and all the medium and AA armament stuff. 🙁
Update: Oh, joy. Tracking data from 20 min ago, show the package arriving to my country, finally. 🙂
6 April 2021, 11:15
Treehugger Kit overall seems nice. I only found two or possibly four sink marks in total, on the sides of the hull, which can easily be fixed. The added armor on the sides isn't shaped correctly on the top side, it should be slanted, but is flat, not sure if I can fix that or not. The one large hull piece require some very basic sanding to get rid of what I guess are traces of slide molding tech.
I wish there was a good photo of the propeller axels, I have no idea what they looked like in real life.
Update: The non-slanted top side, for the armor plating, can be scraped from being flat, to having an angle, so that problem has been solved, without using putty or anything.
6 April 2021, 11:16
Martin Oostrom Most ships have a raised edge around the decks. It prevents small but valuable stuff from rolling off the ship. To get water off the deck there are things called scuppers: en.m.wikipedia.org/wiki/Scupper
Treehugger My plan for the railings, is to first glue on strip styrene to create the outer edge, and then, instead of just gluing on the railings which has a lower edge on it, I want to tediously remove the bottom part of the railings and elevate the railings as seen on photo. This way, the railings have a base in styrene to stand on, and the railings will be elevated to look better. I also want to gently scrape the railings to round the horizontal elements. I think I can do this. 🙂 This way, like seen in photos, the railings are offset from the outer edge, away from the very low hard edge at the very edge coming up from the hull sides.
8 April 2021, 19:15
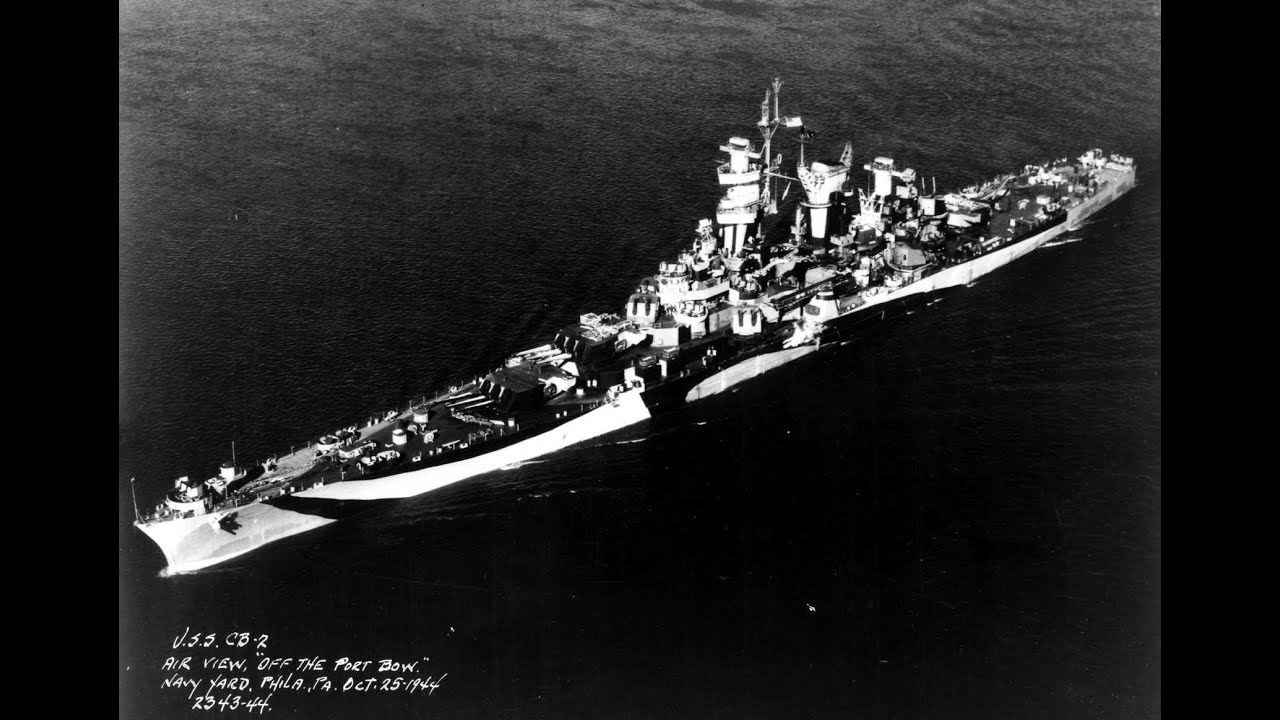
Treehugger Btw, I learned just now that there are some official drawings for the CB-2 Guam ship, but has to be requested. No idea what drawings these are, I don't think it is shown, presumably several drawings: catalog.archives.gov/id/53484224
Treehugger I just learned from this webpage below showing Guam, also seen on drawings for Alaska, the twin-AA pits near the catapult, apparently are similar to other pits (but has been cut short), and is not as small as kit parts E58 & E57. 🙂 This means I have to create, two more styren AA-pits, luckily I have the guiding shape for that one in particular (also used elsewhere more forward).
Treehugger So.. I am no expert, but it looks like Hobby Boss modelled two of the propellers WRONG.
Instead of mirroring the blades, for two sets of propellers the individual blades were rotated it seems and they sort of look non-functional. It looks like Hobby Boss made two propellers propelling the ship forwards, and two for propelling the ship backwards, and so the arrangement doesn't make any sense. Even if you could rotate individual blade, it would still be wrong as I see it (meaning, can't be fixed, unless making all four props look the same I guess).
I made a facebook post on Hobby Boss' Trumpeters page, but I think they deleted my message, or, I can't see it. I also made the mistake of soliciting for four new props, which ofc in hindsight wouldn't solve my issue, I would only get four same looking props which would be an improvement, but still wrong.
30 April 2021, 15:49
David Taylor Could you purchase aftermarket props,not ideal but they will be the same.
30 April 2021, 17:48
Treehugger What do you mean, not ideal but being the same? 🙂
Btw, a photo of the Titanic shows mirrored propellers on the sides, and with a third at the center.
I supposed I could try finish the model, and then leave the propellers off.. and maybe find some aftermarket ones later.
30 April 2021, 20:08
David Taylor Sorry treehugger I meant t5hat the aftermarket ones will be correct.
Clair Greenwood Going strictly from memory here but... The Alaska class suffered from bad mid range speed vibration and if memory serves 2 shafts counter rotated ( 1 per side ) to try to fix the issue with some improvement. So in that case the props would actually be correct.
2 May 2021, 21:15
Treehugger Ah, no, two of the four Hobby Boss propellers doesn't make any sense, they are really backwards.
I suppose it is possible that there are two counter rotating propellers on each side, instead of pairs on each side. Thanks for the feedback. 🙂
Would be nice if there was a way to confirm the configuration of the propellers. The drawings I have seen doesn't really show how the propellers look except from the side, which doesn't really show anything.
Update: Hm, looking at the side drawing again, I can see that the configuration, seem to be drawn, at least, as a pair of same rotating propellers, on the starboard side.
Update: Weird, the drawings show the rear pair of shafts being parallel, but the forward shafts being angled a little bit out to the sides, surprising.
2 May 2021, 21:39
Clair Greenwood I either read about it or it was the Drach video I learned that from. The Drach vid is at : Youtube Video
2 May 2021, 21:44
Treehugger Clair Greenwood, any idea what a "hydraulic gasoline system" is?
According to the drawings, that long shape on the starboard side that I thought was a "skid line", is called "hydraulic gasoline system" on the drawings.
2 May 2021, 21:49
Clair Greenwood No sir, not off hand, however seems an interesting subject to research. Im sure it must have something to do with replenishment of aviation fuel to/from other ships though. To transfer from one ship to another you would need a pressurized system.
2 May 2021, 22:04
Clair Greenwood Treehugger, I did a little research on the hydraulic gasoline system. My assumption was close but not 100% correct. It is not for replenishment to or from the ship, but for refueling her own onboard aircraft. The lines are run outside the ship to minimize the chances of fuel vapor, spills inside the ship resulting in a possible explosion in confined spaces.
Treehugger Thanks. I don't quite understand what the "pipe guard" shape is doing on the outside of the hull on starboard side, but perhaps the pipe is some kind of fuel dump system for the hydraulic gasoline system? The only text for the shape on the side of the ship are the labels "pipe guard" and "hydraulic gasoline system".
3 May 2021, 22:17
Christian Bruer Excellent research and modifications. I will take a seat to follow this interesting WIP.
6 May 2021, 19:36
Treehugger Oh, bad news. The kit's hull shape is noticeably warped. Well noticeable now.
I had glued on the two deck parts symmetrically so that this wouldn't happen (and I did not force the fit eithe), so I think the single large hull piece was warped from the start. I think the hull design is bad in this regard, unless I was maybe unlucky getting a warped hull. The hull apparently has a twist to it, from bow to stern.
At least when viewed from the sides, the twist is not easily seen.
7 May 2021, 18:12
Clair Greenwood Gee that stinks, I wouldn't even begin to know how to repair that. Sorry that happened.
7 May 2021, 18:50
Martin Oostrom Add some bulkheads. Easier said than done though
7 May 2021, 21:43
Treehugger I deleted my earlier comment. So, having cut and ripped the two deck parts off the main hull piece, it certainly looks like the hull shape is in fact warped from bow to stern. At least now with the deck pieces off I have some hope of fixing this. :| I still think that the hull shape was warped from the start. Apparently the two deck parts aren't warped as I once thought, but the rear part did have a bend to it, but no warping.
Edit: It seems like, the only way to fix the warping, is to add counter warping. I think I will explore the idea, of inserting a rod of sorts, that warps the hull back the other way, from bow to stern. It would have to be some 1 cm thick wooden stick or something that doesn't easily bend.
Treehugger Hm, I guess I should re-check the size. Could be that the discs I have ought to be smaller. I have punching tools for every half mm, so I should be good.
11 May 2021, 09:40
Ingmar Stöhr Id did trim of material in the back and bottom of the disk on my build. Diameter is fairly large but the backside has to fit in a 'square' hole
Maybe you get some info here too. Nice build so far
11 May 2021, 14:16
Treehugger Thank you. I am already keeping an eye on that forum thread. 🙂
Next up, I will have to clean up the deck/hull seams, the bow, the bilge keels, and maybe add some propeller stuff, BEFORE I start adding a flimsy edge all around on top of the deck which will be fragile after I glue that stuff on.
Looks like 4,5 mm Ø is a proper dimension for the pivoting disc for the 5 inch guns. I'll work on the 5" guns later.
11 May 2021, 14:32
Treehugger Ah, I wonder now if maybe the hydraulic gasoline system, shown as a pipeline on the aft starboard side, might be used as a channel, keeping the fuel stored aft and away from the center of the ship, and then they pull gasoline towards the center via the pipe to fuel the planes. I wonder, maybe it works like this.
24 May 2021, 15:21
John Excellent, excellent work. Hats off to all ship modelers, the amount of time and effort to produce an accurate replica is staggering. Even a kit OOB will require loads of effort compared to other kit genres. As a retired Sailor who spent all of his adult life onboard warships, a big thumbs up and a hearty "Bravo Zulu"!
3 July 2021, 15:16
Treehugger Thank you. I have some plans for the railings, which, well, will be a bit tedious, because, I will have to snip off the bottom edge of every railing, and sand every stub clean. This because the railings are supposed to be raised up from the deck, not just glued onto the deck. I think I can do it without damaging the photo etch, but I'lve never done something like this before. Before doing that, I will have to glue on the thinnest styrene strip all along the hull, then add several fixtures that the railings will stand on. This precision work is tedious just worrying about it. 🙂
3 July 2021, 17:26
Steven Van Dyck It seems easier to add a strip on the outside before or after fixing the PE unchanged. This leaves you with the stanchions visible on the inside, but the strip and the railing will be aligned.
4 July 2021, 08:10
Sven Schönyan Great effort you´re putting in your build! A good inspiration for the day I´ll start my one.
4 July 2021, 08:17
Treehugger Steven, the kit railings, by the looks of it, are too low. I though at first I could just glue on the railings onto the deck and hide the bottom edge with this outer styrene strip, which would have been ok'ish, but then, the railings is probably too low anyway, so I fix two issues in one go I like to think. 🙂
I will also probably consider, gently scraping every horizontal edge, to round off each edge, which may or may not be a good idea. Presumably, the railings are really hanging wire, but I don't want to pay more money for more realistic looking railings at this point, so I will try use what I have.
4 July 2021, 12:38
Clair Greenwood Thats an awful nice work area, I could only wish for such accommodations. I, like many, am stuck using the dining room table and told to put it all away... lol
11 July 2021, 23:37
Treehugger I used to have my computer table and it worked, I just had to clean things up. 🙂 The nice thing imo about my room is all the drawers. All the drawers. 🙂 Ideally, all the stuff could be just stored away in the drawers leaving a clean table, but ofc, that doesn't work, but hey maybe with 10 more drawers I can make it happen. 🙂
Treehugger Feel free to ask questions. 🙂 Typically, it is fairly easy to make improvements, but one has to make sure you don't end up making mistakes. Having a supply of various styrene products helps, like styrene strips, rods and stuff.
2 August 2021, 19:52
Treehugger Ooh, I just got an idea. So I problem I have, is finding some kind of material for creating 50'ish stand'offs that raises the photo etch railings up from the added low edge of styrene. I initially though I would just use styrene, but I don't really have styrene that is that tiny. So.. knowing that I will have to remove/cut away the bottom edge of the photo etch railings, I should be able to re-use that left over metal to bend them, and create my 50'ish stand offs. 🙂 I should make a jig of sorts to get same'ish shapes for all the 50'ish stand offs.
8 August 2021, 12:43
Christian Bruer I much admire your patience and close eye for the detail. This turns out to become a real masterpiece!
8 August 2021, 19:25
Treehugger Thank you! 🙂 I have high hopes for this even though the finished model can't possibly be 100% good. I wonder, if I end up making good progress, I might invest in some ship crews as well.
Treehugger Nice tip. Thank you very much, this is a nice alternative to the Russian one. I like how there is the option to chose between crews with a helmet vs a cap.
12 August 2021, 06:55
Steven Van Dyck I have 2 Black Cat products in a project, they even have running soldiers with guns, though I needed the standing ones.
Treehugger Probably a good idea to airbrush them and paint them, on the block, if possible. Much more fiddly painting these tiny figures one by one I learned. 🙂
12 August 2021, 10:53
Steven Van Dyck They're easier to paint if they are glued on a stick. Like that you can also paint the boots.
12 August 2021, 20:06
Treehugger Ahh right, you can just use superglue to a wooden stick, and then cut off the figure afterwards after painting, like sawing it off just beneath the sole of the boots. I have a lot of small round wooden sticks lying around that I can use for that.
14 August 2021, 08:57
Clair Greenwood I dunno, I really like how the antifoul red came out in photo 124. It looks quite realistic to me as is. In real life you had variations of color along the hull in all colors of paint.
19 August 2021, 16:55
Treehugger I thought I would add some oils later on. Hm, now that I think about it, maybe going for totally smooth a paintjob might not be entirely necessary, I never thought about this.
I will airbrush on 'intermediate blue' on the sides, and add the light gray on top of sides later when I get to add the railings. I'll also add the black strip that probably runs right in the middle of what I think might be a torpedo belt armor on the sides. In preparation for the 'intermediate blue' color, I have sanded the whole thing smooth. I managed to create the waterline pretty much spot on I think, so that at least I am very happy with.
19 August 2021, 17:07
Clair Greenwood Yes a totally smooth paint job, while pleasing to the eye on a model, is not how ships really looked. They were painted by sailors or yardmen with buckets of paint and brushes usually. Im sure you can imagine the different amounts of color in sections being painted by many guys who just wanted to get done. 🙂
19 August 2021, 17:55
David Taylor Patience is definitely paying off Treehugger.
19 August 2021, 18:26
Treehugger Looking closer, after having added the thin bit of strip styrene all along the top edge of the deck there were so many gaps and tiny pits, took a while to go over them. I think I fixed maybe 95% of them.
I am glad I did this extra work, as I learn to just take my time trying to fix things by a little bit of patience.
Uuh, I forgot to mention it, but I will add another layer of red there, and THEN add the black line. I hope I don't forget that order. 🙁
19 August 2021, 20:29
Treehugger Oof. I think now I must make a plan, a DRAWING , planning out how I can divide the longer photo etch railings, such that the railings best can mist with the existing details. It seems unrealistic to think I can just fiddle with this long PE railing and also mix it into the various details that require modification to the photo etch. :|