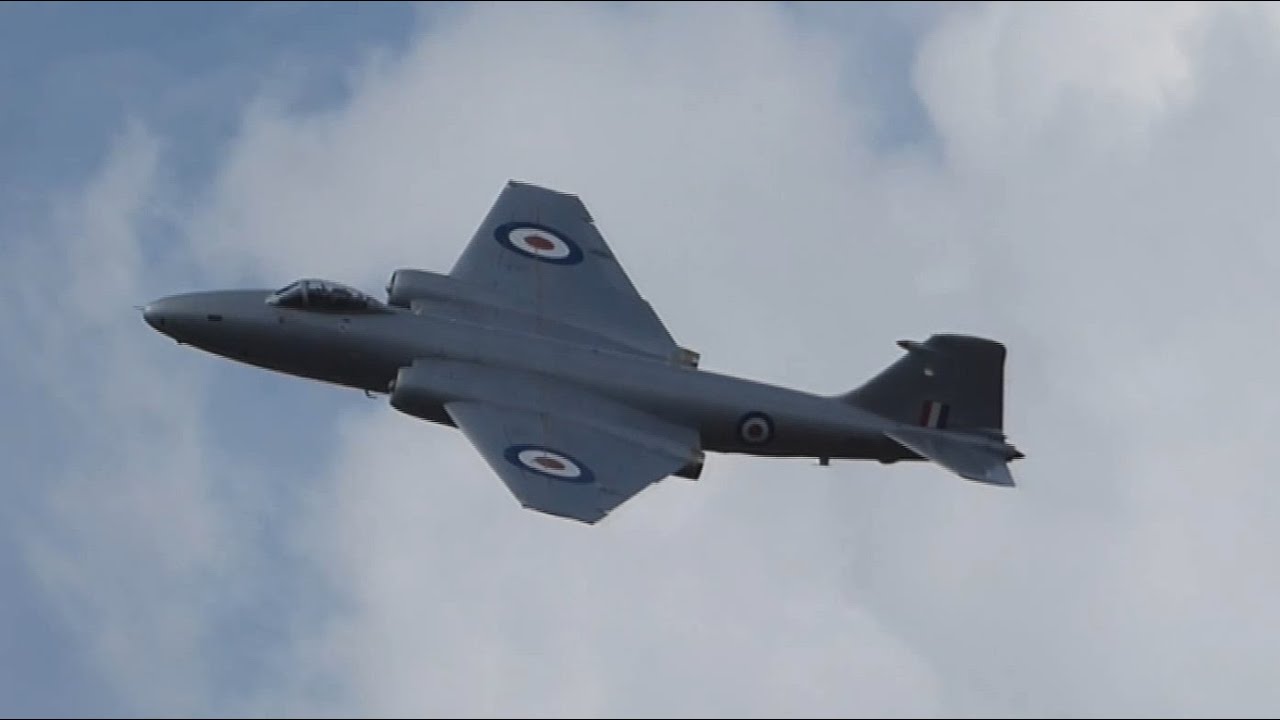
James C I had been considering building either another Tamiya MiG-15 (camouflaged) but I'm still waiting on a canopy mask for it, or the Academy F-86 Sabre. But, inspired by Augie's awesome looking Canberra, I decided to dig mine out and make it my next project.
I've had it in my stash for a number of years now, having received it as an Xmas gift from my brother, but didn't really feel up to the challenge of attempting it before now, so will see how I go on it. I hope to make a start on it tomorrow... unless I have a new years hangover 😉
Slavo Hazucha Very cool choice! Happy to see you picked up a flying topic again!😉
1 January 2021, 22:38
James C Heh, after the Tom-Cat, I need all the practice I can get. I still haven't made a start on this one yet as it's just been too hot and humid. Won't be too far off though.
James C Welcome aboard Nathan, Erik, Sebastian and Murad.... I finally made a start on this one yesterday. I've done a dry fit of the fuselage and wings, and am currently modifying the cockpit instrument panels for the replacement colour p/e parts. Will hopefully post some progress pics once there's more to see.
6 January 2021, 17:02
Jos Jansen Good choice James, following with great interest...👍!
I had intended to throw some paint at the cockpit interior and bomb bay yesterday, but got carried away assembling the wings, munitions and assorted sub-assemblies etc which I'm hoping will make things easier in the long run. It's still been a bit too hot and humid for airbrushing, unless I get a very early morning start.
Just uploaded a single pic of where I'm at. It's going to be a big beast and will be my largest build to date as there is a lot of area to paint.
I've assembled the wings but have not yet permanently secured the engine faces or exhausts yet. The fit looks to be mostly pretty good, with exception of the engine exhaust's which will need a fair bit of filler to blend them in properly to the wings.
The cockpit interior, and seats etc are ready for paint, so will try and get those primered at some point today, temperature permitting...
Slavo Hazucha Looks like a nice lot of parts to play with...!
The Canberra is sort of my "coolest canopy solutions" champion - the version Augie did is just otherworldly like something from a "life in the year 2000" art from the 60´es, this shifted one looks like the thing was designed so that Stirling Moss could take it to LeMans for a spin, just in case... 😄
@ Slavo - Yeah, it's definitely an oddity with the cockpit offset to one side. The B.2 cockpit looks like a zit that needs to be popped😉 Aesthetically, I think the Yanks perfected it though, with their B-57. Combine the already graceful lines of the airframe, and a more symmetrical, bubble type cockpit and you have a VERY cool looking aircraft that's quite pleasing to the eye. (IMMHO)
I got all the interior components primered and painted in black yesterday, so today the plan is to begin the detail painting and hopefully begin attaching the coloured photo-etch.
I made quite a bit of progress on the cockpit interior yesterday. Sadly, most of it will never see the light of day after the fuselage is closed up. The replacement instrument panels were very easy to work with and apply, but I struggled a hell of a lot with the harnesses on the pilots ejector seat... and consequently, I didn't install all of the harnesses and straps provided for, as my eyes and hands just aren't up to to the task. I have a new found respect for those that work with even more complicated photo-etch parts on a regular basis.
The Eduard set included a total replacement for the pilots right side console, which at first appeared to be beyond my abilities (so I painted up the kit panel as a back-up) but in the end I found it quite easy to bend to shape, and looks far better than what you get in the kit.
Next up is to install the navigators window in the left side of the nose and sort out some weight to pack behind the rear bulk-head to prevent it from tail sitting.
Slavo Hazucha That cockpit turned out very nice indeed 👍
Already the kit parts would look quite adequate, but I agree that in this case, the ED parts really added a full new layer of detail. Picking up a nice pace here 🙂
13 January 2021, 09:37
James C Thanks guys. Just taking this one slowly 🙂
@ Slavo - It's just a little disappointing that once closed up you can't see any of it except for the upper half of the pilots ejection seat.
13 January 2021, 17:11
Lode Schildermans James, are you going to build as slow as me and Slavo 😉?
13 January 2021, 21:33
James C Haha😉 Not sure mate, but it's currently too hot to sit at the table for extended periods at present. The Canberra is progressing ok, and I got the fuselage closed up and canopy attached yesterday. Will take some pics and update the album when the sun comes up 🙂
14 January 2021, 17:17
James C I packed in a load of old washers and bolts in an attempt to make it nose heavy (to prevent it from tail sitting) then finally closed up the fuselage. I also got the clear parts masked off and installed. The clear nose stretches the fuselage even longer than what it already was! I finished up yesterday by doing a bit of preliminary sanding to the assorted joins and seams prior to applying filler and found that they should clean up ok as well.
The fit overall has been pretty good, and my only gripe so far with the kit would have to be with the sprue attachment points for most of the parts, which in some cases were very large (and thick) requiring extra care to both remove and clean up.
14 January 2021, 18:16
Nathan Dempsey Coming together nicely James. Going to be a large beast I see.
14 January 2021, 18:54
Daniel Klink What a big stick.. Youre in a flow James.. Count me in for this one too 👍
14 January 2021, 19:06
James C Thanks guys, and yes it is a deceptively large aircraft! 🙂
15 January 2021, 17:22
James C Doesn't look like much progress has been made, but I've been plodding away at blending the upper cockpit faring into the fuselage and sorting out all the assorted joins and re-scribing etc. I also got the engines blended into the wings quite nicely now, as well as the clear nose section which had a bit of a step where it mated to the fuselage. I guess the true test will be when I shoot a coat of primer on it and see if all the effort has paid off.
Also, the wings are now permanently attached, and although only very minor... I've not filled in the joins at the wing roots yet. Will leave it until the glue properly cures, and lastly, the ordinance (bombs and dual rocket launchers) and wing tip tanks have also been assembled and cleaned up as well.
18 January 2021, 02:27
James C I gave the airframe a coat of Stynylrez grey surface primer yesterday, and am now ready now to begin painting... starting with some pre-shading. I also got all the landing gear components, weaponry and assorted attachments painted and ready for weathering as well.
23 January 2021, 19:12
Jos Jansen Nice and steady modeling James, great work on that pre-shading...looking forward to the roll-out and the outdoor pics 😉
24 January 2021, 08:08
Robin (WhiteGlint) Nice pre-shading.
These large wings are a nice canvas for colour modulation and weathering. And for post-shading😉
Looking forward to it. 😄
Keep it up, James. 👍
24 January 2021, 09:04
Slavo Hazucha Came together nicely, barely see any filler! Great base for the final paintjob 👍
24 January 2021, 14:54
James C Thanks Jos, Roland, WhiteGlint and Slavo 🙂
I went over all the surfaces with a fine 3000 grit sanding sponge to smooth everything over again, and then got the underside surfaces painted. So today I hope to make a start on the camouflage.
The replacement white metal landing gear struts that I had intended to use were a waste of money and add nothing to the kit detail wise, other than to cause more head-aches. The biggest problem with them is that the axle that attaches to the back side of the main wheels is very short and the recesses where they insert into the wheels is very shallow. Even using CA, I don't have any confidence that the wheels will support the weight of the completed model without snapping off the metal struts. By sticking with the kit parts I'll definitely get a stronger bond.
24 January 2021, 16:52
James C I got the first colour of the camouflage done on the upper surfaces, but mistakenly used "Extra Dark Sea Grey" rather than "Dark Sea Grey".... don't ask how I managed to cock that up, but I'll try and lighten it up a bit before I apply the RAF "Dark Green"
I had been intending to paint the lower surfaces with "High Speed Silver" as per the Airfix colour call outs, but the replacement decals I'm using are for NZ6106 in the late 1960's after the High Speed Silver had been discontinued.
I believe that the Mk.12's that the RNZAF purchased were the last of this variant off the production line in the UK, and that they were initially delivered in overall "High Speed Silver." Later on, the camouflage was applied to the upper surfaces, and later still the High Speed Silver was done away with entirely with the lower surfaces painted "Light Aircraft Grey"... but I'm open to correction if anyone knows for certain.
25 January 2021, 16:04
Nathan Dempsey Still looking great James. You can always lighten that grey by doing a little post shading. As far as the silver or grey underside, always go with what you like as you're the one that's going to look at it nearly every day 🙂
25 January 2021, 16:35
James C Thanks Nathan 🙂 Yeah, that's the plan. I'll do a custom "lightened" mix of the Extra Dark Sea Grey that I used. As for the underside, I'm pretty certain it is correct for the period and it will compliment the bomb and wheel bays nicely which I've done in aluminium.
These areas were another source of confusion as Airfix calls out for these to be black, which I'm certain is incorrect as all the walk-arounds I've viewed show these areas to be either off-white, or aluminium. With no references for these areas on RNZAF aircraft, I decided to use a bit of artistic license (painting them in aluminium) instead... which also matches the insides of the wheel bay doors😉
25 January 2021, 16:49
James C I lightened up the grey a bit, and also sprayed the green. Just needs a couple touch-ups before I shoot a coat of clear gloss (Pledge) over everything.
26 January 2021, 03:37
Lode Schildermans James, very smooth colors and detailing and the preshading is just what is has to be. Great work, mate
26 January 2021, 06:40
Augie Good looking paint so far james 🙂 RAF Canberra's of the time were sort of semi gloss, but they picked up dirt like no ones business.
It's a bit more weathered than what I had been planning on... but I can live with it.
I'm hoping to give it a couple light coats of gloss (Pledge floor polish) today, and then possibly make a start on the decals over the weekend.
26 January 2021, 17:11
Slavo Hazucha Lovely, shading & color tones - exactly what those big flat wings needed! 👍
26 January 2021, 17:42
James C Many thanks Slavo... she's been glossed over now. I'm pretty happy with the paint work so far... but, always room for improvement though. I'll let it sit for a couple days before I apply a panel line wash and decals etc. It's been really cool to build something from our (NZ) armed forces.
28 January 2021, 00:14
Lode Schildermans James, it is just outstanding. I'm looking forward to the end result
James C I made a start on the decals yesterday and with the exception of a couple stencils, the undersides are done. Also began the upper surfaces and am in the process of getting them to settle down properly. The replacement "Alliance" decals perform well, but the stencils on the Airfix sheet are proving to be a little troublesome, and some are also slightly out of register.
A big disappointment with this build is that despite taking care to make it nose-heavy, it still wants to sit back on it's arse!
The instructions called out to use 100 grams (which I knew wasn't enough) so I managed to squeeze in 150 grams on top of the nose wheel well, behind the cockpit bulkhead and a further 50 grams on top of the forward end of the bomb-bay in the form of old washers, nuts and bolts etc. By doubling the suggested weight, I felt pretty confident that it would be sufficient to keep the nose wheel "planted."
Perhaps if I'd used lead instead I would have been ok as ounce for ounce it would have been a lot heavier. Ahh well, shit happens.
Will hopefully finish up the decals today and get them sealed in tomorrow.
Erik Leijdens Fantastic pain job James. The decals made it come alive.
1 February 2021, 20:21
Lode Schildermans It looks fabulous, James? The decals are the finishing touch, but what a paint job. Awesome
2 February 2021, 05:58
Robin (WhiteGlint) The aircraft looks great, James.
Still a bummer that she's a tail sitter. I feel your pain, built some tail sitters some time ago myself.
Could you fix her with superglue to some kind of simple diorama? The apron of an airbase for example.
Still a fair few assorted stencil's (Airfix decals) left to apply, but they really are total rubbish (out of register) and a big let down after what has otherwise been quite an enjoyable build... and more so, than it being a tail sitter. Unfortunately, the aftermarket "Alliance" sheet doesn't include any replacements, which was a missed opportunity sadly.
@ White glint - Yeah, I (briefly) considered that I could just anchor it to a base; and I technically still could, but doesn't really fit with my display cases. The other option was to just load up the front end of the bomb-bay. But having spent a fair bit of time painting and weathering it (and the bombs etc) just to close it up, didn't really sit well with me either. The other issue with doing that was that the fit of the doors (in the closed position) wasn't all that great 🤔
2 February 2021, 16:54
Murad ÖZER deluxe materials' liquid gravity would come in handy tho at this point it's a nogo due to the b/n glazing on the nose.
i mean even if you'd bore a hole to pour the pellets from a relatively unseen location around the nose gear/bombay by the looks of it they'd have nowhere to go but towards the glazing unless of course there's some sort of a bulkhead and/or firewall around the cockpit.
securing the model on a base seems like the most effective cure and it doesn't have to be as wide as the aircraft itself or a taxiway etc, kinda sorta nametag for ex, or even a mirror so the bombay interior could be viewed?
2 February 2021, 17:17
Slavo Hazucha Fancy belly, very nice paintjob and great realistic contrast in applied effects to the upper side 👍
A lazy tail always disapoints, but once it´s solved in any suitable way (like you did) and the hurt pride composes itself again, it gets pretty quickly forgotten IMHO. The solution is usually not a problem and it´s nothing comparable to true "eye magnets" like surface & paint damage or a decal with oil sucked under the carrier film & stuff like that...😉
Looking forward to the final staight!
2 February 2021, 18:20
James C Thanks Murad. I had also been considering mounting it onto a kind of plinth to elevate it a bit so I can position other builds around/beneath it to save shelf space. Will think about it a bit more, but for now I think I can live with the tail brace. The mirror is a cool idea as well 😉👍
Cheers Slavo, I always appreciate your thoughtful and considered insight mate. Hopefully the final reveal wont be too far off now.👍
I finished off the decals today, but there are a couple on the trailing edges of the wings with silvering that after 3 days now, are proving to be particularly stubborn to remove and are resisting the numerous liberal applications of various setting solutions that I've tried. I've even tried compressing them gently with a damp sponge! I'm at a loss as why it has happened; and only on the Airfix decals, as the surfaces were dead smooth and I had no issues with the "Model Alliance" decals whatsoever. 🤔
Will see how they look in the morning, and if there's still no change, I'll just seal them and be done with it I guess... and move onto final assembly.
I already have the next project picked out and set aside. 😉
3 February 2021, 06:06
Jos Jansen Great work James...tanks, planes...no matter what, again a excellent build!
3 February 2021, 10:07
Nathan Dempsey That's a really nice finish James & a great solution for the tail sitting. I've seen the red jack under several Canberras. I need to make some time for my B-57 or T.17 kits.
@ Nathan - Yeah, while I was initially disappointed... having to revert to using the tail stand (it comes with the kit) isn't a big deal for me any more... and given that almost 2/3 of the aircraft hangs well behind of the main landing gear... the tail brace would have been a necessity when parked up during high winds or when fully loaded I guess. Painting it red was just a bit of artistic license for "high visibility" to ensure the ground crew noticed, and removed it prior to taxiing etc.
After sealing the decals (giving it a satin finish) I just need to install the bomb-bay doors, flaps, Rocket launchers and wing-tip tanks etc
Quite a good kit, but obviously not of Tamiya or Hasegawa quality so doesn't quite build itself, and does need a bit of work to assemble which I found to be quite enjoyable. The only real let down with it was with the decals... which I replaced with the "Model Alliance" sheet. Unfortunately this sheet didn't have replacements for the numerous stencil's which were out of register and just didn't want to sit cleanly without silvering.
If anyone would want to do an RNZAF Canberra, I'd recommend sourcing replacement decals from oldmodelsdecals.com/ as this guy has done a sheet which includes the stencils as well.
Had I known about it, I would have purchased this set rather than the Model Alliance sheet etc as it includes all the necessary stencils as well... and for roughly the same price excluding postage etc.
Anyway, cheers for following 🙂
4 February 2021, 20:29
Augie Nice going James 🙂 Would go well along side mine
4 February 2021, 20:42
James C Thanks Augie, it was your build that inspired me to dig mine out.
I only wish that I'd followed your build more closely to prevent the bastard from tail sitting!😉 👍
Oh... and the bloody thing doesn't fit in the display cabinet!!! 😭
Erik Leijdens Excellent result James! I really like your paint job, faded under the New-Zealand sun. Inspiration for building mine now!
5 February 2021, 06:52
Murad ÖZER that's just gorgeous James, lovely result!😎
5 February 2021, 09:44
Slavo Hazucha Always a feast for the eyes when you serve the menu on that black table!😉
I really like what open sunlight does to well-made models - that camo and shading really start to work their magic in the right light - beautiful job in your best traditions! 👍
And I imagine, when looking at the very right critical angle, the side panels could just be a little bit visible...😉
Yeah, I definitely see the appeal of an RNZAF A-4. Beautiful camouflage. 🙂
5 February 2021, 12:05
James C Many thanks for your positive feedback guys, very much appreciated 🙂
I took the pics in the early morning while it was still a little dark... just to minimize the silvering on the decals 🤔
@ WhiteGlint - Kiwi A-4's are on the build list as I have a pair of Hobby Boss kits but I will need to scratch together the angled refueling probe to make them correct.
5 February 2021, 14:01
Gary Kitchen 🙂 agree with Slavo. I know when I see that table top and white fence behind, that there's something special in the offing.
It got some grit and shit inside of the canopy and nose unfortunately.
5 February 2021, 22:06
James C I also forgot to mention that I have a TON of aftermarket decals left over that I doubt that I will ever use, so if your after South African or Royal Airforce decals I'll happily give them to you, so long as you agree to the postage etc. The decals are the aftermarket "model Alliance" sheet as well as the Airfix sheet which weren't the best to be honest.
Jens Hello James C I absolutely like the play of colors is more than successful, the construction is perfect, it's a shame that you can't solve the load distribution better 🙁 but the original has its say 🙁
Alexander Looks really good! 👍👍 Would have liked a bit more weathering, especially around the engines, but this does give it a compelling look as well.


 1+
1+