
Thread started by christian-w
added a new photoalbum.


41 29 May 2022, 11:24
As usual I built main parts together: powertrain, chassis, body. Everything is prepared for the first spray. Well well.
29 May 2022, 11:28
Thank you! Always, when I paint the silver I think about to skip the clear coat.
3 June 2022, 04:23
Half black done. I was thinking a lot, how to manage all the paintjob - included the red thin lines because I'm not really confident with the decals. But after all brain storming, I'll give them a try. It's so thin to paint or so.
13 July 2022, 17:34
Aaaaah! I was so very much in doubt to buy this kit at the World Model Expo. I didn't in the end. Now you're haunting me Christian!
13 July 2022, 20:44
Sorry 😄 Martin 😉
@Nigel ... to scale the stripe down it should be - I don't know - 1/5th of 1mm (0.2 mm)? I tried to paint it with a small red pencil on the other C3 before I stripped the yellow color. With straight lines it was fine. The problems are the circular lines around the wheel welds. To get them parallel, would be the hardest part followed by parallel taping for the rest of the paint.
I didn't think about thin decal stripes or so but I guess the wheel welds would be a challenge too.
I'll go with the decals. If that fails, I'll overthink another strategy . Somehow.
Challenge accepted 😄
14 July 2022, 19:39
On the pictures there isn't silver on the wheel arches. So there is no need to curve the red stripe. You could make do with one stripe from the nose to the rear, ignoring the wheel arches?
14 July 2022, 19:58
No, Martin. The decals have small areas of silver and black nearby the red thin line. It's around 1 mm.
As next step I'll check the area around the wheel arches (that's the right word I see) which will be coverd by the decals. Then I see, gow much I have to paint silver. I might use a pattern for it.
I'd never let this detail away. That is one of the main characteristics on my point of view.
I took the easy way so far. Maybe it was wrong, not to take the time to mask the wheel arches from the beginning on. I will see.
btw: I added a picture of the decal sheet and a test to paint the strips with a pen.
15 July 2022, 03:58
Now I see! You'll need a very steady hand if you're going to use a pen. Definitely not my forte. My preference would be masking. But I'm not you 😄
15 July 2022, 06:49
How about making your own decals using the Revell ones as a guide?
Two steps forward one step back but at least the new decals should work
15 July 2022, 07:15
That's what my brother told me too: the new decals should work.
But me is always sceptical some how. My experience with those long and thin decals are nearly zero. If it is possible, I'll paint such things (like I did on the FOOSE C7 2015 Corvette Stingray "Foose™ Design" C7 | Project by christian-w (1:25))
15 July 2022, 08:20
If the colours are just white red and black, it should be possible and simple to print them in white decal paper. Scan the original decals and convert to curves should be easy, it is a simple design of almost straight lines
15 July 2022, 12:13
You're right. It could be a solution but the color is silver instead of white 😉
But: my idea turned out well. Brushing the arches with such a pattern "from school". It's acceptable. This looks how it should.
The next step is clear coat.
15 July 2022, 16:15
Looking good!!! Nice recovery work mate 👍 I luv those Anniversary Vettes, are those red rings on the decal sheet for the redline tyres?
15 July 2022, 16:38
Thank you!
Sadly not. They will be put on the rims. The rims have such red thin lines. Another problem to tackle.
15 July 2022, 17:47
7 (!) months later, I did the decals on the body. The left side is not that perfect as wished. My brother took care of the long stripe all over the body on the passengers side. I should have listened to him to set the decals a bit higher of the wheel arches. Then they fit perfectly. So the body is prepared for another layer of clear coat
6 February 2023, 23:20
I feel your pain Christian. Personally, I dislike decals. However, sometimes they complete the model. We are our own worst critic, at times.
6 February 2023, 23:49
Always our own worst critics Bozzer. It's looking good Christian. I do a large number of decals myself and Chris's idea is one I always employ with the dreaded long, thin decals.
7 February 2023, 04:40
Thank you guys 🙂 At the end it looks nice and I like it a lot. In my brain, I'd like to do and have more of such kind of kits. It's a nice variaty.
@Chris , Kyle ... that was my intention on the second side, to cut it in 5 pieces. My brother stopped me 😉
Those decals wer very good to handle. That made a lot of fun. But nevertheless, I'm still no fan of this long decals. That is one reason, I'm not on NASCAR or racing cars. But I'll do my other pace car by Revell to get warm with it. Maybe.
7 February 2023, 05:34
It looks really nice Christian! I'd have never accomplished that in one piece.
7 February 2023, 13:04
Peterbilt 359 (Revell 7410, 1:25) This would look awesome, displayed next to your kit
")
8 February 2023, 17:22
Thank you, buddy's! I try my best.
@Bozzee ... Sweet idea. I think I have a black one but without the stripes. I'm not sure
8 February 2023, 19:17
I'd buy the one, which has still the chrome bumper at the rear and the plastic at the front 😉 This is one, I want to buy too.
9 February 2023, 05:04
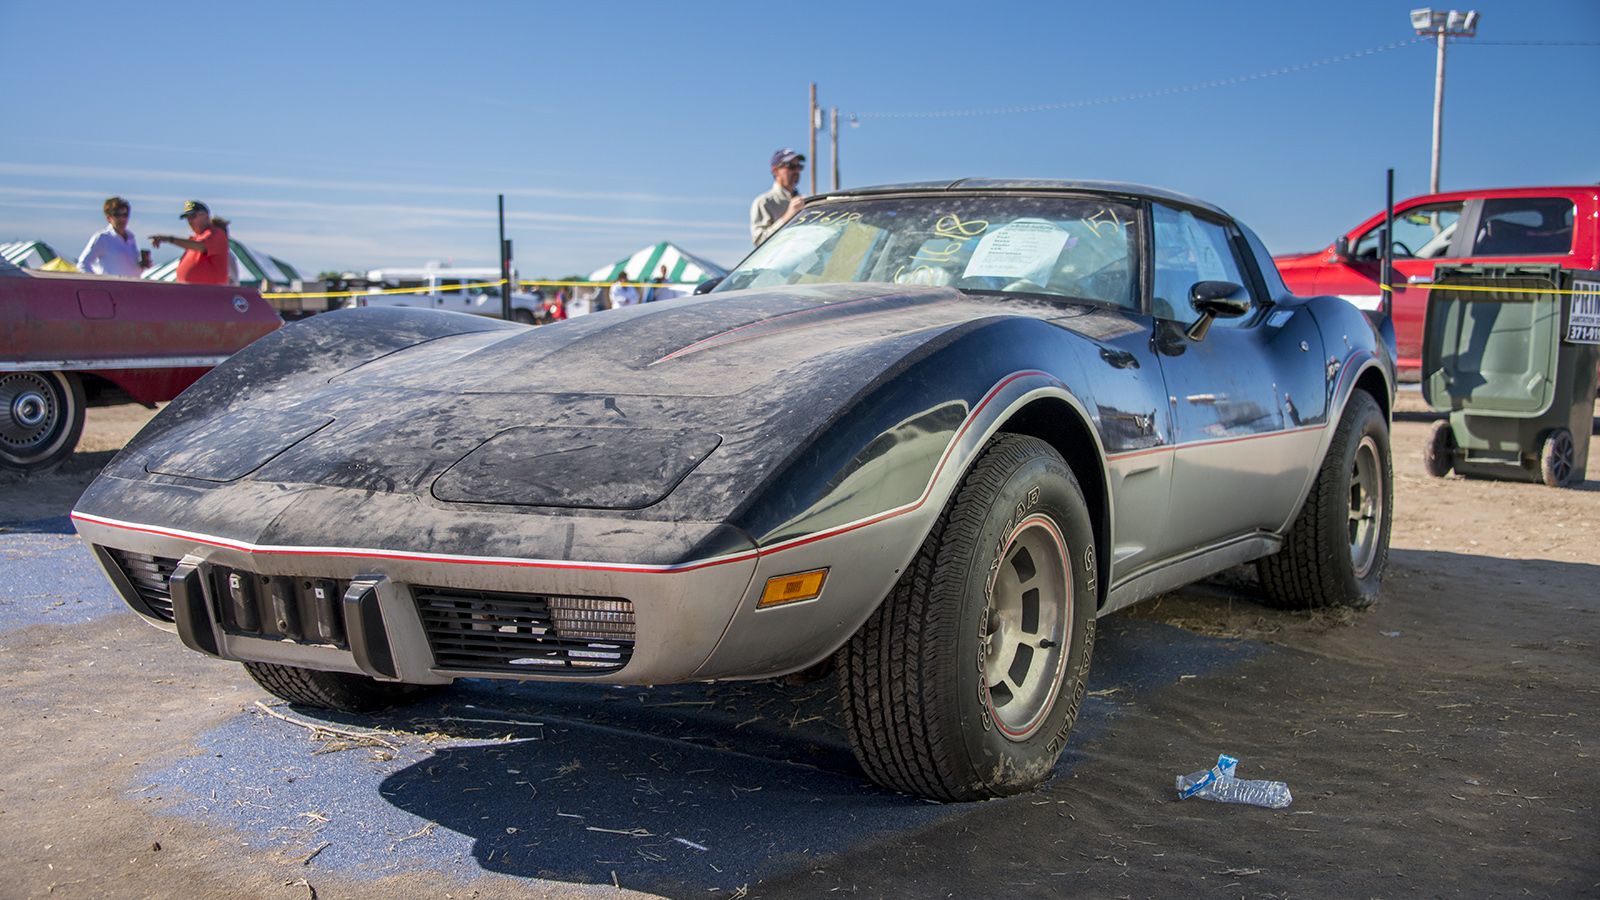
I just looked up the internet whether the C3 had a "sun glare strip" in the windshield. Yes, it has. Then I found a 7-mile C3 for sale! 7 miles! But that was nat that, what made me stunning: it has no front spoiler. That is the interessting point. Why? Because mine doesn't it have so far. Should I skip this part?
barnfinds.com/1978-c..ith-7-genuine-miles/
[img1]
9 February 2023, 05:25
4 Miles! Also no front spoiler: autoweek.com/car-lif..lock-or-preserve-it/
[img1]?fill=2:1&resize=1200:*
13 Miles! Boy oh boy. autoblog.com/2011/10..lfM43V8YrAYiOMv-Rfd9
[img1]

9 February 2023, 05:31
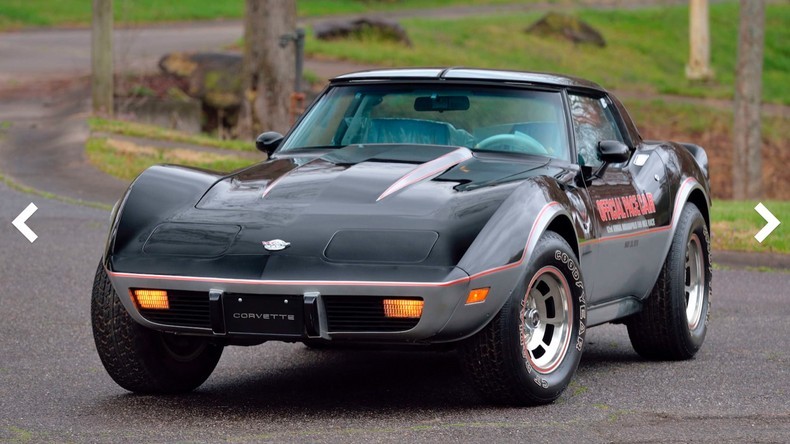
1978 was the 25th anniversary for the Corvette with special badges and the black and silver paint job offered that year.
The pace car edition was the standard car with L88 engine, black and silver with the red stripe and pace car decals (had to be attached by the owner!) and extra interior options. Not sure about the front spoiler though, l have seen some cars without one.
9 February 2023, 07:44
As Nigel rightly pointed out 1978 was the 25th Anniversary of the Vette, I had a 4 speed one about 20 years ago, wish I'd kept it now.
If I remember right the front spoiler was a factory option for the 79 model year & standard fitment on all 80 models. Mine never had one & looked better for it I think.
Beautiful work tho Christian 👍
9 February 2023, 19:20
Thank you, guys 🙂
The front spoiler will be added at least. I will see, how it will turned out without it on the model kit. Before the painting, I did a lot of fitting on it to the front bumper.
9 February 2023, 22:25
i started mine couple weeks ago (as a"between"-project) and i will attach the spoiler before painting. that will be interesting :-D
the fitting is a kind of terrible...the frontbumper also...
21 February 2023, 09:42
It's not really visible but the clear coat is done. Maybe it follows another layer. No I notice: forgot the front spoiler :/
22 March 2023, 19:17
You gotta do the Revell Peterbilt 359, Black Magic now. You've excelled in this build! Fantastic!!!
22 March 2023, 20:51
Thank you very much! Since months I want to build a car in black. Just black. I've not decided, which car.
23 March 2023, 05:11
Christian………. if it's a black car you're after you can't get much blacker than a Buick GN-X
23 March 2023, 16:27
Right. This car is bada$$ 😄. I'm thinking of the 1973 Dodge Charger of the tv series Burn Notice - one of my favorite series. Two birds with one swat 😉
23 March 2023, 17:28
I don't know that 🤔 Have to look it up whether I have such a car in my stash.
24 March 2023, 20:06
Holy moly - dodgegarage.com/news..e-phantasm-cuda.html
I'm not sure whether I have on in my 2in 1 box 😄
24 March 2023, 20:08
Funny fact, that my next build will be a black on black Cuda - but I didn't knew, that this as *Phantasm Cuda* exists 😱. Same specs, same wheels. Cool..know I have to read about the background 😌
26 March 2023, 17:22
Just watch the film. Dominik…….. proper old skool 80's horror & a bad ass Mopar!
26 March 2023, 20:29
Christian, this is very nice work. It is not an easy paint job by any means. Keep going!
24 May 2023, 21:01
Thank you, mates!
I'm excited, how the tires look on the Corvette. I imagine they accentuate the thick fenders (the sweep). My brother works on the same kit parallel baut he makes a regular C3 out of it. He used the provided decals for the tires. They look good too. I will hijack an picture by him and show it for comparison.
25 May 2023, 05:42
My personal preference is your template mate. I love how the letters and the tyres are dull and flat. In your comparison picture, your brother's are too shiny for me. I think that you definitely won the tyre competition 👍
Edit: tyres are tires, here in the UK. You'd have to Google why they're spelt different, but it's definitely not a misprint.
25 May 2023, 07:00
tyres vs tires - all right. I thought, I spelt it wrong. It's like lorry and truck. The same but different words.
Wasn't it bonnet for hood? And a torch in the UK is not a torch in the US *lol* Some of differnets what comes to my mind spontaneously.
Thank you for my win 😄 I think, my brother is not done yet. He told me, he will finish the tires with a layer of matte clear coat.
25 May 2023, 07:18
Lol Christian. You are very correct! Wing-Fender, torch-flashlight, boot-trunk, and the list goes on. It's body parts, that actually cause the most confusion (my Mrs is American) It's definitely caused a few raised eyebrows and a lot of laughs!
I agree with your brother, he should use a clear coat. For Matt, I suggest Winsor and Newton. I used it a lot, when I did 1/35 German armour. It's actually an artist's matte medium, but I believe that it's the best? Galleria, I believe is the brand name? It's a large pot, and lasts forever. Definitely worth the money. I still need to try the gloss, but I'm confident to try it. If you offer him this information, he might be as impressed as I was. Best regards to him.
25 May 2023, 19:03
I was married to an American girl and in school, they use still BE. I often avoided BE when we met the US 😄 I can imagine, that there are some funny confusions. The "torch"-thing is the best in my point of view.
Thank you for this information! I'll skip it to Dominik for sure.
26 May 2023, 05:09
Excellent work Christian 👍
Those rims are a pain to get the red line looking just right, you did a great job!
29 May 2023, 09:50
Thank you very much! The C3 is on a good way. It's not perfect but I'm satisfied with it.
I didn't use the decals for the rims. First I tried a permanent marker. It was thin but kind a transparent. So I used acrylic markers. That turned out okay.
29 May 2023, 15:19
Today I found the steering column😄. Missed it since 4-5 weeks. It was in the box of the Collector's Edition... So I could finish the interior. The rear lamps are done too. Now I can put it together
4 June 2023, 21:50
Thank you, mates 🙂! It's been a present for my last years birthday in April. So good work takes time 🙂
13 June 2023, 04:44
Looking great so far! I have a C3 in planning right now. Lovely cars.
13 June 2023, 05:10
Thank you very much! I like the "swing" (Coke-Bottle-Design) of the C3 a lot too. Nevertheless, I'd like to own a C6 😄 or C4 ZR1.
13 June 2023, 14:10
Ahh the C4 ZR1. For the time it was top of the hill. I've seen a couple in person, next to a regular C4 they are wider!
13 June 2023, 19:45
They are! I think around 2 inches each side at the b-pillar. And you know what: if you take both as a kit by AMT/MPC: you can see this!
This ZR1 was and is such a bad a$$ machine. "King of the hill".
15 June 2023, 19:14
Thank you!
This kit is nearly easy to built. Mostly the parts fitting pretty good. What is not perfect:
I had to work on the interior tube fitting into the body. It looks like it is to thick around the b-pillar. I scratched it very thin at the outside as long the visible side wasn't damaged.
After that the interior tube lined up with the lower window frame.
Through this procedure the dash board came loose but that was not as bad because then it was better fitting to the top deck of the dash board (which is molded on the body.)
The bumpers are really a must dry fit. I glued them in place and had to sand them on the sides to get them lined up to the body. Both.
Same with the front spoiler. There you have to work on. I did it but decided against it at the end.
But the rest fits good. I didn't change anything at the wheels. They look good in the wheel houses. Also you can glue all body parts on before assembling. The cassis and interior tube slides in without any problem - as two separate parts and after working on the interior tube's outside. No rocket science here.
The t-Top are separate parts. I never glue them onto the body.
16 June 2023, 19:50
On the last photo, the way I love this machine- without roof panel. Great build!
16 June 2023, 20:24
Since the T-tops are separate, I would do mini magnets to hold them in (before paint obviously)
17 June 2023, 04:49
Thank you for the nice comments! I appreciate it.
I added another picture of one panel of the roof. As you can see, I tinted them. The Idea with tiny magnets is good. But in my case the location should be invisible. I can't imagine, how it would came out with magnets and the transparent paint. The parks are painted from the inside 😉
18 June 2023, 21:10
That's a beautiful job Christian 👌👌 the T tops are a pain in the arse to hinge or make detachable
18 June 2023, 21:43
came out really nice. the clear green t-tops are the "cherry on the cake", the "point of the i" . they look excellent
19 June 2023, 14:02
How were the t-tops stored on the real car? That's how you do it but too late for alterations 😃
19 June 2023, 16:11
cimg5.ibsrv.net/gimg..a36d31caffb424e.jpeg
corvetteforum.com/fo..op-storage-79-a.html
19 June 2023, 16:51
The storage was clear for me - never thought of this little detail to add on. It was the same "technique" GM used at the 3rd Gen Firebird (sadly mine has no T-Top). With the C4 they changed it to fixed points in the trunk for the (now new🙂 one piece panel. The different is too, that the C3 never had a "trunk lid"- The access was only possible via the interior. The C4 had the opening lid.
Thank you for all the comments (and the idea for the storrage bag 😄 ; I'll see, what I can do with this. I have an idea already)
@Nigel .. it is never to late 😄
20 June 2023, 08:03