

Saab B 5 - Special Hobby

Box art, showing a winter camouflaged B 5.

Opening the box ...

Two frets with very nicely molded parts, with no very apparent flash. Quite traditional: clean and realistic recessed panel lines, a vertically split fuselage and horizontally split wings. No ordnance at all. It's all really nice, but in fact it looks like a reboxing of the MPM kit from 2007, I cannot see any difference at all.

The molding gates seem to have been placed where they cause the least amount of trouble - well done! A-model, are you paying attention?

Some simple internal detailing. Possibly suited to be sanded off and replaced with metal wires or styrene rods for a more 3D-like appearance, but I am not sure how much will be visible with the canopy in place. There are also some nice PE cockpit details that we will look at in a moment!

The second fret - just the fuselage bottom and the wheel spats (to be replaced with the provided resin parts for the Swedish version).

And here are the resin parts needed to convert the Northrop A-17 into a SAAB B 5. All brutally shoved down into a resealable plastic bag... not cool. So let's examine the damage.

Well, some parts have detached from the casting blocks, but nothing damaged as far as I can see.

Teeeeny parts for the bomb rack - 'tis going to be fun with the superglue!

Really crisp engine cylinders and the new, larger cowling in one piece - no need to try to eliminate a horrible center seam! I like!

The resin skis look crisp, but I have to say, the attachment struts seem awfully fragile. Personally I think they look like slippers, so I will definitely use wheels. The skis were only used in the northern Sweden during the winter months anyway, normally the B 5 was equipped with wheels.

Here you can see the main one-piece canopy and the bulbous vac-formed front canopy for the B 5. You get two vac canopies in case you mess up one. Which is pretty likely to happen. Lots of frames, but they are straight and should be easy to mask even without a template (which I have bought anyway).

This might possibly be the most risky part of the build: you will need to separate the windshield from the one-piece part, remove the pilot's canopy and replace it with the vac-formed version, while retaining the entire rear section above the gunner's seat. However, if you also want the gunner's canopy to be open, you will need to find a way to be able to slide it in under the 'middle' part, leaving only the rearmost part in place. I won't do that for sure. Or maybe I will.

You get some nice photo-etch frets - one painted fret and one natural brass. A PE bending jig is strongly recommended for crisp bends of the cockpit and bomb rack details.

Pre-printed dashboards and seatbelts - looking nice and crisp. A tiny paint damage on mine, but nothing that cannot be fixed easily.

Decals for three versions are provided. Looks decently sharp, with the correct colors. The red cross of the first aid kit hatch is ever so slightly offset, but the other markings look good. No service stencils are provided, although the real aircraft actually had a few.

They look very thin, so we'll need to be careful with the setting solutions.

The instruction leaflet is shiny and nicely printed in color. Paint callouts are for the Gunze range, which is a gazillion times better than the old Humbrol numbers, although as usual with 1:72, nothing beats mixing your own hues based on references.

Yep, there are some clear experience expectations here, like cutting and supergluing stuff. Some simple, but crucial details need to be scratch built too. So this kit is definitely not for the completely unexperienced.

Detailed enough for ya? Not sure why the rear machine gun is supposed to be pointing into the fuselage; is it a self destruct mechanism or some in-flight storage location?

One version with that blotchy camo... The paint for the white areas was just chalk dissoved in water. It was roughly brushed on with mops, and should be incredibly sloppily applied. I mean, like really, really badly; not at all as crisp as in the illustration, but covering the edges of the national insignias, running down on the window panes and so on. I cannot help but feeling that if I finished the model like this, it would just look like I am rubbish at painting.

An unpainted B 5? Pretty cool, although the only picture I have seen of a natural metal finish B 5 was an aircraft used as a general purpose utility transport vehicle from the years after the war.

This is the standard olive green dress that most of the B5's wore during their active careers. I think this will be the one I will build. The wire antenna attachment should provide tons of fun!

This is a true multi-media kit straight out of the box, with essential parts ONLY provided in metal and resin. For instance, the entire cockpit area is provided as photo-etched parts only, so you need to be a pretty handy with superglue and tweezers to pull this off.

The nose section is completely different for the B5, so it needs to be sawed off to be later replaced with a resin part. It is a straight cut along a panel line, so pretty easy with a razor saw. But it's a good reminder that this is not going to be your standard shake 'n' bake kit.

Let's now start with the cockpit! The seats are provided as photo-etched parts to replace the rather rudimentary plastic parts. I am using a curved blade to separate the metal parts using a ceramic tile as cutting board instead of my usual plastic cutting mat - this way the parts will not get accidentally bent.

Bending along straight lines is best done by using a jig (I am using something called RP Toolz RP-8). Bending with pliers or by hand risks making the bends wonky and as result, the parts will later not fit together nicely.

The pilot's and the gunner's seats are taking shape.

The gunner's seat requires you to add a bunch of scratch built stuff. The transparent ring around the seat comes from a slice of a plastic tube as the intended PE part cannot be bent into a perfectly circular shape. The gun handles also need to be scratch built. Now time to paint these before adding the pre-painted PE parts, seatbelts, gun sights, dashboard, consoles and a bunch of other stuff.

Cockpit parts primed and ready for final paint before assembly.

The instrument panel consists of a printed part with the dials and another metal part with holes for the instruments. I sandwiched a clear acetate part between these two to represent the glass.

The gunner's turret is also painted and assembled. The machine gun will be added later as it is super fragile. (EDIT: I assembled it wrong, the crescent-shaped gun mount should be far in front of the seat ring - changed it later.)

The cockpit is painted, assembled and also heavily weathered as they were pretty dirty and worn in real life. The gunner's seat will be added and also the dashboard, and then it is time to join the fuselage halves.

Main fuselage halves joined. There's not a lot of mating lines front of the tail fin, so the resin nose section will be essential to provide stability.

Center wing section joined. It is important that this part is perfectly perpendicular to the vertical tailfin in order to avoid gaps at the wing roots.

The nose section is separated from its solid casting block using a Dremel cutter disc. Make sure to wear a proper mask during this part and clean up your workspace afterwards, as resin dust is is super toxic.

Resin nose section cemented onto the model with CA-glue. It is slightly more narrow than the plastic, which will need to be fixed by some sanding of the fuselage nose section. Also the fit of the bottom side is really poor with some nasty gaps of 2-3 mm that needs to be fixed.

Gaps filled with Tamiya White Putty. On the bottom side some styrene slices were used to fill some of the largest gaps. Then of course some of the lost panel lines will need to be rescribed.

Wings and stabilizers added. The wing join is a bit peculiar as it needs to fit around the center piece already added to the fuselage, but with a little care it can be made to fit almost seamlessly.

OK, let's tackle the part I am most dreading, to replace the sliding part of the pilot's canopy. You have only one shot at this, so let's be really careful! The old hood is first sawed off using a razor saw and the edges are sanded smooth.

Here is the vac-formed hood that should be used instead.

The vac-formed piece is first roughly cut out with a side cutter.

My usual method is to use a Dremel in a vice, with a grinding stone running on 5000 RPM, and then carefully grind the part down to the frame lines. Without an electric tool, I guess one could use precision scissors but I rather prefer the process of slowly grinding away the excess as you can constantly see what is going on.

And while at it, I also cut away the sliding part of the gunner's cockpit and sanded off the frames to make it narrow enough to slide in under the middle part betwen the two canopies. This middle part also needed to be thinned significantly on the inside to accept the sliding part, hence the scratched appearance. It doesn't matter, as it will be fully painted on the outside, so the scratches on the inside will not be visible.

Dry-fitting shows that it is a tight fit, but should look good once painted properly.

Starting to add a bunch of resin parts under the wings. Since there are no location markings, you need to take great care checking reference photos and drawings. Also CA-glue bites almost immediately with resin, so you have just one shot to put things where they should be. Also, there should be two dozen microscopic PE braces for the bomb racks, but my skills are nowhere near enough to attach them so I won't even bother.

A bit of a weird sequence here, but before the engine and the engine shroud is attached, I decided to paint the nose section since some of the frontmost surfaces will be partially covered by the engine shroud and I figured it might be more difficult to paint these areas later. The bottom side is a mix of Tamiya XF-19 Sky Gray and XF-23 Light Blue, the top side is XF-61 Dark Green.

The resin Mercury engine is assembled and sprayed with AK Xtreme Metal AK476 Steel. Struts hand painted with Vallejo 707 Chrome and finally some Tamiya Black panel wash is applied to deepen the cylinder head details.

Engine superglued into the engine cowling. Before that, the inside was sprayed zinc chromate green (a mix of Tamiya Green and Yellow acrylics). The front ring was masked off and sprayed with a mixture of Tamiya XF-28 Dark Copper and XF-84 Dark Iron. (EDIt: I later resprayed this to a slightly different color as it looked too brown to me).

Engine assembly superglued onto the fuselage. A bit of a fragile join as it only touches in a tiny spot in the very center, but at least now we can continue adding more stuff!

The fixed parts of the canopies are cemented in place with Ammo Mig Ultra Glue acrylic cement. That middle section was sanded smooth but I didn't care about restoring its clarity as it will be painted opaque anyway. The sliding parts will be added after painting.

Okay. There are ill fitting parts and then there's this guy. That little resin air scoop was like "well, that's not gonna happen sweetie". In the end I found it easier to simply cut off its front grill, scratch-build the rest from bits and blocks of styrene, superglue it in place and fair it in with Tamiya white putty.

A bunch of more resin and photo-etched details added to the front bomb rack and sprayed with gray primer to reveal bad joins. Everything needs to be joined with superglue at teeny-tiny attachment points, and quite frankly, it did not end up as my all time high clean assembly. But I am just damned pleased to have managed to get everything to stick to the model!

Canopies and cockpit openings masked off with the suitable Peewit precut masks and Tamiya tape. Some gaps filled with masking fluid to avoid accidental paint spray ending up inside the transparencies.

Primed with gray UMP primer (AKA Stynylrez). H&S Evolution airbrush, 0.4 needle, 25 PSI. I decided to leave off a bunch of tiny details like pitot tubes, antennas and wing guns until after painting or I would just knock them off (as I always do).

Panel lines pre-shaded with Tamiya XF-85 Black. This hasn't been my favorite technique so far, but it turned out so nice on my last project (the Mi-4 helicopter) that I might start to use it on future projects.

Underside sprayed with my mixture of Tamiya XF-19 Sky Gray and XF-23 Light Blue. Thinned with Mr. Color Leveling Thinner and applied with my H&S Infinity, 0.2 mm needle at 12 PSI. I didn't bother masking off that brownish metal nose ring, as having checked some more photos I realized that this "burnt iron" color should be much more gray, and so I intend to respray it anyway.

Underside masked off - quite easy as it is only straight and sharp lines.

Top sides sprayed green (mix of Tamiya XF-58 Olive Green and XF-67 Nato Green). Some additional fading added by mixing in a few drops of white in the paint mix and spraying a heavily diluted layer in the middle of the panels. May look a bit overdone here but should be quite okay once varnished and some panel liner added. Walkways and a resprayed cowling ring comes next.

Wing walks masked off and sprayed black (I used Tamiya XF-85 Rubber Black as pure black would be way too stark). The cowling front ring is also masked off and resprayed with a thin coat of Vallejo Metal Color Exhaust Manifold, slightly letting the rust colored previous layer shine through. Looks much more convincing this way.

The separate resin propeller blades need to be superglued to the hub at a precise angle and pitch. I contemplated if i should build some kind of jig, but in the end I just eyeballed it, which turned out to be okay enough. Painted with AK Xtreme Aluminium in the front, Tamiya wooden brown mixture in the back. Tips masked off and sprayed Tamiya yellow. The blade surfaces are a bit pitted, which is slightly annoying. I tried to polish them to look smoother but the metal surface is very unforgiving!

Some minor details added. A few pieces were scratch built from stretched sprue, like the trim actuators. These are actually provided as PE, but they look too flat and flimsy. I often find that heat stretched sprue harmonizes better with my models.

The B 5 was equipped with a longer exhaust pipe to avoid the pilot to be dazzled by the exhaust flames during night operations. I tried to reproduce the heat discoloration effect of the metal with a wafer thin application of AKI Xtreme Metal Metallic Blue and Metallic Purple paints over the Exhaust Manifold paint layer. Not sure if it is realistic for the B 5, but it's always fun to experiment.

Model coated with Tamiya X-22 Clear varnish and after a few minutes oversprayed with just pure Mr. Color Leveling Thinner to melt the varnish and even it out to smooth glossy sheen. This is just to protect the paintwork and prepare for decals - the finished model will have a semi-flat surface.

The surface is very sensitive at least for a few days, so no touching with bare hands or you will end up with nasty fingerprints that are almost impossible to remove.

Cooking? I cover the freshly varnished model for a few hours with a micro owen lid to avoid airborn dust to settle and stick to the still somewhat tacky finish.

Decaling underway. Not a lot of decals, but they might be some of the best ones I have ever used. They go on beautifully on a shiny surface using hot water, and with some softening solutions, the backing film completely vanishes.

I cut the large "29" decal in two pieces to avoid forcing the carrier film to stretch over the gap between the tailfin and the rudder, but the film settles beautifully over the details so it probably would have worked anyway.

Weathering applied with AKI Paneliner set and some 502 Abteilung oils. I used various ochre and brownish colors to resemble Swedish dirt, which is kind of reddish (because of the iron rich soil). It's a pity that the perforated dive brakes are molded on the wings and cannot be posed extended, they would have looked absolutely superb.

Model sprayed with a thin layer of diluted Tamiya XF-86 Flat Clear to seal in the weathering and remove the glossy sheen for a silky semi-flat finish. Masks removed from the canopy and the sliding parts secured with white glue.

Propeller added and some brown and yellow stains added here and there with Tamiya weathering powders to break up the slightly monochrome appearance.

I struggled a lot with painting the rims as I just couldn't find a circular template of the exact right size and the wheels did not have an enough clearly defined border between the tyres and the rims to assist with hand painting. In the end I just did my very best trying to paint a circle. It turned out, well, not perfect but quite acceptable.

The very final detail: a wire antenna added from Ammo MIG Medium Fine 0.02 mm rigging thread. It's a super thin and flexible material and is surprisingly resilient. The tiniest application of superglue was used for attachment.

Finished

Finished

Finished

Finished

Finished

Finished

Finished. (Oops, I just noticed that I had somehow lost the pitot tube from the left wing while preparing the shots. I'd better find it before the robot cleaner does it.)

Finished

Hangar shot in the sunlight (Hangar: GPM cardboard kit).
Hozzászólások
77 12 September 2020, 11:17
I love a nice detailed build write-up, top class! Following with interest
14 February 2022, 16:53
wow this is going to be beautiful. The kit is my stash, I really like the plane 🙂
16 February 2022, 13:24
Hm, where have I been when you started this one Thomas? 😛
Wanna build the white one too.
PS. Remember, A-Model doesn't give a damn (me thinks)
16 February 2022, 18:14
You surprised me with the advancement of this project (alike Łukasz), Thomas! Following with pleasure and interest, of course 🙂
18 February 2022, 10:54
The resin nose section is a definite hurdle; it's a big chunk of resin that needs to be slightly sculpted with various electric tools (cutting disc and a grinder head) to fit. It's not easy, but without a Dremel it would be hell. I still managed to end up with some pretty nasty gaps on the underside that now will take several filling sessions to be filled.
18 February 2022, 11:17
You are putting a lot of work into this project. It is coming along nicely.
18 February 2022, 19:49
Finally I fixed the part I that was most dreading, replacing the sliding hood of the pilot's canopy with the bulbuous vac-formed version for the Swedish B 5. It was a bit nerve-wrecking to cut apart the only provided canopy, but thankfully it worked out just fine.
19 February 2022, 12:05
I somehow missed the start of this. Looks great so far. Extra points for the plastic surgery!
19 February 2022, 13:48
Thanks mates! But plastic surgery is not an option with this kit - the box has has injection-molded styrene, resin, photo-etch and vac-formed plastic, and you need to use them all for the model.
19 February 2022, 14:23
You'll get your Surgery Licensure at the end of this build. Humans next!?….
19 February 2022, 17:00
Very nice job so far and good accurate with the canopy, Thomas! 👍
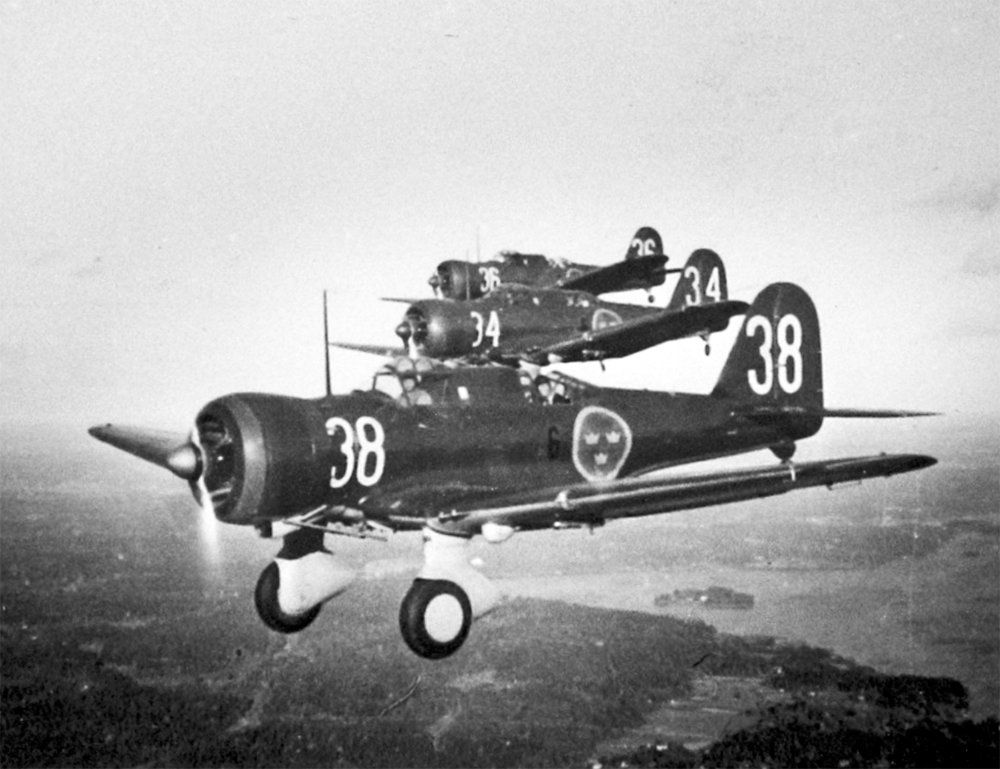
Is it possible that the gunner's canopy lacks side frames?
[img1]
[img2]
[img3]


19 February 2022, 18:15
Cuajete, you are absolutely right - some pretty sharp observation skills! Yes, the B 5 had frameless rear canopy side windows. I am still pondering whether I should try to sand them off, of just simulate the rear canopy being pushed inside the middle, opaque piece.
19 February 2022, 18:36
I am still trying to figure out how the rear gunner (of the B 5 and the Northrop A17) could fire his 30-cal machine gun from inside the rear cockpit. I understand the gunner's canopy could slide forward, but what about that rear end? Anybody who might have insight in this?
19 February 2022, 19:52
Thomas, I am not sure but I think the canopy may have been unmounted on the ground before the machine gun could have been placed there instead.
19 February 2022, 20:17
I can't see anything clearly either. Perhaps one of these photos can suggest something with the rear gunner's canopy. Is it possible that it slides back, inside the solid part of the cockpit so as not to collide with the pilot's cockpit?
[img1]
[img2]

19 February 2022, 21:07
Quite a challenge of a kit this version especially...
Following with interest 👍
20 February 2022, 11:59
Thomas, perhaps that site about Dutch DB-8 would help you answer your gunner questions:
kw.jonkerweb.net/ind..-douglas-db-8a-3n-uk
20 February 2022, 20:00
Łukasz, thank you, yes, I have also checked that page. I think I get it now, the machine gun was mounted on a swiveling frame, but was normally stowed with the barrel protruding slightly downwards and inside a special compartment behind the rear cockpit. The gunner's seat was equipped with a ring construction so the gunner/observer could stand up and use the machine gun. However, the rearmost section of the gunner's canopy would need to be removed first, which was done on the ground.
21 February 2022, 11:34
I was kinda wondering about that on-the-ground rear canopy removal. But, what a goofy way to do it! In any case, great progress on this one Thomas 👍
21 February 2022, 12:37
Starting to add the underwing resin parts. No location marks at all, so reference photos are absolutely mandatory.
23 February 2022, 15:29
This is going to be another masterpiece from your hands, Thomas, no doubt here...
25 February 2022, 18:10
Robert & Cuajete, I will certainly do my best, but man, this is one tricky kit. Not because it is badly designed, but there are just so many pitfalls.
25 February 2022, 22:23
it is unanimous this is a very cool, amazing and any other words to that affect build
26 February 2022, 18:53
Cuajete, yes, but in hindsight I could have done it much better by building the bomb rack from thin metal rods instead and superglue them into holes drilled into the fuselage. It would have been much neater and far less fragile. I definitely recommend that approach for anybody building this kit.
1 March 2022, 19:19
I gave up on the seven wing pylons that should also have four metal struts each: that is 28 microscopic metal pieces bent in very specific angles without breaking. I am usually pretty confident with PE, but that is way beyond my skill set.
1 March 2022, 21:17
Charlie, yes, that was the general idea. Come in high over the target, roll over, dive at 60-70 degrees, release bombs and pull up before the blast zone. Nasty business.
2 March 2022, 06:14
but the German ju 87 stuka was worse it had two small propellers on the landing gear and when the plane was diving the high speeds on the small propellers created a dreadful high pitch noise that frightened the living daylights out of the people on the ground
but the propellers had no brakes on them and the siren would start up in flight making the pilot and the gunner nerly go mad
2 March 2022, 07:37
do you know why the main bomb is mounted on a swinging rack
because if it just was released it would go through the propellers and the propellers would not miss it the rack swings out and the bomb falls harmlessly past the props
2 March 2022, 07:39
Charlie, thanks for the info! And just as a tidbit, the bomb cradle was added afterwards, as Northrop originally did not approve the airframe for dive bombing. However, the Swedish engineers calculated that within certain angle and speed ranges, the max structural limitations would not be exceeded. The aircraft actually turned out to be surprisingly precise although the only aiming aid were painted grid lines on the windshield.
3 March 2022, 14:07
Wow... Fantastic heat discoloration effect on exhaust.
Smooth glossy sheen and propeller looks very nice. Good progress, Thomas! 👍
7 March 2022, 19:27
Lovely. Is your desk that clean or is it just set up for the photo? 😉
8 March 2022, 08:41
Łukasz, nope not just for the photo. I really need to have a clean and organized workspace with boxes and labels and wall shelves for everything, or I will just be frustrated and annoyed.
8 March 2022, 08:53
Yesterday evening I started with the decals; it is always such a relaxing part of a project. The Special Hobby decals are beautifully opaque, but they are still thin and go on very smoothly. Once a few applications of Mr Mark Softer Neo has been added, the carrier film almost totally vanishes.
8 March 2022, 11:34
Looks fantastic already. It's real pleasure to watch your build reports, Thomas.
9 March 2022, 20:38
Your compliments mean a lot to me, since you are all model builders of a very high standard. Thank you friends.
9 March 2022, 21:51
Excellent work Thomas, I like it a lot. The antenna attachments are superb, you have that mastered 👍
As far as wheel masks go: I recommend getting a plotter and cutting your own masks. The pain of painting wheels went away for me since I got mine.
12 March 2022, 12:40
Wheels and wire antenna added, and hereby I declare this project finished. More photos will come as soon as I get back from my holiday!
12 March 2022, 14:33
Fantastic result and very nice pics.
Good job!
Have a great holidays, Thomas!!
12 March 2022, 19:35
A real great model Thomas ! And great pictures taken too - with the hangar in the back it looks very lively 👍.
13 March 2022, 20:55
Also enjoyed your Youtube-video very much. Thanks, that's great modelling from you as always!
30 March 2022, 20:09


