

Messerschmitt Bf 109 G FuG 217 "Neptun" conversion


Hozzászólások
16 April 2013, 10:20
very nice....did you spray over the the fuselage Balkenkreuze to tone them down? The black doesn't seem very black in the pictures (compared to
the code letters)
16 April 2013, 10:54
dera mates thank you for your notes but please don´t exaggerate it to much... it was a fast built needed only a view hours because of the simple hobby boss kit. In fact th balkenkreuz colour wasn´t black. it was RLM 75 grauviolett like the whole plane was coloured in RLM 74/75/76. But unfortunately th decal colour doesn´t matches to all colour brands. I used Gunze acrylics and the colour is different. Maybe one should cut out RLM 75 colour of th balkenkreuz from the decal of the airmodel kit and mask it fo painting it in the colour rband one uses to spray the camoflage!??
16 April 2013, 12:26
Hey Matthias, do you knoe if PP+NO was the only 109 testplane for the FuG 217?
16 April 2013, 12:29
Is the Werksnummer for this plane known? Would love to build one myself in 1:48
16 April 2013, 12:57
@Holger Kranich.... I believe so, but I am not sure.... of course most of us know the numerous Fw 190 with neptun radar
16 April 2013, 13:01
@Wim van der Luijt... I never concentrated on researching the werknummer, but now I want to know it too..... maybe with the known code one should be successfull.
.....another note........ soon I also will release a 1/48 scale conversion kit of the same plane....... like I did it with several other kits up-scaling them from 1/72 scale. So maybe you should wait a little bit 😉
16 April 2013, 13:04
Hallo Mattias , einfach nur genial was du an Sondermodellen so auf die Räder stellst Respekt 🙂
16 April 2013, 13:04
@adam..... I needed long time to get my personal best results with the mottles.... everyone has his own favorite technique. Mine is different to most others because I spray the mottles VERY (and I realy mean very very) thin Gunze acrylic paint. The mix-ratio often is 1:5. 1 part paint and 5 part white spirit. I combine it with very high (instead of most recommendations) pressure, which is about 3 Bar. I found out that especially gunze acrylics have a nice look for mottles than. I often use this mix-ratio also for preshading and than the camoflage itself. I have a 0,2 mm needle in my revell master IDG plus spraygun. I tried this mix-ration also with other colour brands but never got this result. The blendings between each colours are very soft. After the paint work is done most of the mottles are a little bit clossy, but with the final coats of future and then the finaly flat coat you have a nice finish.
16 April 2013, 13:15
Many thanks Matthias for your complete answer. Results are complete stunning and IMHO very realistic.
16 April 2013, 13:29
Yes, thanks very much! Have to attempt a very similar paint scheme soon, and that was quite helpful.
16 April 2013, 14:06
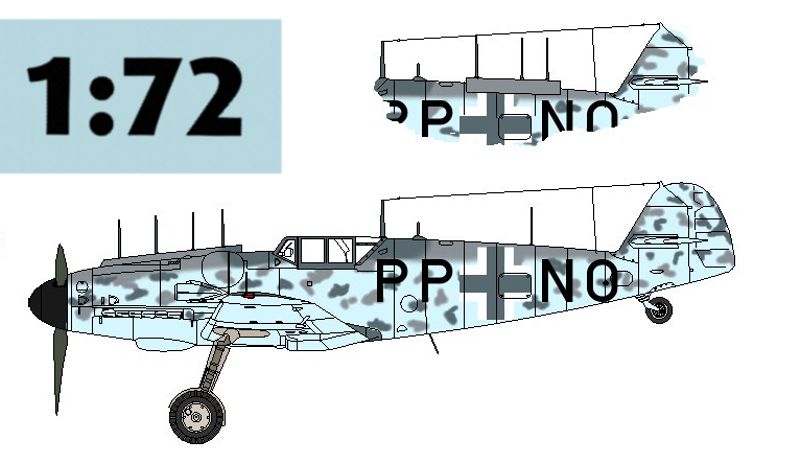
hmmm...hard to find some pics of this beast....quite a rare set up it would seem...this pic doesn't show the wing arials
[img1]

16 April 2013, 14:51
while this pic does have wing arials....but non on the spine......decisions, decisions..... 😉
[img1]

16 April 2013, 14:54
@Adam and Andrew Halper --- I should also note that when I spray with this mis ratio at high preshure you have to be carefull with your airflow..... more air than colour. With the lot of thinner you can aply lot of liquid with less paint. Be carefull not to spray to much liquid to fast.
16 April 2013, 17:00
@Wim van der Luijt and others..... you are right these are the reference pictures. One can see that the antennas not had been mounted all at the same time. With the front antenna they had mounted also the wing antennas and 3 on the fuselage without the wing arials.... on my homepage one cansee this on a 3 view drawing.
I will try to ad a smal picture like Wim did it, but I am not sure if I remember how this works 🙂
16 April 2013, 17:04
Awesome!
I really enjoyed the BF 109 "porcupine".
🙂 🙂 🙂
Nice job.
Congratulations!
16 April 2013, 17:06
So it either had the fornt ones OR the back wires, but not at the same time, right?
16 April 2013, 21:09
Oh, thanks again! I'm an airbrush newbie, so I have a single-action airbrush and acrylics. I'm probably going to have to use a stencil (good thing mine's 1:48 too), but I plan on practicing on as many plastic bottles as it takes, first.
17 April 2013, 01:31
...and I'm putting distemper over the whole business, so my mistakes should be somewhat forgiven! 🙂
17 April 2013, 01:33
Album info
I decided to use a cheap Hobby Boss Bf 109 G to built this project. It was a different experience than building other Bf 109 kits but it was OK by me 🙂. I used some 0.2 mm brass wires to built the antennas. Normaly the shown front and back antennas of the fuselage had not been seen at the same time.


