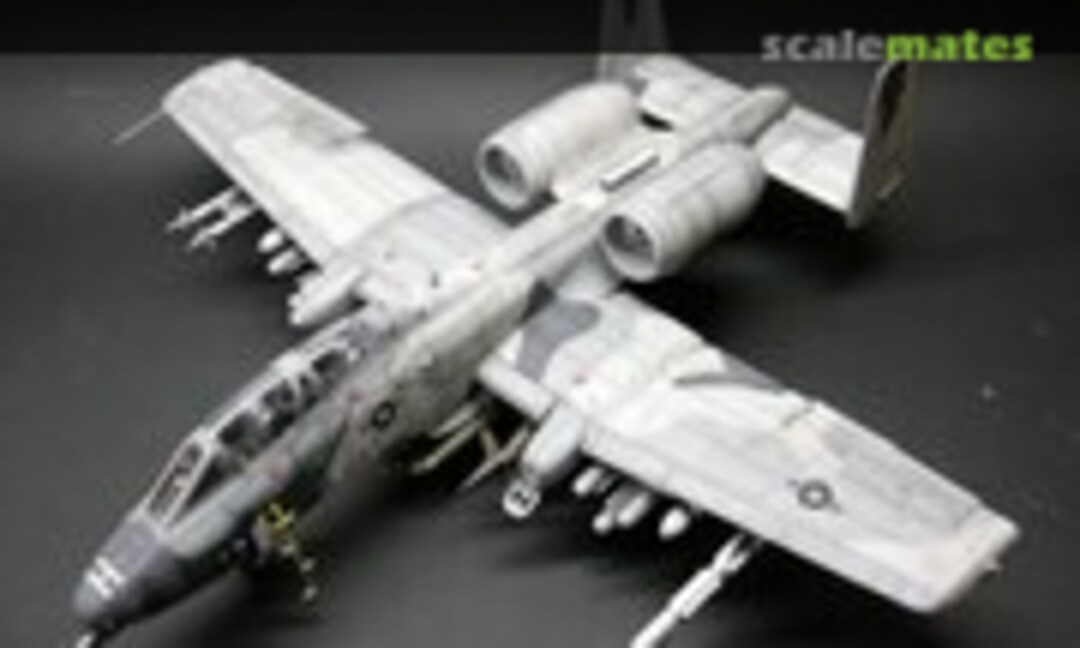
WIP - A-10N/AW Thunderbolt II

Big box of plastic.

Only one armament cinfiguration?

First parts and problem. 0,5mm gap.

Trumpeters cockpit - lack of details.

Ammo drum.

Comparing kits and aftermarket barrel.

Barrel attached.

Components of GAU-8.

Building trailer to show gun compared to VW Beetle.

Trailer progress (metal sheet is from pepsi can)

Trailer progress (other side).

Trailer progress (hook added).

Trailer progress (suspension).

With temporary attached gun.

Gluing wings is tricky, have to be done step by step.

Movable flaps in wings.

So far the best fitted part - back halves of fuselage.

Progress after few days.

Close up of gun mounting place (plastic was thinned from 2mm to 0,5mm).

Wing tips require a lot of puttying and sanding.

I had to rescribe a lot of lines after sanding. Also holes were cut for mesh.

Upgrading ammo belt with 0,5mm wire and pepsi can metal sheet.

Added metal parts to rest of feeding ammo belt.

Added mesh to rear part of fuselage.

Added metal parts to back section of ammo belt.

Just got the beetle to put on base.

Very bad quality of parts.

In progress.

It took me few hours to get this.

Interiir painted.

Dashboard and steering wheel

And body almost ready for painting. Still not sure about the color.

All ammo belts upgraded, trailer with wheels compared to VW body.

Added wash and some pigments.

Added turning lights and interior mirror.

Steering wheel painted brown and dashbord changed for right side drive.

I made some toolboxes, wrenches, mirrors, seatbelts. Printed some magazines.

Added bars to bumpers and printed registration plates.

Dashboard, steering wheel, seatbelts and mirror attached.

All stuff and equipment in place.

Some carpets added.

Wheel covers painted and some polished.

Body painted with light yellow.

Last pictures of interior.

Last pictures of interior.

Beetle almost completed.

I need to make some wipers.

Most of the parts needed to build a plane.

And parts needed to build a resin kokpit.

Painted and rusted trailer.

Painted gun.

Painting cockpit.

Painting cockpit.

Wheels added and some rust applied.

Rust added to Beetle.

Front wheel bay.

And gun on a trailer.

Another view.

Assembling cockpit...

... and ejection seats.

Painted front wheel bay wall.

Painted front wheel bay.

Cockpit assempled after many hours of fitting.

And fuselage halves glued. They require a lot of putty.

and more putty.

Rear of cockpit needs some attention. Will cover with miliput epoxy putty.

Finally nose after a lot of puttying and sanding looks good.

Ejection seat waiting for pilots...

but pilots do not fit well. 🙁

A lot of sanding and rescribing was needed here...

and here...

and will be needed here on rear fusalage and horizontal fin.

Promisly looking joining of front and rear fusalage.

Side-bottom view of the same.

unfortunately wing do not fit at all.

Lenght of the plane in scale while it should have at least 50,5cm according to Fairchild dimension and almost 52cm according to Wiki dimensions. Maybe with gun???

I spend 30 minutes to make those seatbelts.

And 2 hours to do all those belts.

and another 30 minutes to paint and weather. Complete build of both ejection seat took about 6-7hours. It's shame that you wont's see much of this in closed cockpit.

Added about 70g of weight to nose to avoid flipping plane back. Trumpeter advised 80g but resin cockpit is already very heavy and I didn't want to putt too much stress on front wheel.

Added a little piece of plastic to gun cooling air intake.

After glueing windshield we have another episode of puttying/sanding.

Front wheel well is in place now. And again more putty.

This side was treated with CA glue and now looks good.

Gun tip from Verlinden cockpit set. I drill holes and glued some wooden stick to imitate gun barrels...

...because you can see them through air intake.

Tail after sanding. I add some PE parts and antennas.

Ejection seats mounted in cockpit.

Engines are firstly mounted in transparent bubbles (resin engines are included in kit)

They do not fit too well, I'm trying to find proper position for them...

...by moving backwards.

Engines with clear parts are then mounted in nacelles containig only few parts...

...but it is quite clever because by using those metal parts...

...you can open nacelle anytime you want.

Also main fan is made out of clear plastic and front rim is half grey half clear plastic.

Painted parts of nacelle.

And front of clear bubble.

Engines painted...

...and mounted in bubble (and after this I changed my mind how to show engines).

Finally I glue last part of canopy.

I had to add strips of 0,25mm HIPS to bottom parts of wing joints.

Wings glued, plane is getting it's famous cross shape.

I had to add a lot of CA glue to holes between wings nad fuselage.

Fan cover had a bad hole, so I add some CA to make it smooth.

Compressor section have different colors, so I used the one I had. Also I drilled 8mm hole in engine exhaust.

I started to thin exhaust cover. Mine half versus kits half.

I cut the middle section of clear cover to show engine.

Added some wires to engine.

Kit engine on tom comparing to my version with plumbings and wires.

I made part of nozzle from piece of wood stick, some metail foil and scraps of plastics.

Nozzle painted and mounted.

Wires and plumbing painted...

and engines mounted in covers.

Missiles and bombs painted and prepared for decals.

12 mk.82 bombs, 6 AGM-65 missiles and 2 mk.20 bombs.

1 GBU-8, 1 GBU-10 and 2 MERs for bombs.

1 ALQ-119 pod, 2 AIM-9L missiles and 2 TERs for Mavericks.

Finally armament is complete.

Air intakes were added and whole engine section was glued. Now it looks more A-10.

Air intakes needed some filling.

I have to add HIPS strips in the rear section.

Finally I was able to start wash. WIP photo.

After wash.

Dry fit of engine fans.

Flat lacquer Klear Kote Matt was applied.

It gives a real nice flat surface.

Engines were mounted.

This is the end.
Commentaires
22 December 2014, 06:29
Yes, indeed. In 1:32 it will be around 52cm/21" long and 55cm/22" wide.
22 December 2014, 07:27
Thanks Es-haq. Are you familiar with this photo:
[img1]
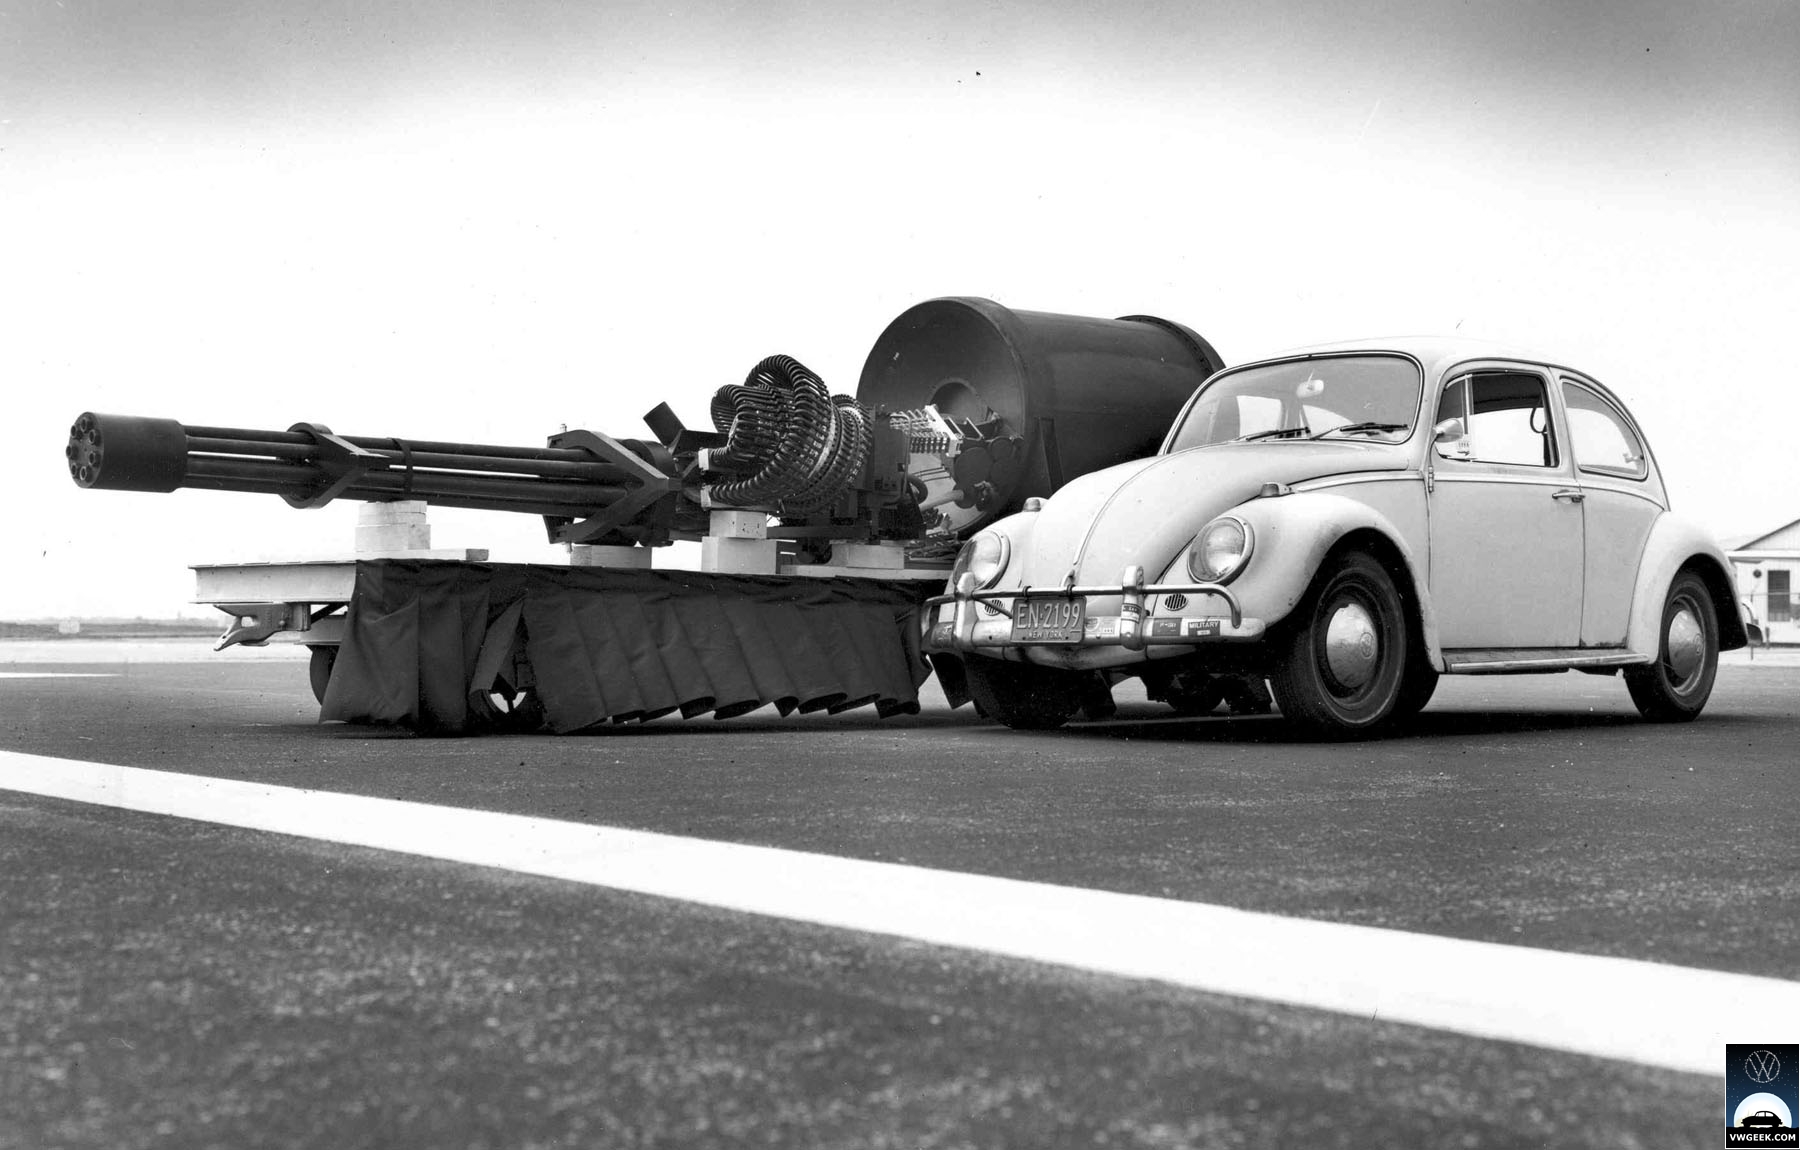
It was my inspiration.
7 January 2015, 16:48
Aaahh, i love this double seater A-10! That one is high on my wishlist!
8 January 2015, 10:26
It's a very nice plane. It's ugly as hell but it has something that you can't stop looking at it.
It''s a shame that quality of parts is very bad.
8 January 2015, 10:34
I heard the same in reviews... Its a shame that some parts are bad like hell... But i want to have it, doesnt matters how bad it is...😢
8 January 2015, 12:13
Holy Banana... I knew that guns as big but not that it was that big!
Looks like an interesting project!
8 January 2015, 14:37
Gun is about 6 meter long. In scale it is around 18-19cm while Beetle is only 13cm in scale.
8 January 2015, 14:39
Lovely! As soon as I saw your latest photo in the main feed I saw the famous old photo in my head, the one that is posted in the thread by you. This will be nice to follow!
8 January 2015, 18:23
Thank you Urban, Ricardo and M.Julian for watching.
Stay tuned - next update soon 😉
9 January 2015, 05:00
Did you all know that the production of the N/AW A-10 had a production run of only THREE aircraft before Congress stopped the supply of money to Fairchild, because they said it was too expensive. ?
AND, Przemek, are you going to have the two canopies opened or closed. ?
If opened, I am sure you have seen the canopies open to the side, like the Me 109's.
I am not trying to sound like a 'know it all', but I my opinion the A-10 is one of the most exciting kits you can build. And I am absolutely stunned at the extra detailing you have achieved with this huge kit. It will be a masterpiece. 🙂
Wikkipedia. "The N/AW version did not interest the USAF or export customers. The two-seat trainer version was ordered by the Air Force in 1981, but funding was canceled by U.S. Congress and the jet was not produced.[18] Only one of the two-seat A-10 built now resides at Edwards Air Force Base's Flight Test Center Museum.[19]
16 February 2015, 22:08
Thanks Kerry.
I'm not sure yet about canopies.
I know that they open a little bit different but my original idea was to build ready to start plane (canopies closed) with max armament load. Passing by the trailer with gun and beetle display while pilots show this display like they would like to say: "Hey look, I hope it's not our gun out there!"
16 February 2015, 22:14
I am so impressed with your fantastic work mate and I hope you didn't mind me throwing in my two cents worth, as I have actually sat in one of these most amazing aircraft when I did my American tour and mate, they are HUGE, BIG, MASSIVE and just smell SO nice LOL.
I have two kits of the Hobby Boss 1/48 scale, but what you have done to yours has just been amazing. Honestly, I can't praise you enough. And the Beetle as a size comparison is just so cool. !!! 🙂
16 February 2015, 22:22
I also have a flight sim game by DCS (Digital Combat Simulations) (Russian ) of the A-10 C, and you can actually start the engines through the normal start up procedure, and all the targeting and weapon selection is available too. A most enthralling game. google.com.au/url?sa..vm=bv.85970519,d.dGc
16 February 2015, 22:27
Thank you very much. Your comments are always welcome. I hope you will be able to advise me more then once and I promise I will take your opinion into consideration.
Thanks again for watching. And I'm really glad that you like it.
16 February 2015, 22:27
You seem to have it all in hand Przemek, I am just going to sit back and enjoy your work. 🙂
16 February 2015, 22:30
Wow going to be a great dio remember seeing the picture of the beetle and the gun, awsome idea, will be great to see the finished project.
17 February 2015, 21:12
Hope you don't mind going to try your idea myself, sometime. Mimicking highest form of flattery......
18 February 2015, 18:09
Thanks Raymond. No, I do not mind. I myself often watch others modellers galleries or work-in-progress projects looking for inspiration.
18 February 2015, 18:55
No problem Raymond. I'm glad I could help.
BTW, I like your avatar.
18 February 2015, 20:53
A kit full of gaps, but you did great so far! The trailer weathering is a dream!!!
26 February 2015, 20:07
Thanks Holger. I'm trying to do my best but this kit puts me on the edge. 😉
26 February 2015, 20:13
Oh i can imagine!!! But what i see so far from you is stunning!!!
One question please, why did you use two different muzzles? One resin and the other one as a turned metal part? Just because you got it at home or for some other reason?
26 February 2015, 20:18
At the beginning I bought two metal ones and in the meantime I get resin cockpit from Verlinder. I didn't knew that in this set will be also resin muzzle. in this way I have three muzzles (four if we will count kit's one). So I put one metal to gun that is on trailer and I wanted to test how the plane will look with resin one. Because gun will be mounted at the very end I still have time to decide which one should I use: resin or metal. Resin one is a very good quality with sharp details and after drilling holes it looks really good.
26 February 2015, 20:43
Yes, the resin one really looks good but i like the turned one better!😢😢
26 February 2015, 20:58
Me too. :-D
And I think that finally the metal one will be mounted.
26 February 2015, 21:08
Doesnt matter what you do, it will become an impressive model! Especially the comparison between the gun and the Bug is impressive!😄
26 February 2015, 21:12
It just came out unintentionally. When starting this model, especially gun build I looked for some good photos about it. And when I found the old photo with gun and Beetle I thought "Hmm, why not to show it like this".
And now I'm still wondering why noone before did such display.
26 February 2015, 21:20
Taking your inspiration just that one step further, it struck me (at photo #33) that you could make the most awesome technical for the post-zombie apocalypse world ... ha ha !!!
More seriously though - Przemek you've hit upon great idea and you are brilliantly executing it - top stuff. Cheers
26 February 2015, 21:43
Thank you very much.
Yeah, I know what you mean. It could be a nice idea on another diorama. After I painted the whole gun I started to regret that I didn't make a resin copy of main components of it, just to have it in case I would like to use it on tank or create some SF killing machine or just on another crazy idea. 😉
26 February 2015, 21:55
What a great build so far! I remember that photo well, looking forward to the final result
26 February 2015, 22:16
Thanks Wim, but I'm affraid it will be a long road. This model needs a lot of time and attention. And a nerves of steel. 🙂
26 February 2015, 22:23
And buckets of putty! But it looks good so far, you'll get there I'm sure
26 February 2015, 22:31
True. Big buckets.
I hope I will finish this model before he finishes me. 😄
26 February 2015, 22:32
You certainly are making a big impression on all of us here Przemek, and I for one am now becoming more inspired to tackle the models I have had for a while and do some detailing I had otherwise never considered before.
You have chosen a most difficult subject, and made it look like something an A-10 Sqn would be proud to have in their display cabinet mate. 🙂
26 February 2015, 23:06
Thank you very much Kerry. Your words mean a lot to me and are a reward for all my troubles and also encouragement to make efforts to build it as good as I can. I would be proud and honored if anyone would like to put my model on display.
26 February 2015, 23:53
Thanks Kerry. Just wanted to add some details becuase kits engines were too simple. I'm glad that you like it.
5 March 2015, 13:15
LIKE IT ??????? I love it 🙂
Everything you touch seems to turn to gold Przemek. 🙂
5 March 2015, 15:00
Thank you again. It's seems that with age I want to add more details to my models. I'm worry what it will be in ten years. 😉
5 March 2015, 15:55
Just relax as you can't do anything to stop it, AMS do get worse with age...
5 March 2015, 16:04
I thought so. It seems that all I have to do I do my best and see what time will bring. Thanks Urban.
5 March 2015, 16:11
Amazing update, I hadn't checked in for a while, but it looks like you had your hands full with this one
13 August 2015, 18:31
Przemek, You have done a magnificent build and no doubt your very proud of your skills mate. 🙂
Please post images of the totally finished "Scene" when it's all done.?
To think, only three N/AW's were made by Fairchild.!!
I have the 1/48 Hobby Boss and I am now wanting this Trumpeter beast.
Salute. 👍 👍
13 August 2015, 22:41
Thanks Matthias.
Wim - model is quite challanging. It's not the worst but it's an early Trumpeter so it have some fitting issues.
Kerry - thank you very much. You are too kind as always.
14 August 2015, 10:26
I did wash and it's drying now. I'm waiting for new flat lacquer as I tried Tamiya Flat Clear but is not giving me result that I would expect. The surface is still glossy and whey I tried few layers is getting like an orange peel.
So I ordered Klear Kote Flat from Alclad as it has a quite good reviews and ratio quailty/price/bottle size is very good.
20 August 2015, 10:54
Thanks Wim. It is almost done. I hope I will be able to finish it in next 2-3 weeks.
After I will get new flat lacquer I will have to install engines and covers / glue rest parts like vertical fins, undercarriage, etc and maybe some pigments.
20 August 2015, 12:19
Here someone invested a lot of blood sweat and guts!👍 Adoreable!
2 September 2015, 11:29
Thank you very much guys. I feel embarrassed of your comments as I didn't think that you will like it so much. I thought about it as an another properly glued and painted model.
Thank you again.
2 September 2015, 13:16
it's a few levels higher then that in my opinion... It is a nice build to follow and very well executed...
2 September 2015, 13:22
Thank you Bart.
I've just uploaded last photo. Next album will be with completed model. I have to mount new source of light in my man cave and then I hope I will be able to take some photos of my recently completed models like A-10, AS-90 or Chinese MLRS/AntiTank/SPH.
2 September 2015, 18:46
Absolutely beautiful. Nothing more I can say. Your work speaks for it self. BRAVO.
3 September 2015, 11:37
Your "Scale Comparison" VW is a perfect way to show just how bloody big these A-10's really are.
My heartiest congratz to you for the most excellent way you have presented such a superb build with the best detail I have seen.
Salute my friend. 🙂 👍
10 September 2015, 02:49
Soeren - thank you.
Soheil - thank you too.
Kerry - thank you very much. My friend, you are too kind for me.
10 September 2015, 11:33
huge amount of work on that baby, but you really nail it. really welll done.
29 November 2016, 11:39