Tamiya F-14A Tomcat "Swordsmen" WiP


Comments
2 10 November 2018, 18:49
After finishing the cockpit I am now making some progress with the gear bays. This kit is a gem. Beautifully engineered.
25 November 2018, 10:56
Oh, a Tamiya cat! I'm in!!!
Very nice work on the office and especially the gear bay. This is gonna be a fun to watch!
25 November 2018, 18:47
Oh Yeah .. Front Seat for me ... 😉 I' m building this bird after the F16 ...
25 November 2018, 20:01
Thank you for your interest so far! Small update for the nose gear strut.
29 November 2018, 19:33
Looking beautiful! I love the sparkle in that light reflector! What did you paint it with?
29 November 2018, 19:44
I coated the back with Alclad Chrome. Tamiya even put a tiny light bulb in there ...
29 November 2018, 21:17
cockpit and gear bays looking fantastic!!!! front row for the rest of the build 🙂
29 November 2018, 21:35
Wow, that looks very promising ... I'm moving in the front row. I have the same idea, a cat of VF-32. I will build this from HobbyBoss. I will absolutely follow you with this ...👍
29 November 2018, 21:37
Thanks! 👍 Any prep work you did? Or just straight onto the bare (clear) plastic?
30 November 2018, 18:12
Prep work? You mean for the clear part? No, nothing. Just Alclad over the bare plastic, then primer and white.
30 November 2018, 21:13
Amazing work. the detail work is top notch. I have this bird. Not sure when I will build but you are giving me ideas of the detail I could put into it. Looking forward to seeing more.
17 December 2018, 12:24
Great work , i'm waiting to see this finished landing gear ... 😉
22 December 2018, 23:33
This is really a great follow. The work here is just fantastic and the photo presentation of your work each step is on a professional level. I am super impressed, I could learn a thing or two here. 🙂
26 December 2018, 16:08
I Like every update so far. And I have to agree with Michael: The photos are very good too! 👍
26 December 2018, 16:13
Looking great so far. Nice choice of markings too. I'm taking a seat.
27 December 2018, 14:01
After fiddling a lot with cockpit, landing gear and intakes I made some progress with the fuselage construction - finally!
27 December 2018, 19:13
Beautiful! I see a lot of primer/putty on the radome, was the fit that bad?
29 December 2018, 00:58
Patrick, the fit is excellent, but I really wanted the seam line to disappear. So I puttied, primed, puttied, then the putty really dried and sank in, so I had to putty again ... These are not kit-related issues but putty-related problems. I have to find a really non-shrinking putty yet. Even superglue shrinks a tiny bit.
29 December 2018, 14:52
OK, pfew.... That's a relief! I hope to start my Tamiya Tomcat soon, so every bit of encouragement helps! 🙂
29 December 2018, 18:33
Jos, on my reference photos, there's no groove where the wing halves meet. So I filled it. Was I wrong?
29 December 2018, 19:52
I can not tell you that, I was wondering because I have the same kit that I want to build soon.
29 December 2018, 20:03
Ah, pheewww, alright then. All other Tomcat afficcionados, please chime in, but in absence of proof of the opposite: There seems to be no groove where Tamiya puts one.
29 December 2018, 20:12
Nice work , i'm following this and i think i'm gonna look at this more then once when i start mine F14 ... 😉
29 December 2018, 20:50
Great work Jos. In picture 42 where you filled in the panel line you did the right thing, because it's a seam joint. I've built about 10 1/48 Hasegawa Tomcats, their method of putting the top and bottom wing together is a bit different in the way the join on the Tamiya one is longer and lower where Hasegawa's is higher but shorter. You have correctly filled in the seam join.👍👍👍
29 December 2018, 23:30
Do you know if the same issue is present in the Hobby Boss 1/48 too? Got one in the stash so thought I would ask as you two seem to know what you are doing 😄
30 December 2018, 00:26
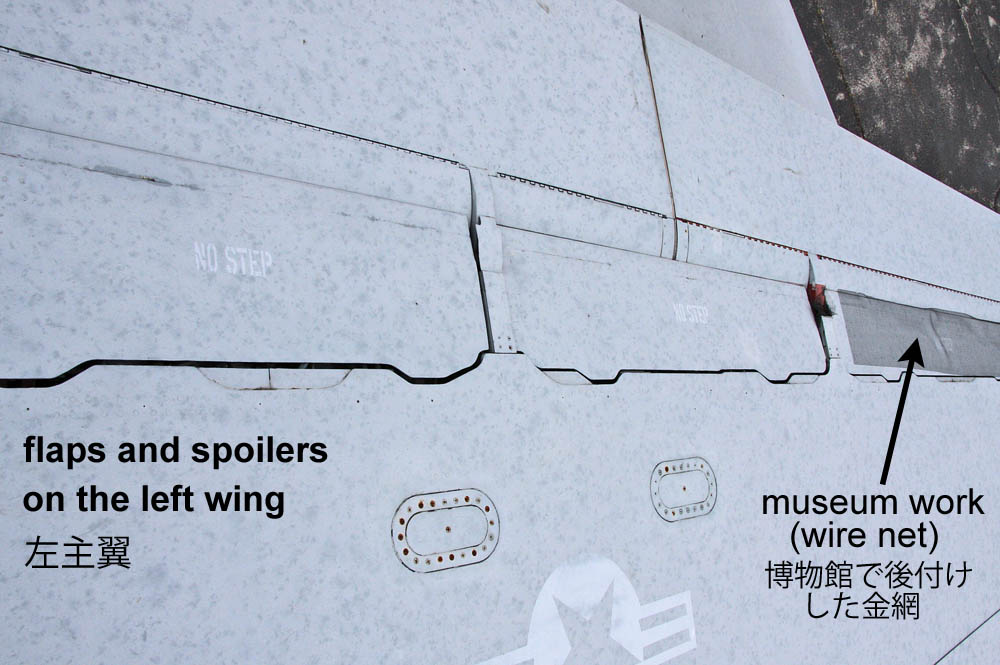
playtime 222, the HobbyBoss kit also has a line in this area. In the pic you can see the main flap doesn't seem to have a panel line but the outer flap seems to have one, as faint as it is. I've got another photo in my reference showing the particular panel line filled in with something that looks like putty, but I could be wrong. Either way if it's a panel line or not it is very faint and not like other regular panel lines.
cybermodeler.com/air..f101cag_rtwing.shtml
30 December 2018, 03:53
Here you can see how faint the line in question actually is.
[img1]
30 December 2018, 04:02
I sure will put it up here when I get started! 🙂 I just took my Tamiya Tomcat wings and that joint line is actually on the underside. Looking at page 56 of Danny Coremans' Uncovering the Grumman F-14 A/B/D Tomcat book and looking at the scale drawings in there it is just the way Tamiya engineered the wings to get a sharp trailing edge. The way you filled that line it will clean up easily.
30 December 2018, 06:46
Patrick, thank you for checking Danny Coreman's book. His books are excellent - I have the ones for F-16 and F-18 myself. In fact, they are so good that you want to add a ton of detail to your kit and this slows you down. Been there, done that ... 😉
30 December 2018, 14:03
I know! I only look at one page at a time to stop me from going nuts in trying to replicate all the detail in there. 😉
30 December 2018, 16:57
Update: Aside from building pylons and stores I painted the inner parts of the engines and nozzles.
4 January 2019, 14:33
Glad you like it! 🙂
Hey, something came up: Photos of early Tomcats almost never show them with fuel tanks. Weren't they used so much in the early days or is this just a coincidence? I originally planned to build my cat with tanks - if I'm wrong here please intervene now!
4 January 2019, 16:09
I checked the early Detail&Scale volumes on the F-14 and they do show detail fotos with fuel tanks (also in the grey/white scheme) so you are not wrong if you add them.
Nice work so far - engines look good!
4 January 2019, 19:01
Love the way you sprayed the engines...I have the same tin of Revell in my stash...LOL...also ancient but effective 🙂
4 January 2019, 19:54
@Thomas: I also have the excellent Detail & Scale publications and use them as a reference. Yes, there are photos of early Tomcats with tanks, but very few. Maybe that's because they were mainly photographed on land bases and not on a carrier. I have to google for some operational pictures ...
@Jos: Childhood colors rule! No need to buy each and every new fancy paint line. 😉
4 January 2019, 21:39
www.scalemates.com/profiles/mate.php?id=25429&p=albums&album=42722
Demigod, I got this picture through a fellow modeler. Apparently the tanks weren't that popular because the original ones with the fins had issues with separation. The fin would have them bump into the plane's ventral fins. After modifying the tanks they were seen more often/almost always.
5 January 2019, 17:10
I really got angry with the green tint of the windscreen. Every time, I got dust on the wet paint. Rinse and repeat. I ended up spraying in the draft of an open window. I call it now - it won't get any better.
12 January 2019, 18:41
Wow! That's persistence on that front window! I like the subtlety. Too often models have a too green tint. It is just glass opposed to the Perspex in the rest of the canopy panels.
12 January 2019, 19:10
They came out nicely. What color are you using for the cloth appearance?
18 January 2019, 18:02
I used some Vallejo U.S. field drab, but a mate brought it to my attention that this may be still to bright. So I'm going to put a dark filter over it.
21 January 2019, 17:38
At last! Ready for paint. I black-based the model and started applying the marble coat with Mr. Paint colors.
20 April 2019, 18:15
Demigod, the words 'marble coat' and 'Mr. Paint' sound like music to my ears! 🙂
20 April 2019, 18:41
How come the bottom side is airbrushed dark, if the bottom is to be white?
23 April 2019, 10:45
It's black primer on the bottom. Over this I will apply marble and blend coats in white. The dark base color will continue to shine through and give a patchy, used and realistic appearance. Just keep watching ... 😄
23 April 2019, 11:01
So, after the third blend coat the grey upper side ist finished. Now the same procedure for the bottom.
27 April 2019, 17:47
Hey guys, I need your help. There are two options to do the walkway on the intake - see the photo above (no. 77). Furball instructs you to use the upper version, but I've never seen it. I'm only familiar with the lower, classic 4-segment walkway.
Which one is correct for an early F-14A in January 1976? And is the walkway only on the left intake, or on both?
29 April 2019, 17:53
As for which one to use, I too am not familiar with the upper one, but Furball is pretty good with their research. I would trust their recommendation and use that one, which would actually be kinda cool as it is kinda unique. As for left or both, I say left only. It is squadron specific, but some early schemes (including VF-84 as well, which can be seen quite well from the film "The Final Countdown" ) used only the left.
You can see in this picture from 1975, which unfortunately does not show the left side, but does show the right side does NOT have the walkway.
upload.wikimedia.org..in_flight_c1975.jpeg
Hope this helps!
29 April 2019, 18:36
Concur on no right-side walkway. I have one pic I have no time to post (off on hols) which shows the walkway on the left with a black front panel with the remainder grey!
30 April 2019, 06:19
Michael, Playtime, Hans, thank you so much for your input! Photos with a top side view seem hard to come by. So, if you find more, don't hesitate to post them here! I'm still unsure which walkway to use.
A friend from a German forum provided this:
[img1]
Seems to date from 1977.

30 April 2019, 08:22
The upper walkway style was only used in the very early days of the Tomcat. I think I have one picture from 74 with it on a VF-1 cat. From the 77 picture that you have posted I would assume the later walkway style would be correct for 76 VF-32 bird.
30 April 2019, 08:35

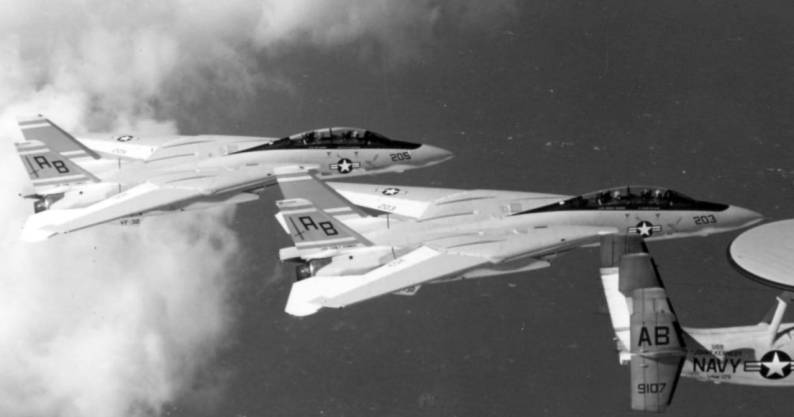
I found some pics of cats with the old style walkway but they were never VF-32. Only VF-211(that one says 1987 but I think its a mistake, maybe 1978?), 142(1975), 124(1972) and 14(1975). The machine you are building was made in 1972 though in the "block 75".. I am sorry to have weighed in now😄 It appears that anything could be considered correct until you find a picture, and since your BuNo 159008 was lost in 77 there are really not that many pictures..
30 April 2019, 09:13
[img1]
This picture shows machines from possibly the same block or very close and it seems they do not have walkways on the left. I would use the old style on the right only then.
30 April 2019, 09:14
[img1]

Having a closer, slower look now I'm back, the black is just the shadow between the intake and the side of the fuselage.
4 May 2019, 13:14
Thank you for sharing the photo! So there seems to be a consensus for a single walkway on the left. But which style, is still unclear. Anybody a pic of any Tomcat with the old style walkway? Just to get a feel for it for weathering?
4 May 2019, 18:23
Hans, I'm not sure this is the old school walkway in your picture. The angle of the photo is quite flat, so the segment lines might not show properly, and in the end it's this version:
[img1]
4 May 2019, 20:58
old style walkways:
-at an angle
flickr.com/photos/13..m-72157666781218675/
-completely new machine
flickr.com/photos/13..m-72157666781218675/
-both sides, good visibility
flickr.com/photos/13..m-72157666781218675/
Hope all the links work.
4 May 2019, 22:43
Also note that the AB220 picture can sadly not be considered much of a reference as it is a significantly newer and different block TARPS capable bird
4 May 2019, 22:46
Just my two cents more, Martin your last image is both sides grey and if you look carefully enough the walkways are segmented.
5 May 2019, 02:22
@ Michael: I think those are the panel lines/ribs the segmented ones are supposed to kept clear from and the last picture has the black outline and "No Step" writings Demigod is asking about. Again, just my two cents...
5 May 2019, 03:53
yes the old style walkways were also sometimes used on both sides. They were painted throughout the entire area though.
5 May 2019, 09:34
As for the segmenting, I agree with Patrick. Can of worms indeed🙂
5 May 2019, 09:42
So, let's close this can of worms again!
Hans provided me with a photo of a VF-32 Tomcat with dark walkways, modern style, on both intakes, dated November 1975. I sent this picture to Furball and asked for clarification. Those guys are so great - the guy responsible for the research of the aircraft of the decal sheet came back to me within hours. He stated he had no top side photo of the aircraft in question (200) and, thus, had extrapolated the walkways to be in factory condition. Which is old style grey. Regarding the "new evidence" he recommended to actually go with the newer, segmented walkways on both intakes.
Where does that leave me?
1. Community research is great. Everybody can contribute a little bit, and this bit may be the gold nugget I was looking for. Thank you, guys!
2. The research behind decal sheets is not (and cannot be) perfect. Some things are just a leap of faith. Use your own brain.
3. Furball's customer service is awesome.
4. I still don't have positive proof for the aircraft I'm building. I can only extrapolate from photos of other aircraft of the time. There is still a probability that I'm wrong despite the educated guess. That can't be helped.
5. The actual evidence photo, that proves me completely wrong, will come to my hands two days after finishing the model. That's modeller's fate. 😄
6 May 2019, 17:32
After all the reference digging, let's get back to the model. The white underside was marbled, blended and is now finished.
8 May 2019, 19:13
Thank you, guys!
@Patrick: Skunk stripe? You mean the walkways? Or the tail hook?
9 May 2019, 05:47
He is talking about the anti-glare black paint around the windscreen and canopy, often referred to as the "skunk stripe" if it encompasses the entire cockpit area. 🙂
9 May 2019, 07:41
Ah! The skunk stripe! That one will be painted using pre-cut masks from Galaxy Models.
9 May 2019, 18:02
👍 I had a look at the reviews, all of them are raving about those masks.
10 May 2019, 01:29
Yeah, they have masks for all necessary and unnecessary crap on the Tomcat. I bought them for the wing flap masks. Those fit great. Some of the masks for the leading edges are wrong - there are two for the left wing and none for the right wing (or the other way around, can't remember). At times, the masks force you to paint in a strange order: details first, then masking, then the main paint coat. I prefer to do it the other way round. So: mixed feelings.
10 May 2019, 14:33
Hmmmm.... I was thinking about ordering them directly through Galaxy since both HLJ and 48-ers were out of them. So, I might not need to bother then?
10 May 2019, 15:19
That depends on what you want to mask. I found the masks for canopy inside and outside, wings, tail hook and especially for the nozzle blades most useful. Same for the different versions of skunk stripe. The rest is a bonus. There may be flaws, but you can compensate for them.
What's the alternative? Cutting the masks yourself? God no. For my next Tomcat, I'll order the set again.
10 May 2019, 18:07
Weathering has begun! First, I sprayed on some dirt an touch-ups. Now, I'm in the middle of an OPR campaign for the bottom of the fuselage and wings.
13 May 2019, 11:48
I put weathering on hold and applied a MRP semi gloss clear coat. It's a compromise between the glossy factory finish and the duller, weathered finishes seen on a carrier.
Next the skunk stripe - flat daaaaark grey.
2 June 2019, 17:16
Man, that is some of the crispest paintwork I have seen in awhile. This is really turning into a beauty!
5 June 2019, 13:26
Thank you!
Now come all the small bits and pieces. The engines got various metal tones, heat discoloration with clears and filters and grime with oil paints.
8 June 2019, 17:55
Exhausts look great, as does everything that came before! Everyone loves the Tomcat, but you treat yours with real skill & care 👍
10 June 2019, 14:03
Every time this one pops to the top of the list, I'm amazed by the effect of adding olive drab to those metal tones. Nice! 👍
10 June 2019, 14:26
Thank you, guys - glad you like it!
The paints are Alclad, mixed with Gunze Olive Drab for one ring, and dusted over with Tamiya Khaki for another ring.
11 June 2019, 11:46
Thx! I'm stuck in the small bits ans pieces right now. This is one of them. I glued the nozzles after the main paint job was done - but then there's a joint where none should be. So I filled it, sanded and repained the whole thing. This should work.
5 July 2019, 14:38
Life signs from my favorite slow-speed aircraft build 👍 - superb job on the repaint, the nozzles look even better now joined to the aircraft - keep up the good work, great stuff in every update!
5 July 2019, 15:12
Thank you!
I got some nice ejection seats from Quickboost - but paining the eject handles is a PITA. So, I built my own ones using thread. For me, the finished seats look better that way.
7 July 2019, 17:40
Nice handles. @JamesC Another option is thin electrical wire with tamiya tape for the yellow. I used this on a balsa Hunter a while back, so quite a bit larger than this.
9 July 2019, 09:37
Last pic: I guess the usual phrase "I´ll take a seat" gets re-defined here😉
9 July 2019, 16:58
Hello Demigod. Excellent build. But I have a question. Please don't take it the wrong way, I am the last person to lecture anyone on accuracy but this machine was supposed to have the old style beaver tail. Was your decision to skip it due to the lack of availability of the replacement part? I am looking into the similar thing with one of my builds (Finemolds 72) and while I have the part (Fujimi 72), fitting it in would require an amount of sculpturing that I am frankly thinking of skipping in the end..
11 July 2019, 08:41
Oh man, Martin... I really feel sorry for you being the one to have to break this bad news.... Aaaand, I feel sorry for Demigod having to read it.... But truth is.....you're right! 🙁 Seeing Demigod attaching those exhausts and patching up that beautiful paintwork as if nothing ever happened, I have high hopes though. My thoughts are with you Demigod! Either decision you make, I'm with you on that! 👍
11 July 2019, 17:40
I wouldn't fell bad about that in the slightest. Does Tamiya even have that option?
11 July 2019, 17:54
Thank you all for the kind words - glad you like it!
Martin and Patrick: Do be honest: until now I didn't know that this bird had a different tail. And frankly, I don't care so much. I like to paint and give the finish a vibrant, realistic vibe. 100% accuracy in the build is not so much my concern. Then I would have had to update the gear bays, too ... I replaced the gun vent panel only because I stumbeled over the replacement part.
Is there even a resin replacement for the tail? And ... where does it say this A/C had the old version in 1976?
11 July 2019, 17:59
Seems like SCM is acting up.... I found a link to an interesting discussion on Beaver tails.
11 July 2019, 19:05
www.arcforums.com/forums/air/index.php?/topic/260685-early-f-14a-expert-advice/
11 July 2019, 19:06
There we go! 🙂 You might be still good with the current setup as the Beaver tail changed with Block 75 airplanes around '76.
11 July 2019, 19:07
I´ll follow whatever tail you put on this model😉 Still a good thing Patrick mentioned this, everyone is that bit smarter now 👍
11 July 2019, 19:15
I think the plane is block 70(the block number could be on the decals actually, right after BuNo) otherwise I agree with you Demigod and I will probably follow your example. Your jet is 100% awesome 👍
11 July 2019, 19:34
Checked again and your jet is block 75 so you are fine. My apologies.
11 July 2019, 20:12
Phhheeeew, good that this is cleared up. Seems my Tomcat is only the second one to receive the new tail. That's what I call dumb luck, hehe! But indeed a fruitful discussion that will help in my next build.
12 July 2019, 14:42
No matter what.... regardless of what everyone thinks, you build a fantastic 'cat' according to your imagination, absolutely great!
12 July 2019, 15:15
No doubt about that Jos, Demigod's build is absolutely stunning! 👍
12 July 2019, 15:56
Oh I'm taking notes for the F-14D on my bench... Nice looking work there!
12 July 2019, 16:51
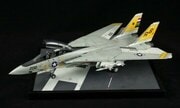
Base time! My little Tomcat earned a nice place to stand on - a piece of carrier deck built from scratch.
23 July 2019, 18:28
I think it will like its new home 🙂 and will look spectacular standing there 👍
25 July 2019, 18:22
It's finished - find the gallery pictures here: Tamiya F-14A Tomcat "Swordsmen" finished | Album by Demigod (1:48)
Thank you so much for your help, critique, encouragement, wisdom and experience. It wouldn't be the same model without it!
26 July 2019, 15:43
Fabulous outcome. The base is stunning as well. What thickness was the base polystyrene board.
2 August 2019, 18:35