

Focke Wulf Ta 152 H-1 (1970 tooling)

1970 tooling from FROG.

Dry fitting shows the the entire cockpit needs to be rebuilt from scratch.

The cockpit surgery has begun.

Air intake screen applied.

Air intake attached

The wings have to be sanded down.

The cockpit will be a challenge since there is nothing here. I will have to measure everything to fit and build it up from scratch.

Major reconstruction on the fuselage necessary before building the cockpit.

A few details added to the back.

I realized I had the details backwards so I did them over. Second time worked out.

The beginnings of a cockpit started

The spacing and depth is wrong on the exhaust tubes, so I scavenged some tubes from a junk model and will attempt to cut them apart and set them into the side.

Building the exhaust midpoint.

One side finished.

The exhausts are in.

A bit more progress on the scratch built cockpit

I cleaned my tape for Treehugger 😉

Bit of scratch for the wheel wells

I have to try and rebuild this horrible cowling. 🙁

There that's a bit better 🙂

Dry fitting the nose.

The canopy was totally uneven and so I decided to do the risky thing and file it from the inside. Hopefully I didn't just ruin it.

Cockpit has been painted and awaits the details.

A bit of detail added to the scratch built cockpit.

A bit of detail added to the scratch built cockpit.

A bit of detail added to the scratch built cockpit.

A bit of detail added to the scratch built cockpit.

I separated the canopy into two halves.

I corrected the seat position.

I corrected the seat position.

Today I scratch built some space for the wheels.

Dry fitting to see what the scratch built wheel wells look like.

Additional support added to the cockpit to keep it from breaking.

Major construction going on here, trying to get this thing to accept a cockpit. All scratch of course.

Dry fit test. The cockpit sort of works.

It's gotten to the point where I have started to glue the fuselage halves together.

After the poly cement liberal amounts of super glue was added to remove any unwanted seams.

More super glue! Looks nasty at this stage.

And the sculpting begins!

This mess of super glue will hopefully become a proper hood.

A rough outline of the shape I am trying to make.

I couldn't see the shape I was working on so I used a permanent marker to get a quick look. Still needs more work.

Needs more adjustments. But it is closer.

The shape is looking better. Tomorrow I will look at it again and make more adjustments.

After correcting the general shape of the fuselage I am now going to attempt to create the shape of the hood. If this doesn't work I will try casting one from a FW 190 and reshaping that.

A lot of adding and subtracting super glue. Sanding things into shape. It seems to be working.

Hood complete. The super glue worked as a sculpting medium.

Carving an auxiliary air intake out of sprue.

I successfully attached the auxiliary air intake without losing it.

I made an exhaust shield and rebuilt one of the exhaust pipes with super glue that broke off.

The other side is a little bit different. It doesn't have a shield but it does have a little pipe sticking through the guard.

More work on the wings

Scribing lots of tiny circles.

Upon closer inspection, the position of the circles which I based on the kit were not quite right. So I had to fill some with sprue goo, which I hate using because it takes so long to dry. But I couldn't risk super glue because it would interfere with the new circles I will be making.

I made some more improvements in the wheel wells.

I've marked out the proper panel lines. Tomorrow I will take a second look at them before starting.

I purposely made deep panel lines so I don't have any problems with sanding. They will be filled with powder and sealed latter. I'm still waiting for the sprues goo to harden.

Panel lines are finished on the underside of the wings.

Making some bumps. The top half of the wing is getting closer.

More bumps!

Panel lines and adjustments are finished on the top of the wings.
Comments
54 27 January, 18:23
My next big project is turning this FROG into a Prince. Wish me luck I'm going to need it.
27 January, 18:25
I'm following. In my opinion the Ta-152H is the most beautiful plane of WW II. I got the kit from Kora in my stash and hope to start the build in spring this year. Good luck and, above all, have fun building it.
27 January, 20:18
Nicolas, I agree. It's a long, lean, fighting machine as they say. Definitely one of the more elegant designs to come out of the war.
27 January, 22:10
I had to widen the fuselage today, in order to make space, before I scratch build the cockpit.
29 January, 01:47
this is going to be awsome.
I am picking kits that are near perfect so I have fun.
but there are also people who pick not-so-perfect-kits like this Ta152 and they still have loads of fun!
GL 🙂
31 January, 13:12
Well mostly I pick not-so-perfect-kits because I'm a cheap skate. I'd rather pay 6 euros than 40 for a kit. I do have some moderately priced kits and they are a lot faster and fun to make, but often I just have the need to challenge myself and see where my skill level is at.
31 January, 17:56
@Skyhiker: I totally like your approach and I think you did a great start!
31 January, 19:16
same here @Skyhiker, I really like the 6eur price point. so affordable. probably thats why I started to look into the 1/144 scale 🙂
31 January, 19:58
Excellent work on the exhausts, and the cockpit is coming along nicely.
2 February, 03:24
I did a bit more today but I can't seem to get any images to upload. Anyone else having these problems?
2 February, 19:03
Looking at photo #17 I want to give a tip:
I would be a little careful keeping the roll of masking tape on the table. I like keeping them in a holder, or placed in a bag, to avoid the side of the roll picking up all kind of dirt.
2 February, 19:10
Yes, I keep my tapes in a bag but it doesn't seem to help as well as it should. I think I need a better bag. When I photograph things at this scale there is more dust than I realize.
2 February, 19:18
I can finally upload my images again now, I was having problems too.
2 February, 20:13
Treehugger I cleaned my tape and got a new bag. Thanks for pointing that out. No need for fuzzy tape.
2 February, 20:20
I have to take a break and will be back in a week. I must say I am in love with this plane. It's really a beautiful design with those long wings. I can't wait to get back to it.
8 February, 06:54
I'm going to build this one from my stash this year, definitely following! 👍
8 February, 14:14
The canopy was totally uneven and so I decided to do the risky thing and file it from the inside. Hopefully I didn't just ruin it.
2 March, 13:17
I have built 70s Tamiya kit - but that was a least workable. The base was there even though many errors. This 'kit' just seems like a waste of time. Like trying to make a dog poop look edible by putting a cherry on top.
If I saw this kit I would stamp it into the ground. Useless
8 April, 20:15
This kit has its flaws but nothing that can't be corrected with a little bit of skill. Are there more accurate kits out there that are easier to build - yes. But the modern trend of wanting perfect kits seems counter to the art of modeling. If you have ever built a model from a block of wood you wouldn't call this kit useless. Challenging or time consuming I can agree with but it is not crap.
10 April, 08:09
I agree with your modern trend thesis - especially if you add in the AM factor. But I think there is a line to be crossed between the kit manufacturers chucking out a quick buck kit with no effort in a fancy box (my pet peeve - rebox) etc, and thereby throwing the burden on the modeller and on the other side 'great expectations' along with spewing out bundles of dollars on AM on an already close to perfect kit.
I suppose if you are saying the kit can be built into an accurate replica then the modifications and work are justified.
I do admit that scratch building is the purest form of scale modelling so it depends on one's 'Weltanschaaung' and philosophy.
Anyway it looks like you gave up on it which influenced my previous comment - in other words all that effort bore no fruit
10 April, 11:54
I haven't given up yet. Sometimes life forces me to take breaks but I hope to get back into this one soon. I have to put a lot of tiny details in the cockpit next and I need the right head space for that. Kits like these take time and often I will start easier kits mid process to keep things flowing. I absolutely agree that reboxing old kits without a mold date is deceptive. Thankfully with this site we can look up the history and sometimes see the sprues before buying anything. I've only had one kit that I couldn't do anything with. I bought it for 20 bucks opened up and threw it directly in the trash. That was a Top Gun F/A-18 Hornet snap kit, which really was a piece of shit.
10 April, 16:03
lol - hopefully I wont end up with one of those 'open kit open bin' models. I would reconsider throwing in loads of detail in that cockpit because none will be seen - it may be one of those more of a burden - but it is your show.
As I'm just getting into it again I bought several boxes of the 1/72 AZ joy packs - about 20 bucks - 3 kits in a box - although the Gustav set has no stencils the Emil set does but no decals - much easier to deal with. I am using them to practice some skills. (Will post on here soon)
Just to add they are about to bring out AZ Mustang Joy pack - I'm only into German aircraft and armour but it might be for you. I suspect they may bring out another later mustang set
10 April, 17:59
Following. Really looking forward to the end result.
Especially since I built this kit myself last year. Although I didn't put so much effort and detail into it as you are doing.
10 April, 21:29
Worked on the canopy and tried to figure out how the scratch built cockpit will fit into the body.
2 May, 23:45
It's coming along!
From about halfway back on the underside there should be no join line - but forward of halfway you are good which makes things a little easier.
Just an idea but you can download the ZM instructions to get an idea?
6 May, 10:13
Trez your message is pretty cryptic. Are you talking about panel lines or internal wing structures? The last photo is just a dry fit. I haven't started with dealing with any panel lines yet. I've been working on the inside of the wing walls to make something that gives an impression of space for the wheels.
6 May, 11:45
Apologies - I meant the external join lines. I can see what you done - it looks good. I thought the ZM instructions would help as a guide
6 May, 12:56
Trez, thanks for your ideas. I'm using a lot of photos and the instructions from a 1:32 model to help figure out what is going on. This little model is a challenge to correct but I'm having fun pushing my skills and learning as I go.
6 May, 15:36
I worked out most of the cockpit issues today. It's not perfect but I got it in there.
15 May, 23:09
Moreno, I'm glad you're liking it. This is kinda pushing my skills a bit. We'll see what happens in the end together.
15 May, 23:11
Don't worry too much about updates - things like that can cause one to rush. We ain't going away so take your time! 🫡👍
16 May, 00:34
Getting this kit to accept a cockpit was like pounding a square peg through a round hole. I had to reshape the whole damn fuselage.
16 May, 03:35
Whoah!!! Amazing what you did to that old tooling! Very cool to watch! 👍🏼
16 May, 15:20
Really liking what you're doing, Skyhiker, and learning lots too. Impressed with your skills 🙂
16 May, 19:43
Łukasz the shape of the hood is really off in the kit. The superglue is just material for me to try and sculpt into a better hood.
16 May, 20:26
No, It's just cheap super glue from a discount store that I poured right from the tube and hardened with accelerator.
16 May, 22:08
Well the fine engraving blade I just bought broke within a day of use. Very frustrating.
23 May, 14:42
Luckily I bought a .02 mm blade in addition to the .01 mm that broke. It will have to do even though I would prefer the lines to be a little bit thinner.
23 May, 15:06
Amazing progress! Once you go the route of updating such an old kit, there's no way back, is there?
24 May, 22:19
Thanks Patrick, your right there is always more to discover and do. I'm having fun with it. Of course I have no idea what it will look like in the end. I'm spending far too many hours allowing myself to be lost in process. But if that's what it takes, why not?
24 May, 23:19
It's amazing how every kit I look at of a FW Ta 152 H is different. All the photos of the original aircraft are so blurry that details are impossible to pick out, so I'm left with looking at kits and guessing which ones are correct.
26 May, 01:25
Anyone out there with a book on the TA 152? I'm trying to figure out if the top of the flaps have a vertical line down the center of them or not. From underneath there is a line there but I am getting conflicting images of the top surface. Can anyone post a decent image?
28 May, 16:28
I looked through some of my books and picture collection. But to find even a picture of the Ta152 is rare. 🙁
28 May, 17:06
Thanks Mattes. There are a few decent books out there but they go for 80 Euros and I can't afford that. I doubt the library would have anything worth while. Maybe the model shop will let me look through one of their books but usually they are sealed in foil. Hopefully someone here has something. Getting panel lines correct is not so easy. Even worse are the rivets.
28 May, 17:49
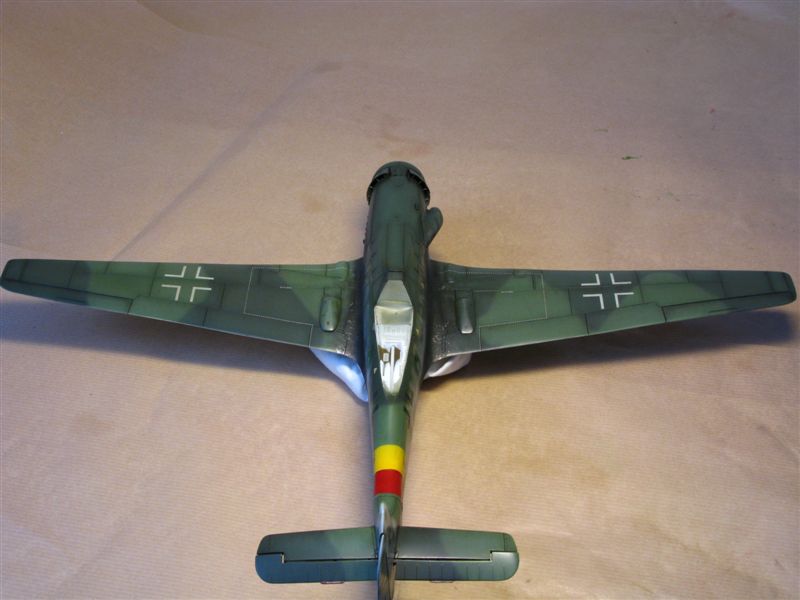
I found this image which clearly shows the flaps divide in two sections. Interestingly the sections are not even like the underside.
[img1]
29 May, 05:48
Maybe this would be helpful? flugzeugclassic.de/f..hlands-bester-jaeger
I do not have the magazine, but kind of stumbled over the link 😉
31 May, 13:34
Thanks Ben, this kit gets a bad rap. It's not as bad as people make it out to be. Of course I am putting a lot of work into it to make it better. But if its done straight out of the box it's not that bad. The backwards propeller is a stupid engineering mistake but that's an easy fix.
31 May, 23:54
Album info
Turning a FROG into a Prince.


